How to Use Midjourney to Create AI-Generated Images in Make
Imagine being able to create stunning AI-generated images with just a few clicks! Combining Midjourney’s powerful image generation capabilities and Make’s automation platform opens up creative possibilities. Did you know Midjourney has generated over 1 billion images since its launch? In this comprehensive guide, I’ll explain everything you need to know about using Midjourney within Make‘s automation platform. Whether you’re a digital artist, marketer, or just someone interested in AI image generation, this guide will help you streamline your creative workflow!

What You’ll Need


- Midjourney Account
- Userapi.ai Account
- Discord Account
Let’s dive in!
What is Midjourney?
Midjourney is an AI-powered image-generation tool that transforms text prompts into stunning visuals. Think of it as a digital artist that brings your ideas to life with just a few words. Whether you want a dreamy landscape, a futuristic city, or an abstract painting, Midjourney can create it in seconds.
It works through Discord. Users type in a prompt, and the AI generates images based on the description. The results are often highly detailed, artistic, and unique, making Midjourney a favorite among designers, creatives, and hobbyists. Unlike traditional image editing software, Midjourney requires no technical skills—just your imagination!
The AI is trained on a vast dataset of images and artistic styles, allowing it to produce everything from realistic portraits to surreal fantasy scenes. While this is great for inspiration and creativity, it’s important to note that the AI doesn’t “think” like a human—it simply interprets patterns based on the input it receives.
Whether you’re an artist looking for fresh ideas or someone who loves experimenting and getting creative with visuals, Midjourney offers a fun and powerful way to explore AI-generated art. Give it a try; you might be surprised by what it creates! 🎨✨
Building Your First Midjourney Automation Scenarios


Step 1 – Create a Folder On Google Drive
Let’s start by creating a folder in Google Drive. This will be our home base for everything we’re about to do.

Step 2 – Retrieve Authorization Key
Next, we’ll gather some vital information from Discord. Head to your Discord server and select an existing channel or create a private one. Once there, you’ll need two things:- The channel ID: Look at your Discord URL and copy the last two numbers
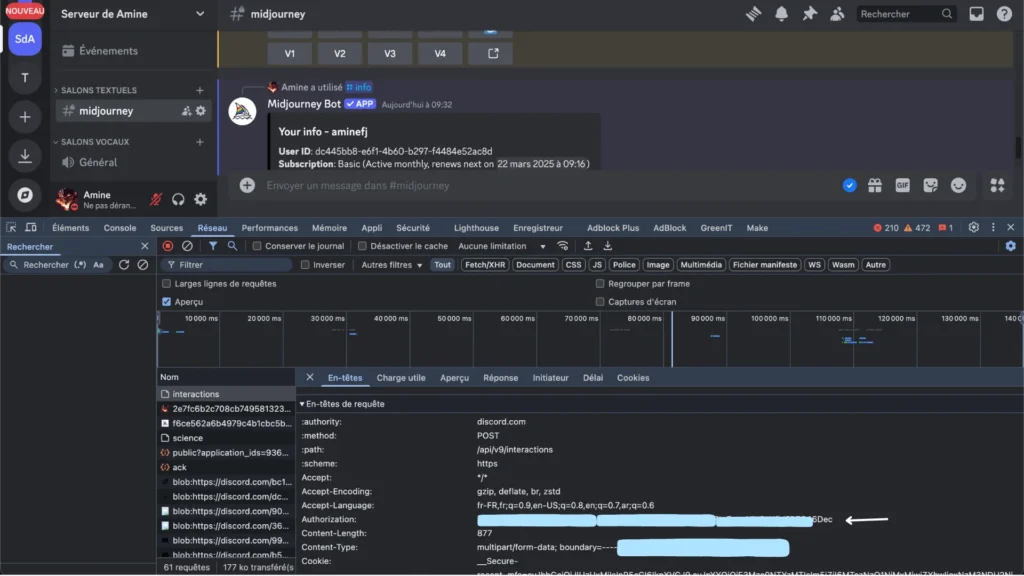
- For some channel information, press F12 to open the Inspect tool, select the Network tab, and type ‘/info‘ in the channel message box. Hit Enter to see the details.

Now that the network panel is open, look for the ‘interactions‘ section. Click on it to view all your channel’s activities. Here’s an important step: locate your authorization key and copy it carefully. Store this somewhere secure, like a password manager or a private note, as we’ll need it for the next steps. Remember: this key is your digital signature, so keep it private!
Step 3 – Connect Discord to Userapi.ai
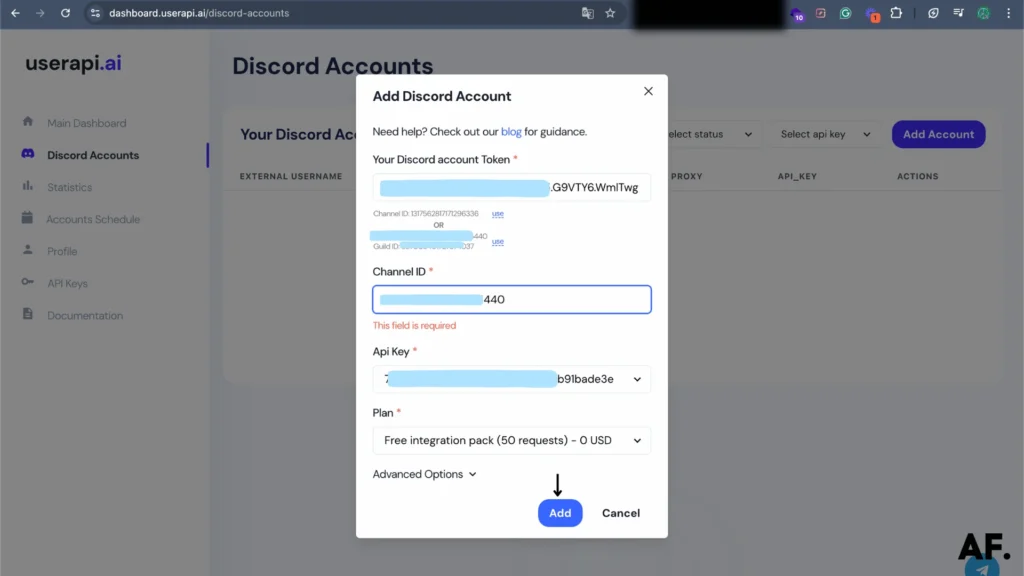
Time to connect everything! Head over to userapi.ai – if you don’t have an account yet, don’t worry; you can create one for free in just a few minutes. Once you’re logged in:- Navigate to the Discord Accounts section
- Paste that authorization key we saved earlier
- Select which Discord channel you want to connect to (this is where we’ll put everything to work!)
Pro tip: Take your time with this step – ensuring everything is connected correctly here will save you trouble later!
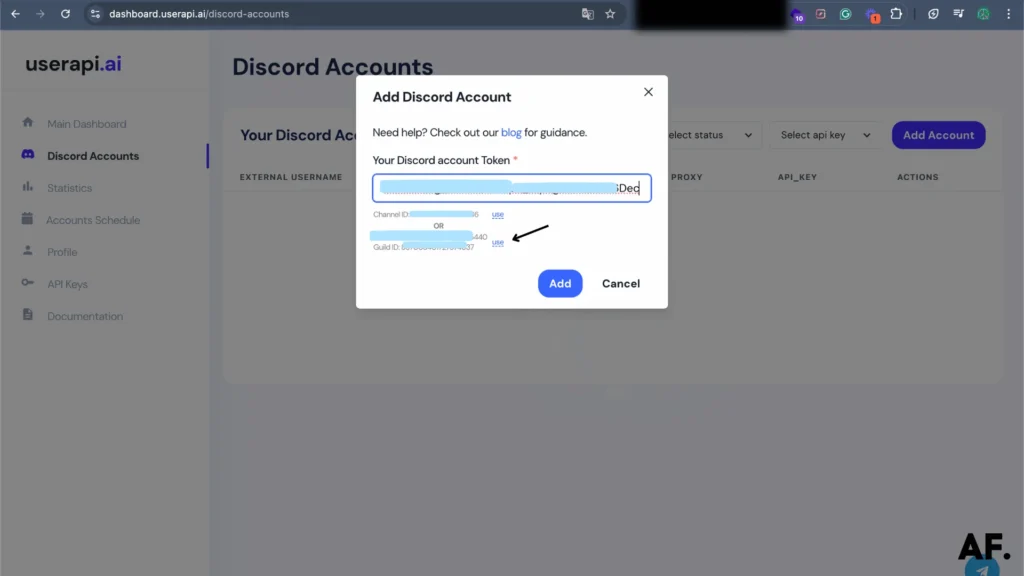
Ready to make it official? Look for the ‘Add‘ button and click it. This is the final step that connects your Discord channel to userapi.ai!
Step 4 – Create the First Scenario
Now, let’s set up your first creative scenario! Head over to the ‘Make’ section and create a new scenario – this is where the fun begins.
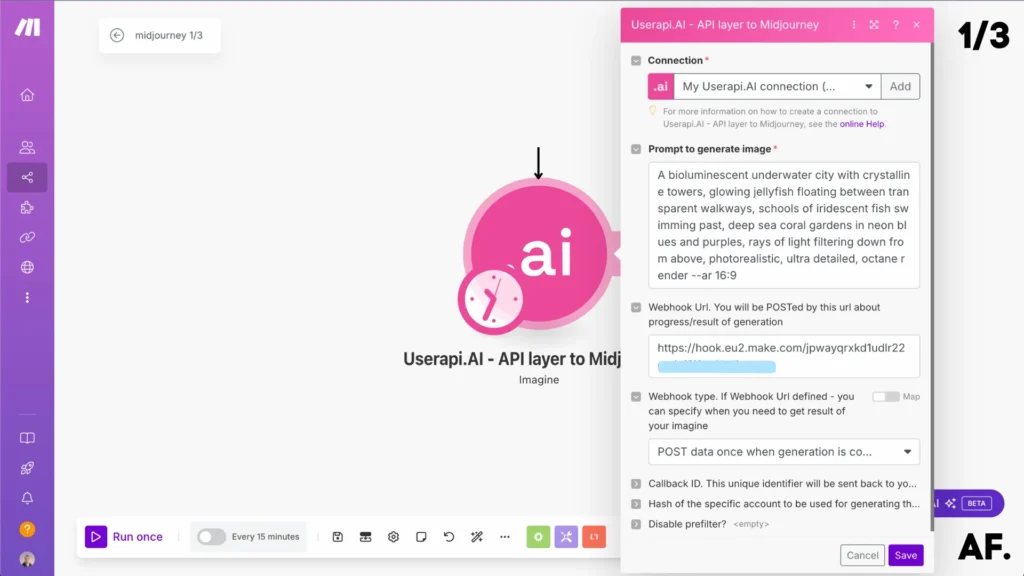
For this first one, we’ll keep it simple:- Select the ‘Imagine‘ module from userapi.ai – this powerful tool will handle your image generation
- Add your creative prompt – this is what will guide the AI’s imagination
- In the settings, choose ‘POST data once when generation is …’ for the webhook configuration
- Don’t worry about the webhook URL just yet – we’ll grab that from your second scenario in a moment
Step 5 – Create the Second Scenario
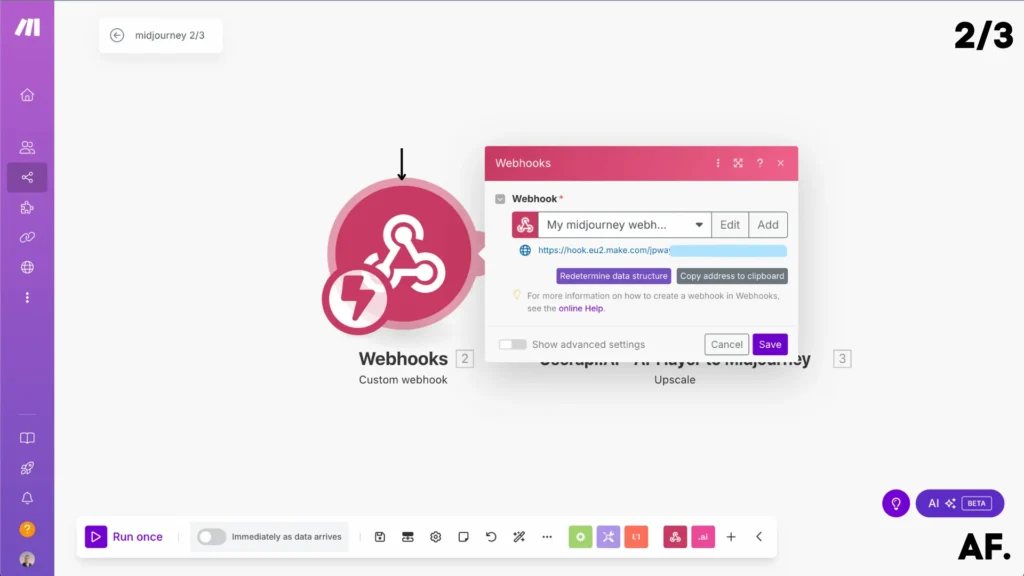
It’s time to create the bridge between our scenarios! Here’s what to do:- Create your second scenario
- Add a custom webhook to this new scenario
- Copy the webhook URL that appears
- Jump back to your first scenario and paste that URL into the webhook field we left empty earlier.
Perfect! Now, your scenarios are connected and ready to talk to each other.
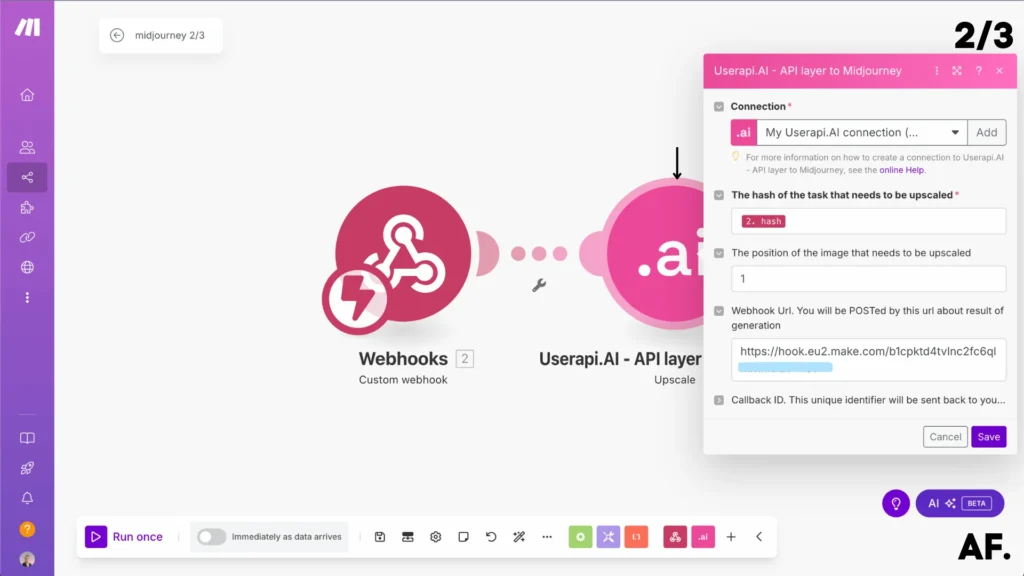
- Add the ‘Upscale‘ module to your workflow
- Fill in the required information:
- Enter your hash code
- Select your initial image
- For the webhook URL, we’ll use one from the third scenario (don’t worry, we’ll create that next!)
Pro tip: The Upscale module is fantastic for turning good images into great ones. It adds crisp details that make your pictures pop!
Step 6 – Create the Third Scenario
Time for our final connection! Let’s set up scenario number three:- Please create a new scenario (this will be our third one)
- Add a fresh webhook to it
- Copy the new webhook URL
- Pop back to scenario #2 and paste this URL into its webhook field
Perfect! We’ve created a communication chain between all three scenarios, each flowing naturally into the next.

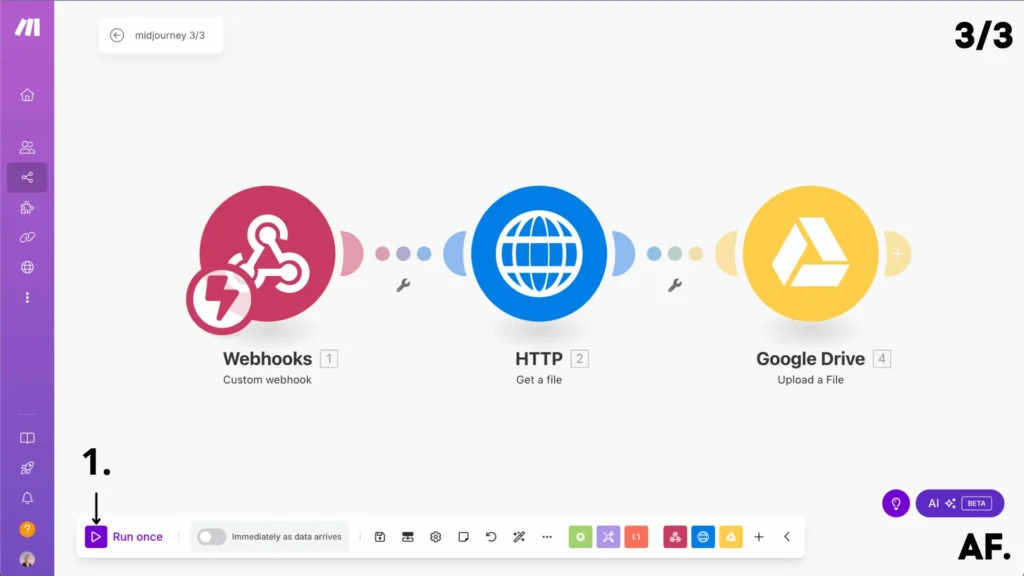
- Return to your third scenario
- Find and add the ‘Get a File‘ module from the HTTP section
- Look for the URL field in this module
- Paste in the webhook URL from your previous module
Think of this as creating the final piece of our image processing pipeline – it’s how we’ll collect our beautifully upscaled results!

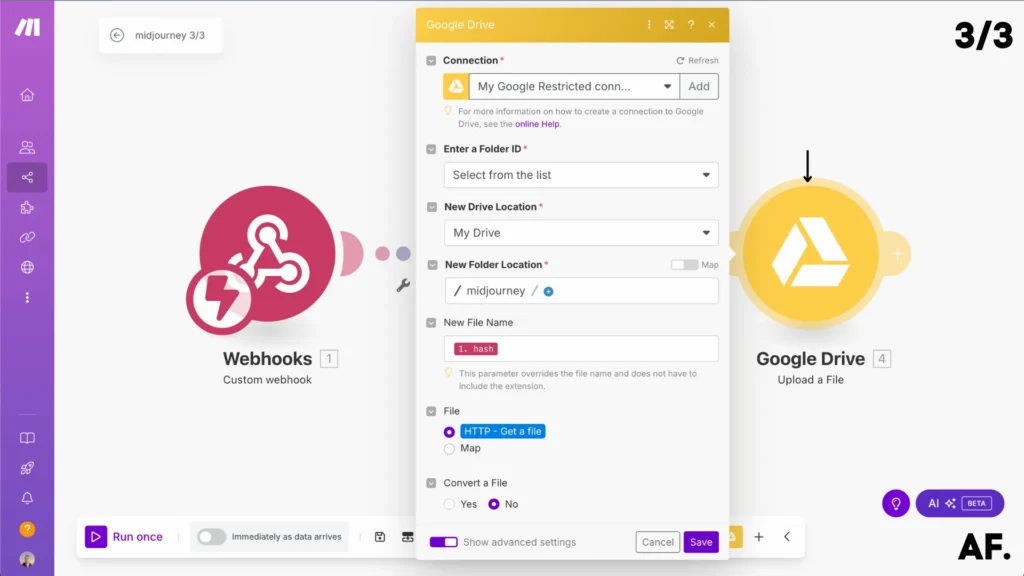
- Add the ‘Upload a File‘ module from Google Drive
- Click to enable ‘Show Advanced Settings‘
- In the file name field, you can customize how your files will be saved
- I use the hash as the filename to keep everything organized
- Feel free to use whatever naming convention works best for you!
This step ensures that all generated images are automatically saved to your Google Drive folder—no manual downloading is needed!
Step 7 – Save And Run
Almost there! Time to bring everything to life:- First, hit ‘Save‘ on all three scenarios to lock in your settings
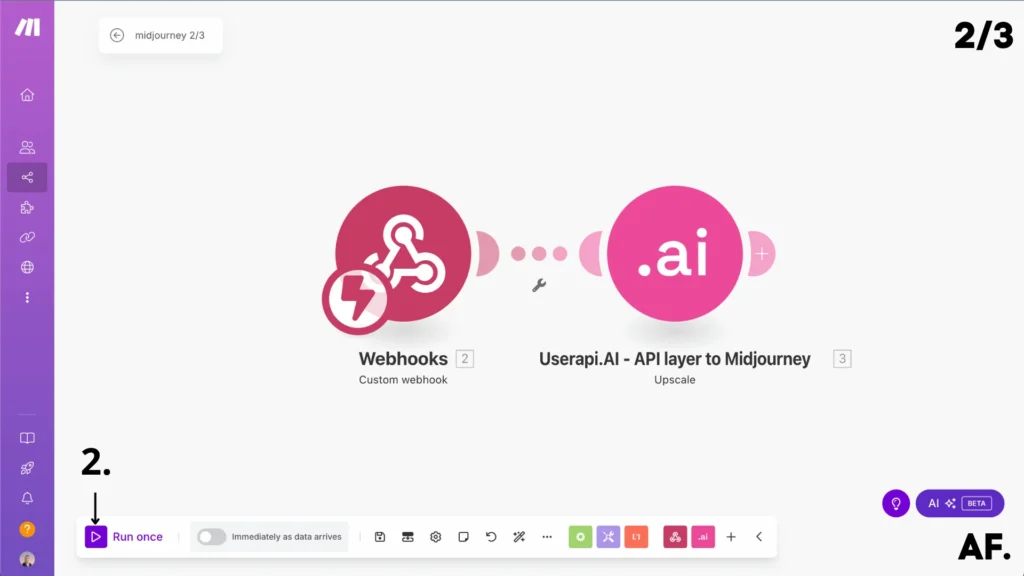
- Now for the exciting part – let’s test the workflow:
- Start with your third scenario (the Google Drive uploader)
- Then activate your second scenario (the upscale)
- Finally, run your first scenario (the image generator)
There you have it! Your automated image generation pipeline is now ready to go. The scenarios will work together like a well-oiled machine: generating images, upscaling them, and saving them directly to your Google Drive.

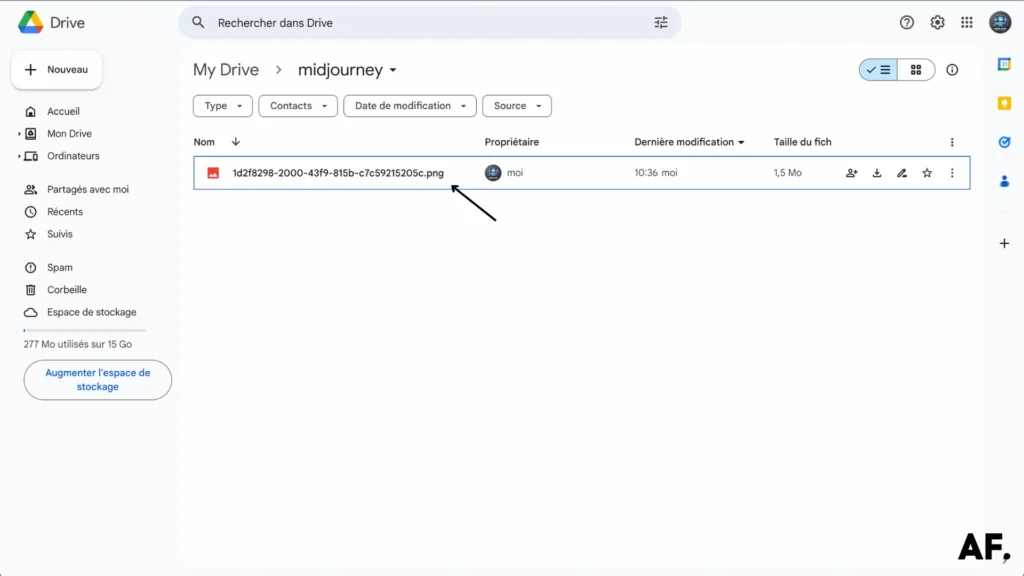
Result
Check your Google Drive folder and… voilà! Your freshly generated and upscaled image is automatically saved and ready to use. The whole process – from prompt to final image – happens seamlessly in the background. Pretty cool, right?
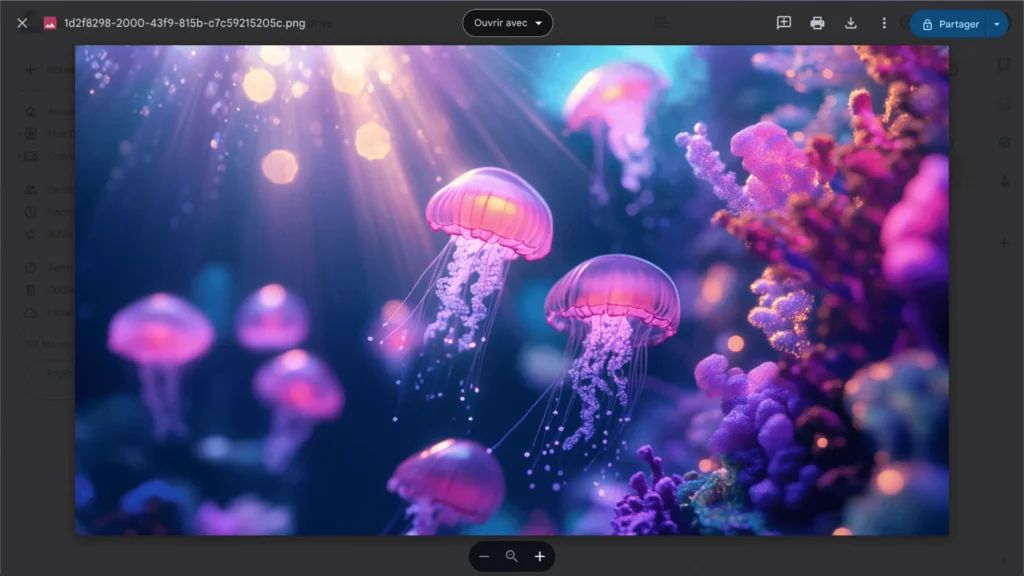
And there you have it—your AI-generated masterpiece! The image above shows the final result of our automated workflow, from the initial prompt to upscaled perfection. Each time you run this process, you’ll receive a new creation straight to your Google Drive folder.
How to Write Effective Midjourney Prompts?
Writing effective Midjourney prompts is all about clarity, creativity, and detail. Since the AI interprets words to generate images, the more precise and descriptive your prompt, the better the results. Here are some key tips:
1. Be Specific
Instead of saying “a dog,” try “a golden retriever wearing sunglasses on a beach at sunset.” The more details you provide, the closer the image will match your vision.
2. Use Adjectives & Styles
Words like “cinematic lighting,” “hyper-realistic,” or “watercolor painting” help set the artistic tone. If you want a fantasy vibe, add “dreamlike” or “surreal.”
3. Include Camera Angles & Lighting
For photography-style images, try “close-up portrait, soft lighting, depth of field” or “aerial view of a neon-lit city at night.”
4. Experiment with Composition
You can specify how elements should appear, like “a warrior standing on a mountain, dramatic pose, wind blowing.”
5. Try Different Variations
AI can interpret prompts differently, so tweak your wording and test multiple versions for the best results.
A great prompt mixes creativity and precision—have fun experimenting!
Who Can Use Midjourney?
Midjourney is for anyone who loves creativity. Whether you’re an artist, designer, marketer, or just someone who enjoys experimenting with AI-generated art, It’s easy to use and accessible.
Artists & Designers
If you’re looking for fresh ideas or need inspiration, Midjourney can generate unique concepts in seconds. It’s excellent for creating fantasy scenes, character designs, or even abstract art.
Content Creators & Marketers
Do you need eye-catching visuals for social media, blogs, or advertisements? Midjourney helps you create stunning images without graphic design skills. Just type your idea, and let AI handle the rest!
Writers & Storytellers
Authors can use Midjourney to visualize characters, settings, or book cover concepts. It’s a fantastic tool for bringing ideas to life visually.
Hobbyists & Curious Minds
Even if you’re not a professional, Midjourney is fun to play with! Whether you want to create dreamlike landscapes or quirky, surreal images, it’s an exciting way to explore AI-generated art.
No special skills are needed—just your imagination and a prompt. If you can describe it, Midjourney can create it!
What makes Midjourney different from other AI image generators?
Midjourney stands out from other AI image generators like DALL·E and Stable Diffusion due to its unique artistic style, ease of use, and community-driven approach. Here’s what makes it different:
Artistic & Stylized Output
Midjourney leans toward a more artistic and painterly style, often producing dreamlike, highly detailed, and visually stunning images. While other AI tools aim for realism, Midjourney excels at creative and abstract aesthetics.
Runs on Discord
Unlike DALL·E or Stable Diffusion, which have dedicated apps or web platforms, Midjourney operates entirely through Discord. Users interact with the AI by typing prompts in chat, making it a social and collaborative experience.
No Installation Required
Since Midjourney is cloud-based and works via Discord, installing heavy software or having a powerful computer is unnecessary, making it accessible to more users.
Strong Community & Iteration Features
Midjourney encourages user engagement with upscaling, variations, and community-generated prompts, fostering creativity and collaboration.
While tools like DALL·E focus on accuracy and realism, Midjourney is the go-to choice for those seeking a more artistic, imaginative touch in their AI-generated images.
What Type Of Businesses Can Use Midjourney?
Midjourney is a game-changer for many businesses, especially those that rely on visuals. Since it creates stunning AI-generated images quickly, companies can save time and resources while boosting creativity. Here are some industries that can benefit:
1. Marketing & Advertising
Businesses can use Midjourney to generate unique, eye-catching graphics for social media, ad campaigns, and promotional materials without hiring a designer.
2. E-Commerce & Retail
Brands can create custom product mockups, lifestyle imagery, or concept art for marketing without expensive photoshoots.
3. Publishing & Media
Writers, bloggers, and journalists can generate book covers, article illustrations, and engaging thumbnails for content.
4. Gaming & Entertainment
Game developers and filmmakers can quickly design concept art, characters, and environments, helping with early-stage creativity and world-building.
5. Interior Design & Architecture
Professionals can visualize design ideas, test different aesthetics, and effortlessly create mood boards for clients.
6. Fashion & Apparel
Before creating physical prototypes, designers can experiment with new patterns, fabric textures, and clothing styles.
Midjourney helps businesses turn ideas into visuals faster and more affordably—perfect for industries that thrive on creativity!
How Midjourney Can Help You?
Midjourney is a powerful tool that can boost creativity, save time, and bring your ideas to life—whether you’re an artist, entrepreneur, or just someone who loves experimenting with visuals. Here’s how it can help you:
Unlock Creativity & Inspiration
Are you stuck on an idea? Midjourney can generate unique images based on your prompts, helping you explore different artistic directions and spark new concepts.
Save Time & Effort
Creating high-quality visuals manually can take hours or even days. With Midjourney, you get stunning results in seconds, making it perfect for quick concept art, marketing materials, or social media content.
No Design Skills Required
You don’t need to be a professional artist or designer to use Midjourney. Just type a description, and the AI does the rest, making it accessible to everyone.
Affordable Visual Content
Hiring designers or setting up photoshoots can be expensive. Midjourney provides a cost-effective way to create visuals for personal or business use.
Endless Possibilities
Midjourney helps you effortlessly bring any vision to life, from futuristic cityscapes to dreamy illustrations.
Whatever your creative needs, Midjourney makes it easy, fun, and fast!
How Automation with Midjourney Can Help You?
Automating Midjourney can streamline your workflow, save time, and boost creativity without constant manual input. Whether you’re a business owner, marketer, or content creator, automation can help you generate high-quality visuals effortlessly.
1. Speed Up Content Creation
Instead of manually entering prompts every time, automation tools can generate AI images in bulk, helping businesses create consistent branding, product visuals, or social media posts.
2. Scale Your Creativity
By integrating Midjourney with APIs or scripts, you can quickly produce multiple variations of images, which is perfect for testing different styles and concepts.
3. Enhance Marketing & Advertising
Automated image generation allows brands to create unique promotional materials, ad creatives, and blog visuals on demand, reducing reliance on expensive designers.
4. Improve Productivity
Artists and designers can automate repetitive tasks, like generating concept art or mood boards, so they can focus on refining and finalizing the best ideas.
5. Personalization at Scale
Businesses can use automation to generate personalized customer images, making branding and marketing more engaging and tailored.
With automation, Midjourney becomes a powerful tool for effortless, high-volume, high-quality image creation!
Conclusion
Now, you have all the tools and knowledge to create amazing AI-generated images using Midjourney in Make! Try using different prompts and settings to achieve the best results. As you become more comfortable with the integration, you’ll discover endless possibilities for automating your creative workflow. Don’t forget to join our newsletter to get the latest news and tutorials about automation and AI!
FAQs
Can Midjourney create images from images?
Yes, Midjourney can use existing images as references to create new images. This is sometimes called “image-to-image” generation. You can upload a photo and ask Midjourney to create variations or use it to inspire you to make new photos.
How do I use the Midjourney bot to generate images?
You use Midjourney through Discord. Join a Discord server with Midjourney, type your description (called a prompt) in the chat, and the bot will create images based on what you described. It’s as simple as typing what you want to see.
How do you get Midjourney to replicate an image?
To replicate an image in Midjourney, upload the reference image to Discord and describe its key features in your prompt. Include details about the style, composition, and elements you want to match. Remember that the result will be similar but not an exact copy due to copyright and AI limitations.
How do you create AI art in Midjourney?
– Write a detailed description of what you want to see
– Include specific details about style, colors, and composition
– Use the Discord chat to send your prompt to the Midjourney bot
– Give it a few seconds to create your image
– Choose variations or upscale the results you like best

Further Ressources
- How to Run Custom Code on Make: Step-by-Step Guide
- PDF to Google Sheets: Quick Automation with Make & ChatGPT
- How to Automate xAI Grok with Make : Comprehensive Guide
- How To Use Deepseek AI In Make: Step-By-Step Guide
- How to Convert Videos into Blog Posts Automatically with Make
- How to Use FLUX AI Image Generator in Make: Step-By-Step
- How to Automate Perplexity AI with Make
- How to Use Leonardo AI Image in Make: Step-By-Step Guide