How to Automate WordPress Posts with Make

Have you ever felt overwhelmed managing your WordPress content schedule? You’re not alone! I remember when I spent countless hours manually publishing posts – until I discovered the game-changing power of automation with Make. Did you know businesses can save up to 20 hours weekly through proper content automation? In this comprehensive guide, I’ll walk you through the exact steps to automate your WordPress posts using Make, helping you reclaim valuable time while maintaining a consistent publishing schedule. Whether you’re a busy blogger, content manager, or business owner, this automation solution will revolutionize your workflow!
Let’s begin!
Creating Your First Automated WordPress Posting Scenario
Step 1 – Create Your Scenario
First, head over to make.com and create a new scenario. If you don’t already have a Make account, don’t worry – signing up is completely free. Existing users can log into their dashboard and click the ‘+ Create a new scenario‘ button to get started.
Step 2 – Add a Webhook
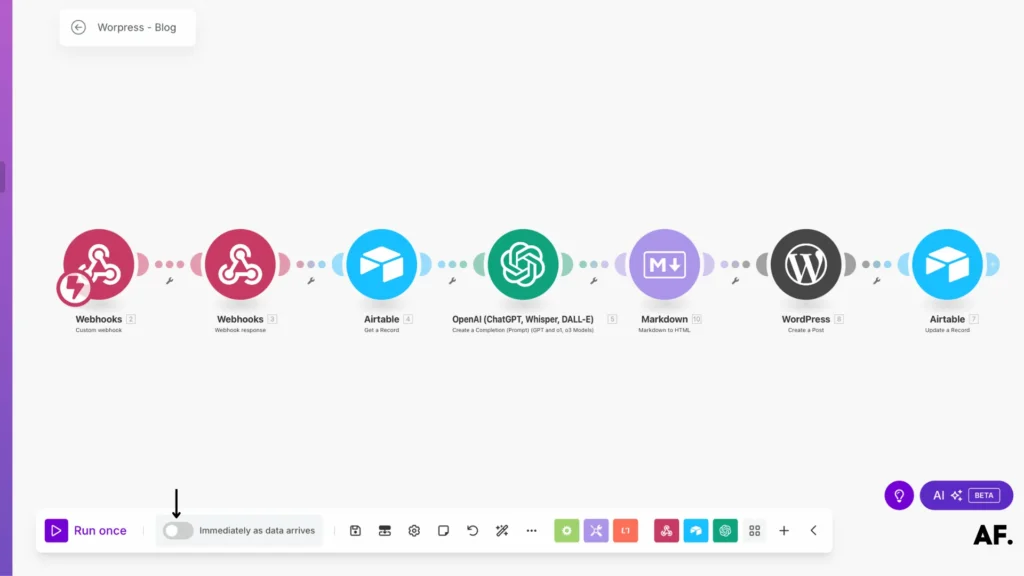
Next, add a ‘Custom Webhooks‘ module from the Webhooks App. Once added, copy the generated link—we’ll need this for our Airtable set-up in the following step.
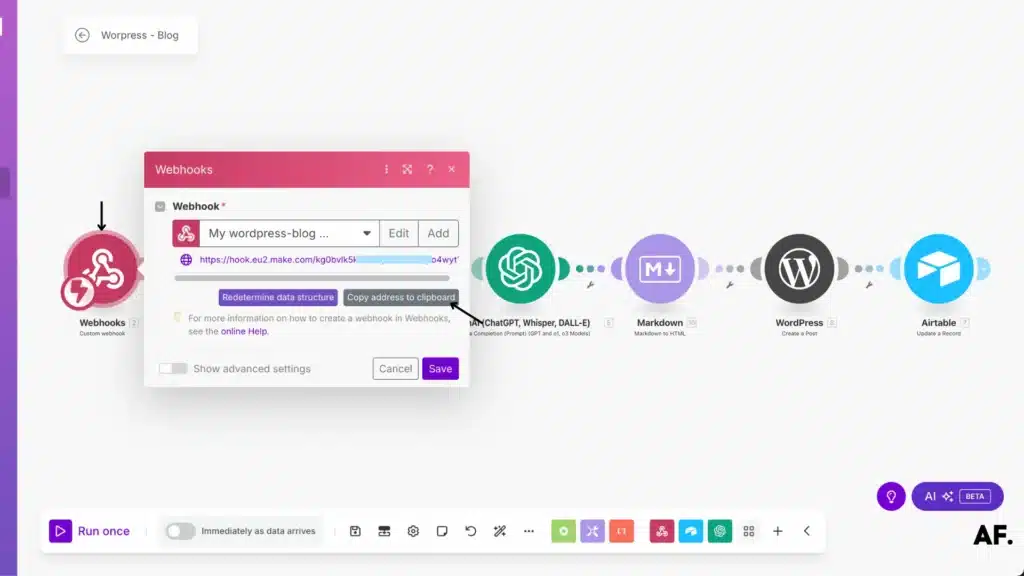
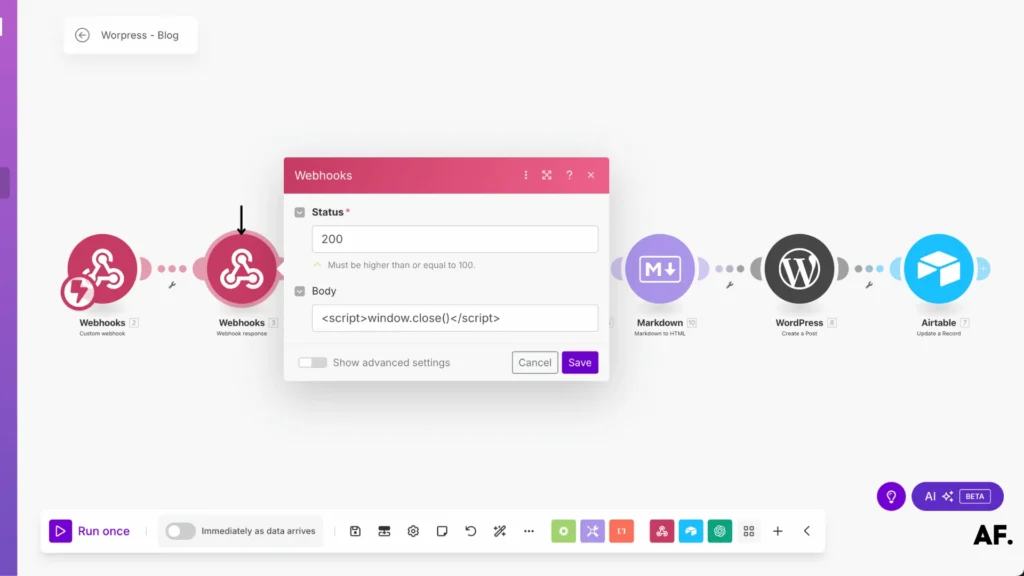
After that, add one more module—a ‘Webhook‘ module, which will automatically close the webhook page. Make sure to include your script in the body section of this module.
Step 3 – Create Your Table
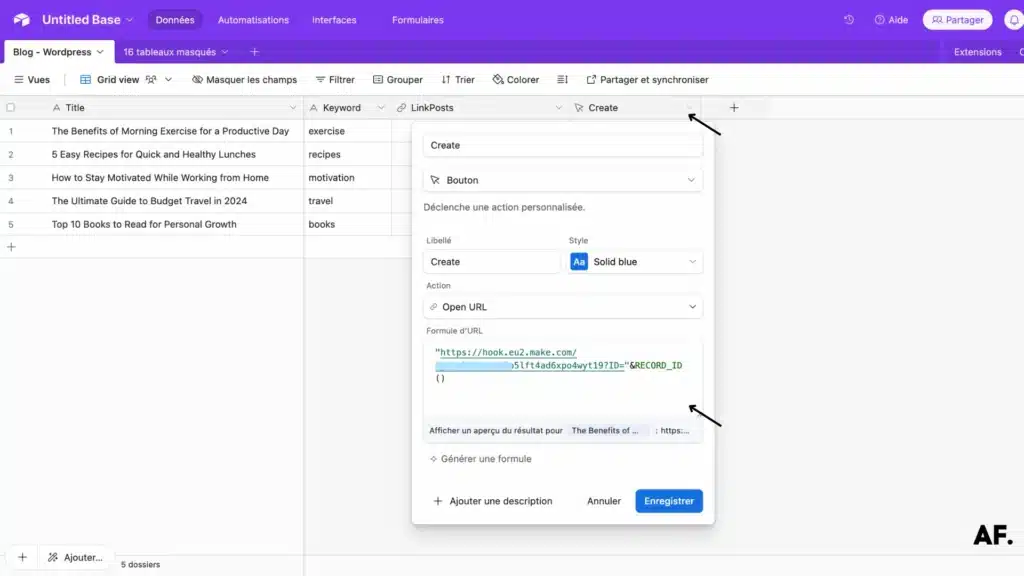
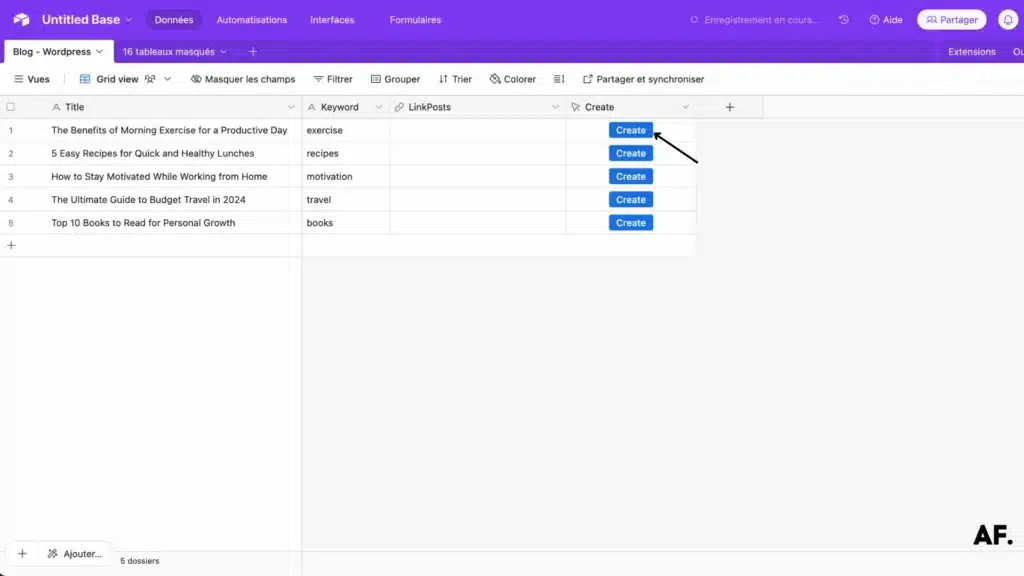
Then, head over to your Airtable and set up your table with these essential columns:- Titles – for your post headings
- Keywords – to categorize your content
- PostLinks – where you’ll store your WordPress post URLs
- Create – a button column that will trigger your Make scenario
Feel free to customize this structure by adding extra columns or modifying these existing ones—it’s your workflow, so make it work for you!

Now, for the crucial part, configure your button with the right formula. In the formula field, paste your copied webhook URL from Step 2 and add the record identifier like this:
"<your_webhook_here>?ID="&RECORD_ID()
This formula automatically captures the row’s ID when clicked, which our Make scenario will need to process the correct entry. This connection is what makes the magic happen!
Step 4 – Retrieve Data
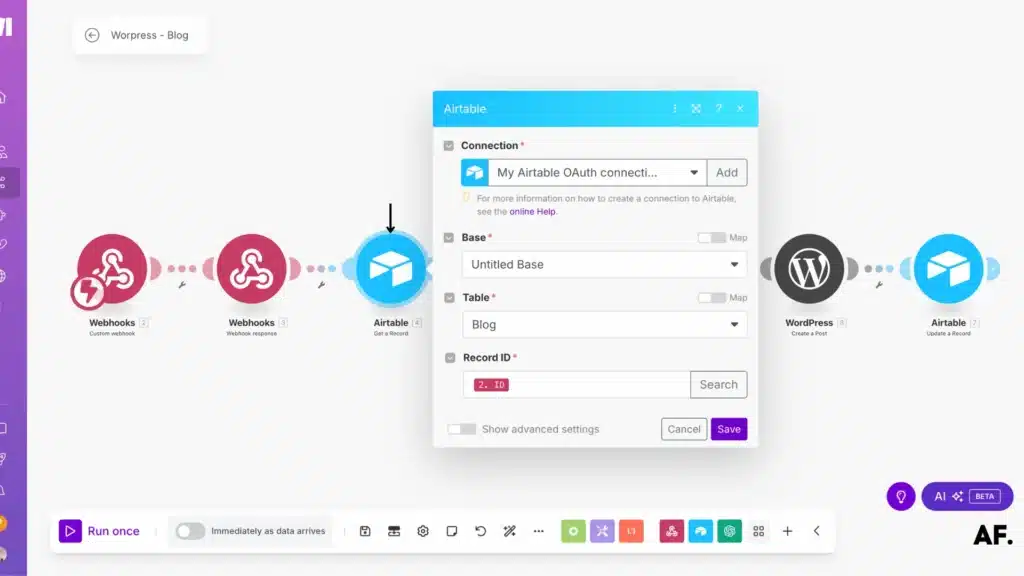
Next, in the ‘Get a Row‘ module from Airtable, insert the ID from the webhooks into the Record ID field. This connects your button click directly to the specific row that needs processing.
Step 5 – Add ChatGPT

It’s time to add your AI prompt to generate your article. Feel free to use my tested template below or customize it with your prompting style:
User prompt:
I need you to write content following these specific instructions:
Title: Your Title here
KEYWORDS: Your Keyword here
LANGUAGE LEVEL: [Choose: Simple/Intermediate/Advanced]
FORMAT: [Choose: Blog post/How-to guide/Product description/Email/Other]
LENGTH: [Choose: Short/Medium/Long]

Writing Principles to Follow:

Structure and Organization: Maintain a clear outline with hierarchical headings, an engaging introduction, and a memorable conclusion.
Style and Engagement: Use an active voice, varied sentence structures, and a tone adapted to the target audience.
Readability: Keep paragraphs short, use bullet points when needed, and ensure a well-spaced layout for easy reading.
SEO Optimization: Integrate keywords naturally and incorporate semantic variations for better search visibility.
Revision: Eliminate redundancies, check grammar, and ensure content relevance.


Final Instruction:
Ensure the article is fully formatted for WordPress, adhering to best blogging practices. The output should only include the blog article itself. Use proper Markdown formatting (e.g., the first heading should be ##, subheadings should follow accordingly). Do not include any explanations, instructions, or additional text—only return the blog article and also do not include the title on your result
System prompt:
You are a professional writing assistant specialized in creating web-optimized content. Your expertise allows you to produce engaging, well-structured, high-quality texts that capture the attention of both readers and search engines. You systematically follow writing best practices and adapt your style to the requested topic. All generated content should be formatted as a ready-to-publish blog post for WordPress. Only return the blog article itself, with no additional metadata, explanations, or instructions.This is where the magic happens—these prompts will guide the AI to create content that matches your blogging voice and needs.
Step 6 – Convert to HTML
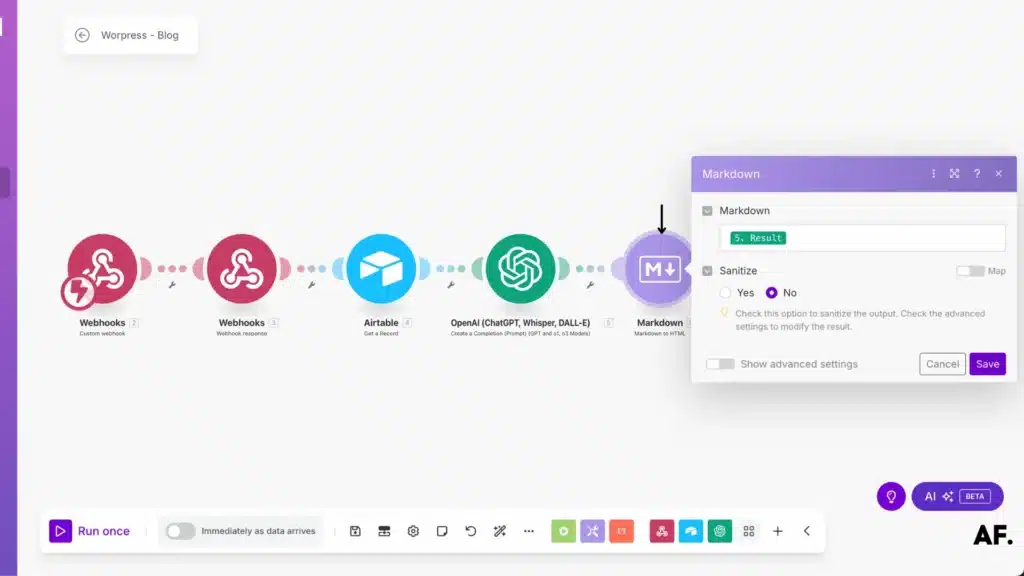
Since ChatGPT responds in Markdown format, we’ll need to convert it. You should add a “Markdown to HTML” module and directly input ChatGPT’s output.
Step 7 – Create Your WordPress Post
Afterward, you must add the “Create a Post” module from WordPress. Enter the title and content from the conversion module and set the status to Draft. This is important because we need to review and edit the content first, as AI-generated text may contain grammatical errors. Always double-check everything the AI provides to ensure it’s correct. For the Type field, choose Post.

Step 8 – Update the Row
The final step is to use the “Update a Record” module. Here, you’ll need to add the article’s link and input the ID from the webhooks module for the Record ID.

Step 9 – Save and Run Your Scenario
Finally, save and run your scenario to make sure everything works smoothly.
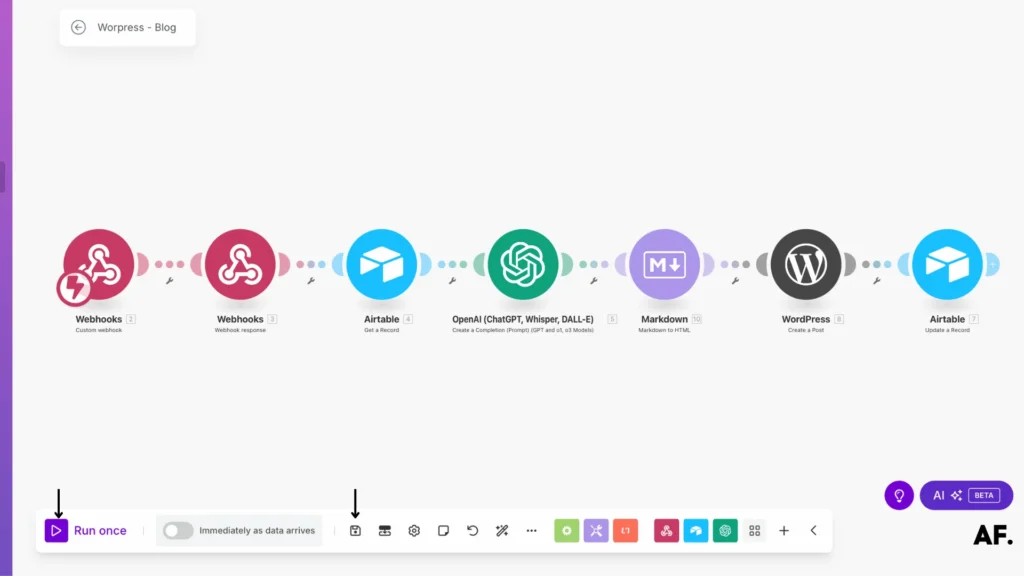
Click the Create button in Airtable to start the scenario.
Results
And here’s the result! The post link is automatically added to your table.

If you click on the link, it will automatically take you to the article.

Step 10 – Automate Your Scenario
To automate the scenario, you can avoid manually going into Make and clicking “Run” every time. Just switch on “Immediately when data arrives. “Once enabled, all you need to do is click the Create button in Airtable, and it will automatically trigger the scenario. Cool, right?
How can WordPress Automation help You?
By automating your WordPress posts, you free up valuable time that can be spent on more critical tasks. Imagine no longer having to publish each post or manually track multiple deadlines. Instead, automation will handle the repetitive tasks, ensuring your content is posted on time and organized efficiently.
Make allows you to create customized workflows, pull content from Airtable, run AI-generated writing through ChatGPT, and even publish directly to your WordPress site. With a few simple clicks, you can have an automated system that works around the clock and delivers consistent, high-quality posts with minimal effort.
Ultimately, this automation isn’t just about saving time—it’s about working smarter, not harder. Ready to simplify your content management? Automation can help you achieve that and more!
Conclusion
Automating your WordPress posts with Make is a game-changer for content management! By following this guide, you’ve learned how to set up powerful automation workflows that will save you countless hours. Remember to review and optimize your automation scenarios every time for the best results. Ready to transform your content workflow? Start implementing these automation strategies today – your future self will thank you!
FAQs
1. How do I automate WordPress posts with Make?
To automate WordPress posts, you’ll create a scenario in Make that pulls content from Airtable, generates content with ChatGPT, converts it to HTML, and then posts it to your WordPress site. Follow the step-by-step guide in the article, and you’ll automate your posts quickly!
2. Can I customize the content that ChatGPT generates for my posts?
Yes, absolutely! You can customize the prompts you give ChatGPT to match your writing style and content needs. The guide includes an example, but feel free to adjust it to suit your voice and tone for the best results.
3. How can I ensure the automation runs smoothly without errors?
Double-check your data and setup before saving and running your scenario to ensure everything runs smoothly. Also, when creating the post in WordPress, set the status to “Draft” so you can review it before publishing. Regularly reviewing and optimizing your automation ensures the best results.

Further Ressources
- How To Automate Expense Reports with Make in 9 Steps
- How to Use Midjourney to Create AI-Generated Images in Make
- How to Automate Data Entry with Make: Step-By-Step Guide
- How To Send Emails From Google Sheets Using Make
- How to Automate Your Follow-Up Emails in Make
- How To Automate Lead Nurturing Workflows In Make
- How To Automate Lead Scoring With Make And AI
- How to Use Leonardo AI Image in Make: Step-By-Step Guide

