How To Automate Lead Scoring With Make And AI

Did you know companies using lead scoring see a 77% increase in lead generation ROI? That’s huge! I’m excited to show you how combining the power of Make (formerly Integromat) and AI can revolutionize your lead-scoring process. Gone are the days of manually qualifying leads – it’s time to embrace automation and let technology do the heavy lifting for you. In this guide, we’ll explore how to create a sophisticated lead-scoring system that works while you sleep!
What You’ll Learn

- Create An Automation in Make
- Create An Automation in Airtable
- Create A Form in Airtable
- Adding Triggers
- Connecting Make and Airtable
- Using AI
- Extract Needed Data From AI
- Update A Row in Airtable
What is Lead Scoring?
Lead scoring allows businesses to determine which potential customers (leads) are most likely to buy. It involves giving each lead a score based on how interested they seem and how well they fit your ideal customer profile.
For example, if someone visits your website multiple times, downloads a free guide, and opens your emails, they’d get a higher score than someone who just glanced at a blog post. Lead scoring helps sales and marketing teams focus on the best leads instead of wasting time on people who aren’t ready to buy.
Most businesses assign scores using demographic data (like job title, company size, or location) and behavioral data (website visits, email interactions, and social media engagement). Many customer relationship management (CRM) tools and marketing platforms have built-in lead-scoring features to automate the process.
The benefit? It helps businesses work smarter—sales teams can follow up with the hottest leads, and marketing can nurture the rest until they’re ready. In short, lead scoring improves efficiency, boosts conversions, and ensures your team spends time on the most important leads.
Setting Up Make for Lead Scoring
Step 1 – Set Up Your Airtable
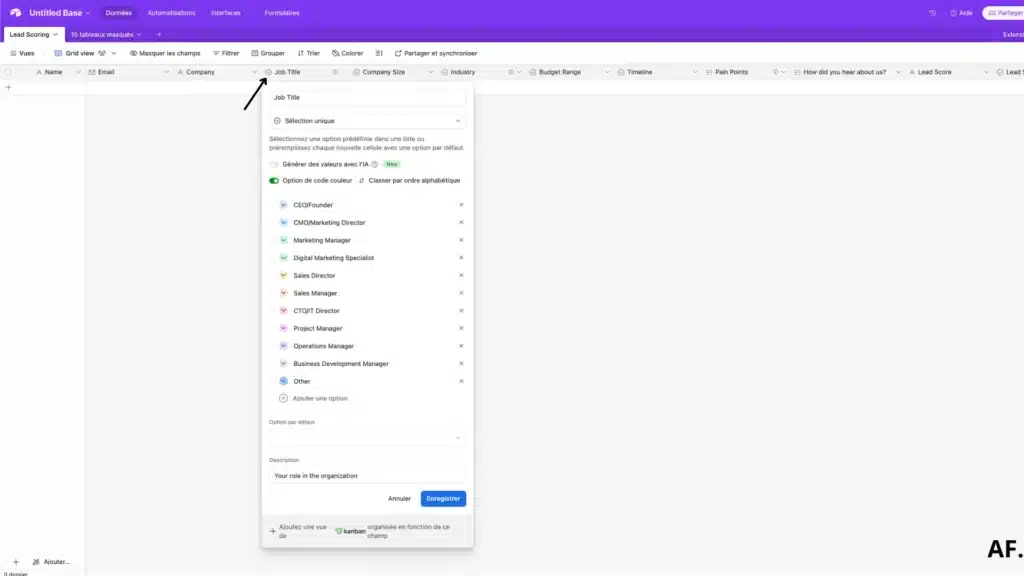
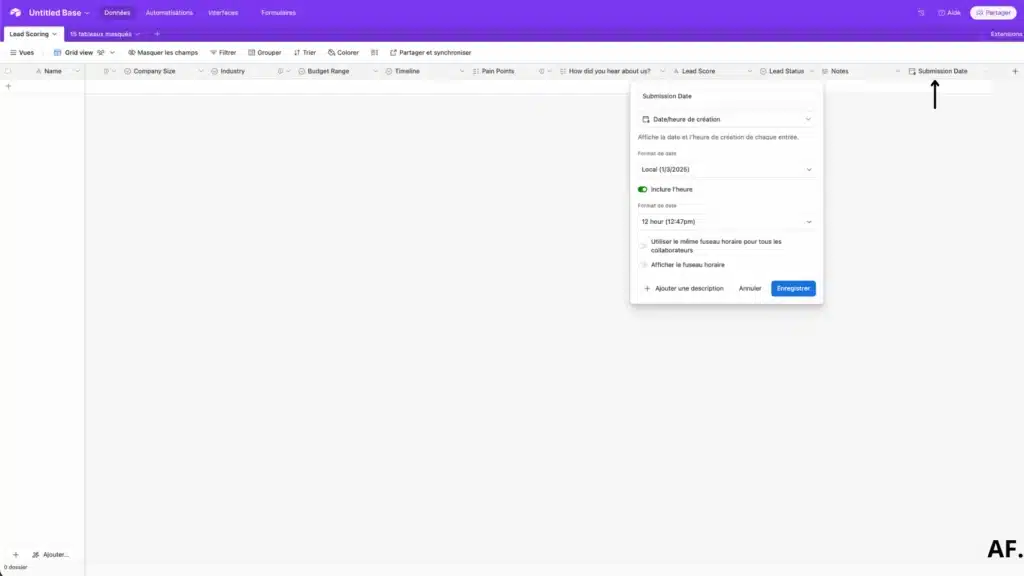
First, go to your Airtable account and create the following fields for your lead-scoring system:- Name (Single line text) – Capture your prospect’s full name
- Email (Email) – Store contact email with proper formatting
- Company (Single line text) – Record the organization name
- Job Title (Single line text) – Note the prospect’s position
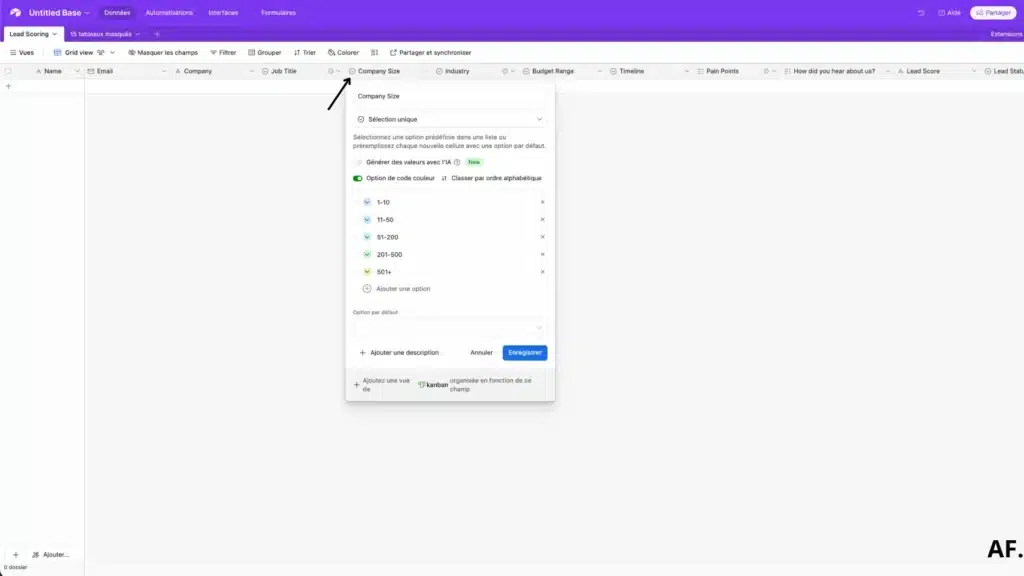
- Company Size (Single select with options: 1-10, 11-50, 51-200, 201-500, 501+) – Categorize by organization scale
- Industry (Single select with options relevant to your business) – Segment by sector
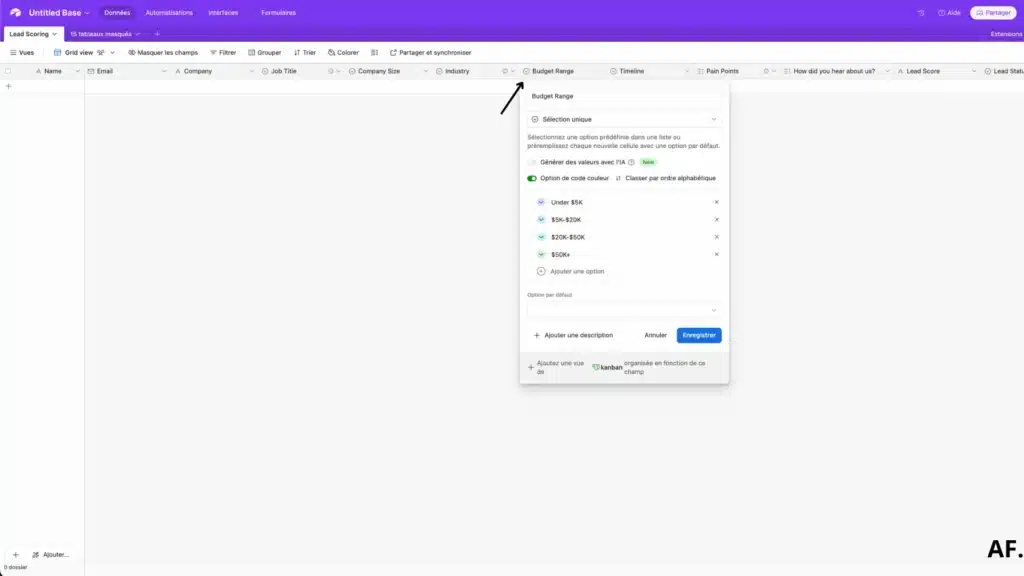
- Budget Range (Single select: Under $5K, $5K-$20K, $20K-$50K, $50K+) – Understand spending capacity
- Timeline (Single select: Immediately, 1-3 months, 3-6 months, 6+ months) – Track purchase readiness
- Pain Points (Multiple select with common challenges) – Identify specific needs
- How did you hear about us? (Multiple select: Search, Social Media, Referral, Event, etc.) – Track marketing effectiveness
- Lead Score (Number) – This will be calculated automatically based on your criteria
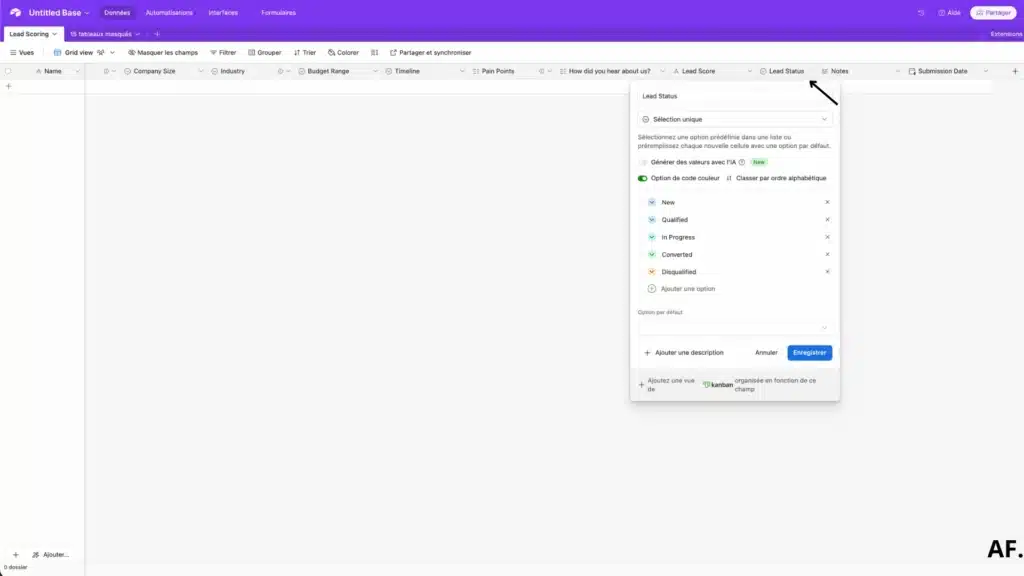
- Lead Status (Single select: New, Qualified, In Progress, Converted, Disqualified) – Monitor progress through your sales pipeline
- Notes (Long text) – Record important conversation details and follow-up items
- Submission Date (Date – automatically filled) – Track when the lead entered your system
These fields will give you a comprehensive view of each lead and help prioritize your follow-up efforts.
Step 2 – Create a Form
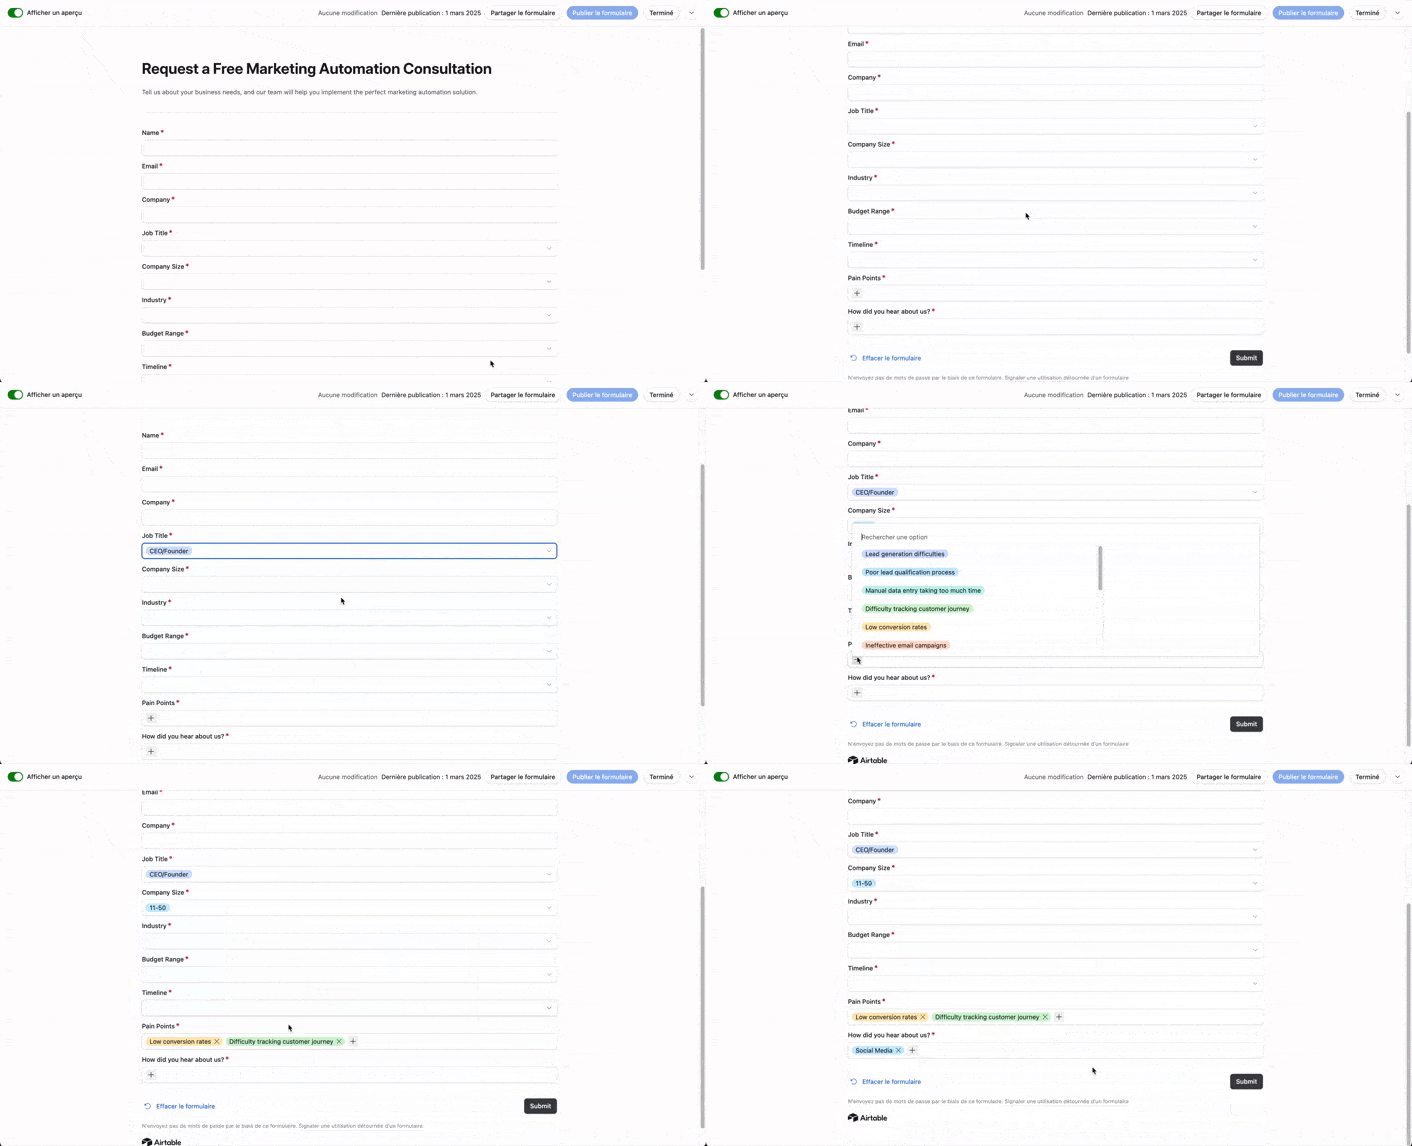
Now, let’s create a form in Airtable to collect lead information efficiently. Click on the “Form” button at the top of your Airtable workspace. This will open the form editor, where you can customize how your leads submit their information.
The form interface makes it easy to configure which fields appear to potential clients, set required fields, and customize the overall appearance. This user-friendly approach eliminates the need for complex coding while ensuring you capture all essential lead information in a structured format.
With just one click, you’ll transform your database into an interactive lead-generation tool that seamlessly integrates with your existing Airtable setup.

Click the “+” button to start the lead scoring setup. Assign point values to different response options. Higher points mean better leads. Focus on company size, budget, and timeline. Your ideal customer profile should guide point values. Airtable calculates scores automatically, helping sales teams prioritize leads instantly. Choose your most important qualification criteria. Make sure your scoring reflects your business needs. Review and adjust your system regularly.

After setting up your lead scoring system, click the “Publish” button. This makes your form live. Your leads can now submit their information, and the system will score entries automatically. Your sales team can begin working with qualified leads immediately. Remember to share the link to the form with potential customers.
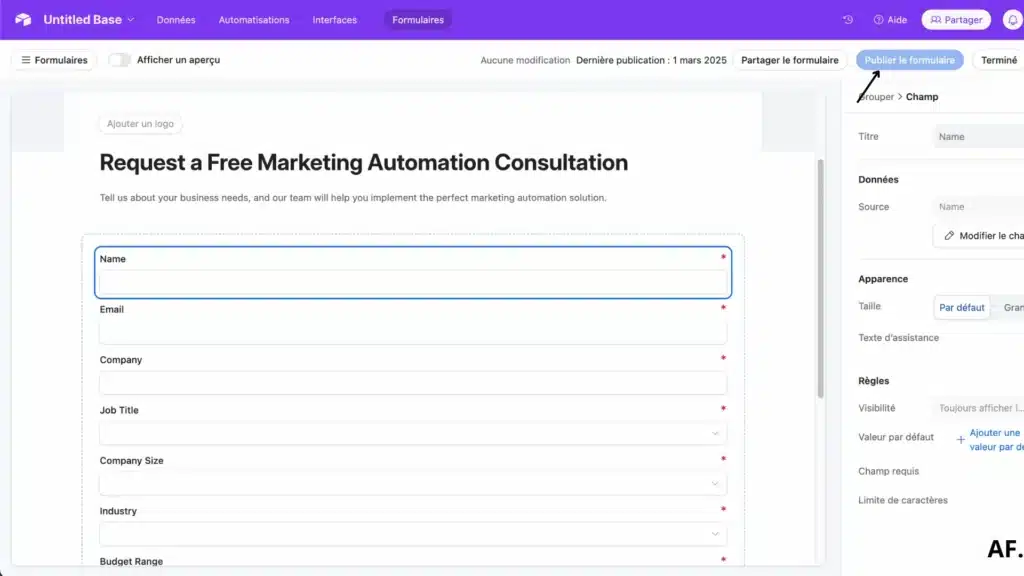
Great! Now, you’re looking at your completed lead capture form preview. This is exactly how potential leads will see it when they visit. Take a moment to review all fields and scoring criteria. Make sure everything appears professional and user-friendly. Check that the required fields are properly marked. Confirm that your branding elements look consistent. Test the form yourself to ensure smooth functionality. Once you’re satisfied with how your form looks, it’s ready to share with prospective clients.
Step 3 – Create Your Scenario
Start building your automation workflow by heading to Make.com. You can create a free account using the special link provided if you’re new to the platform. For existing users, click your dashboard’s “+ Create a new scenario” button.
This step launches your automation journey, connecting your Airtable lead form to other essential business tools. Make’s visual workflow builder will help you create powerful automation without coding skills. Once your scenario is created, you can trigger actions whenever new leads submit your form.
Step 4 – Add a Trigger
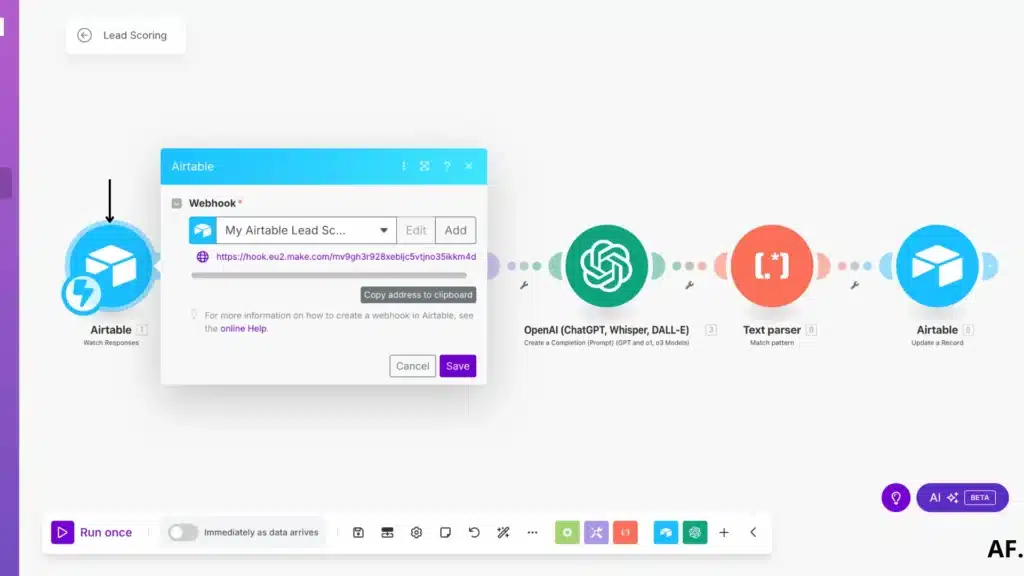
First, add a “Watch Responses” webhook module to your Make scenario. When the modal window appears, click the “Copy Address to Clipboard” button to save your webhook URL. This unique address will receive form submission data automatically. After copying the URL, click the “Save” button to confirm. This webhook will monitor your Airtable form for new submissions and trigger your automation workflow whenever a lead completes your form.
Step 5 – Add a Trigger in Airtable
Go to the top of your Airtable interface and click “Automation.” This opens the automation builder. Create your first action by selecting the trigger “When the form is submitted.” Choose your lead capture form from the dropdown menu on the right side of the screen. This establishes the connection between your form submissions and the webhook you created in Make.

For your second action, add a script component. This is where you’ll insert your code to connect the form submission with your webhook URL. When triggered, the script will automatically send the form data to Make. Select “Run script” from the action options, then paste your webhook URL into the appropriate field. This crucial step ensures that every form submission flows seamlessly into your automation workflow.
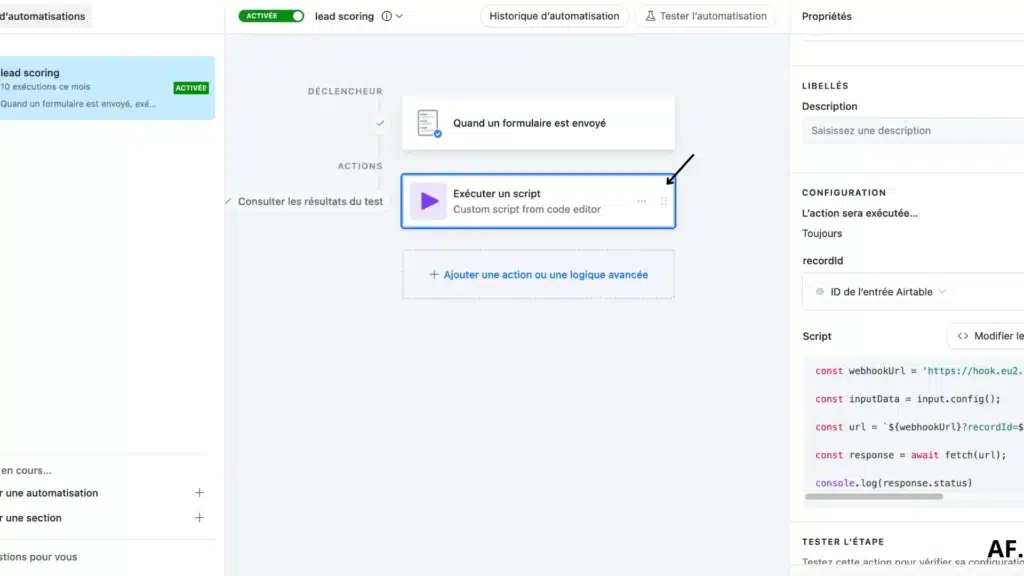
For your second action, add a script component. Click the “Run script” option, then paste your webhook URL into the code on “<your_webhook_here>” :
const webhookUrl = '<your_webhook_here>';

const inputData = input.config();

const url = `${webhookUrl}?recordId=${inputData.recordId}`;

const response = await fetch(url);

console.log(response.status)
Remember to add the recordId parameter to the values section on the left side of the screen. This ensures that each submission is properly identified as it moves through your automation workflow.

Step 6 – Retrieve Data in Make
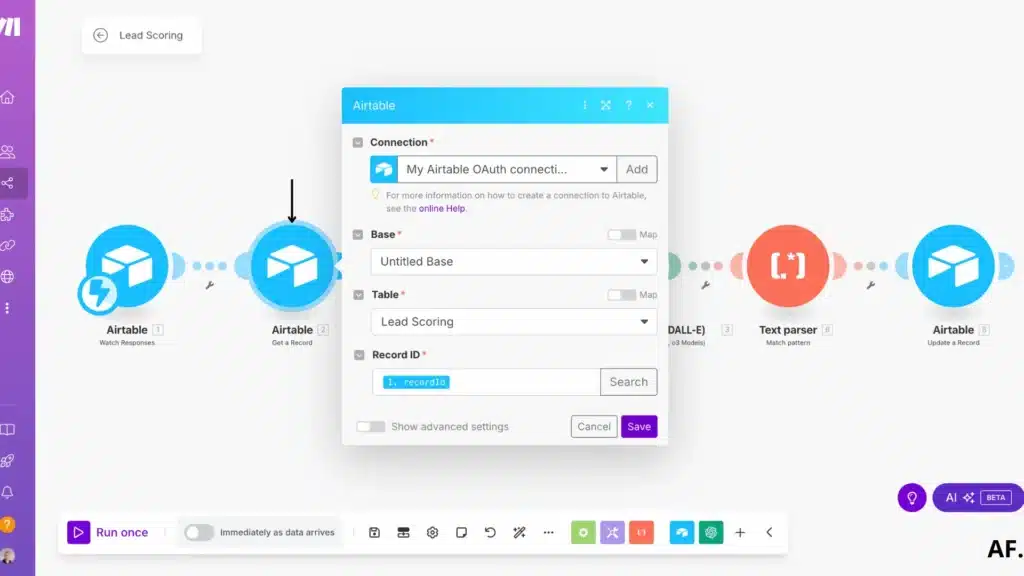
Add the recordId value to the “Get a Record” module in the Airtable category. When your automation successfully runs, this value will be populated automatically. The recordId connects your webhook with the specific form submission in Airtable. This ensures you retrieve the complete submission data for further processing in your Make scenario.
Add a “Set Multiple Variables” module from the Tools category. Create two variables: one for pain points and another for the source. Use the join function to convert these arrays into strings with commas as separators. This formatting makes the data more usable in subsequent steps of your automation. The join function will transform multiple selections into a single text field with values separated by commas.

Step 7 – Add AI
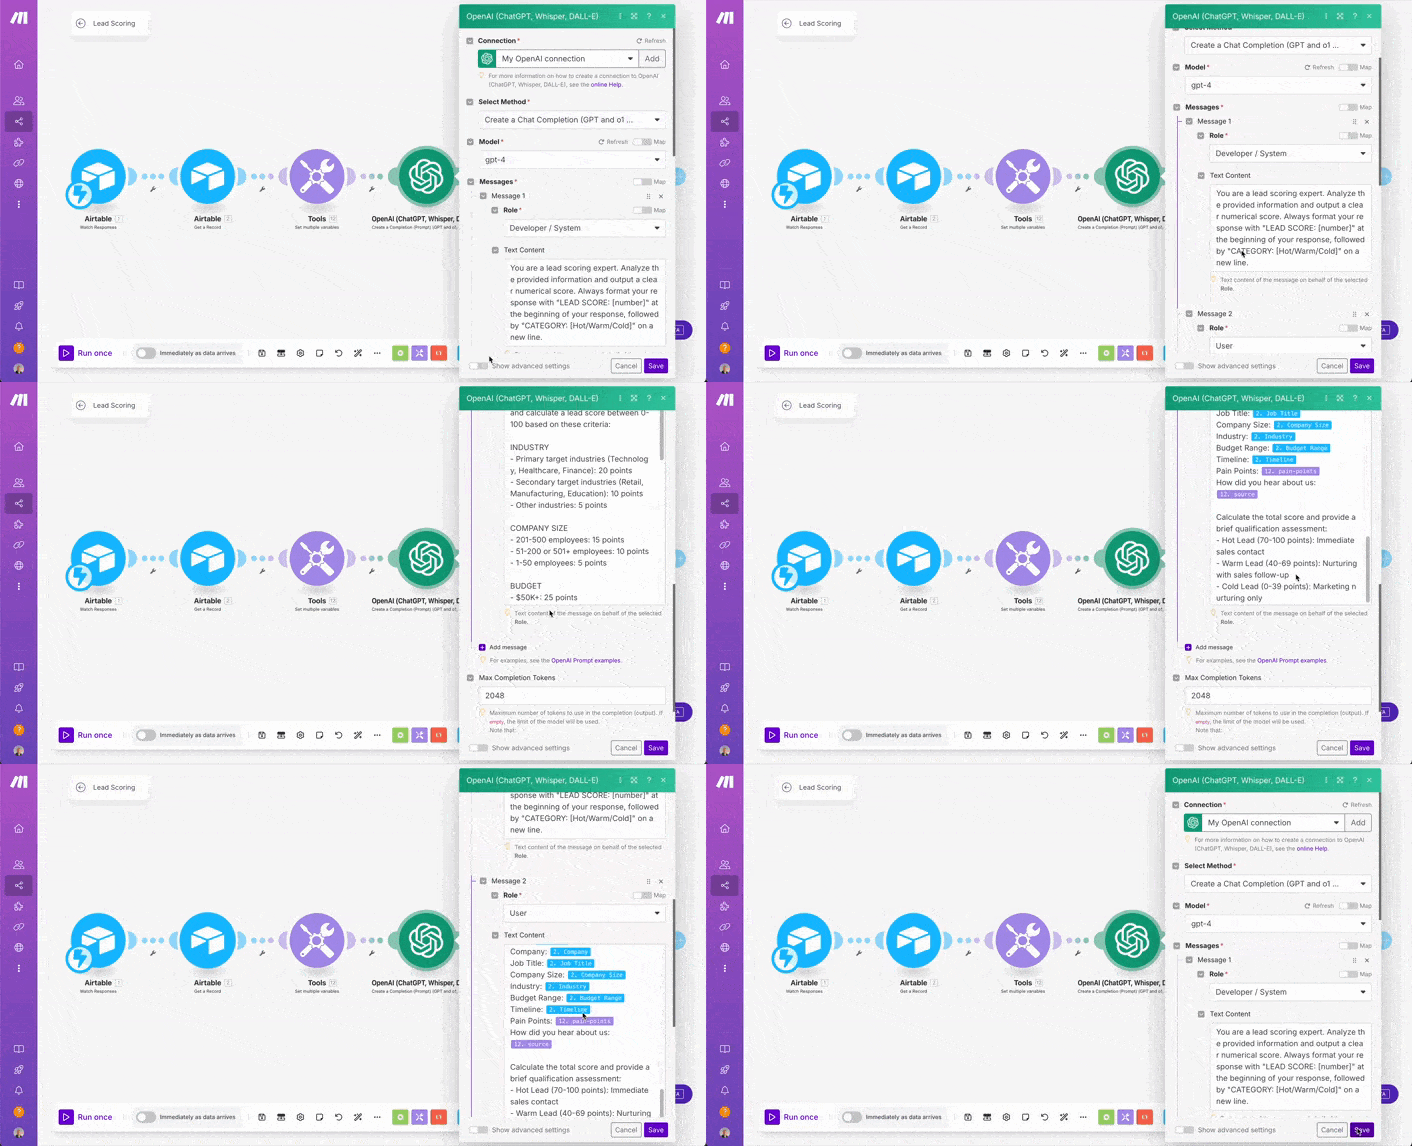
Add the GPT-4 model to your automation workflow. Paste your custom prompt text in the Messages Items.
Developer / System :

You are a lead scoring expert. Analyze the provided information and output a clear numerical score. Always format your response with "LEAD SCORE: [number]" at the beginning of your response, followed by "CATEGORY: [Hot/Warm/Cold]" on a new line.

User :

Analyze the following lead information and calculate a lead score between 0-100 based on these criteria:

INDUSTRY
- Primary target industries (Technology, Healthcare, Finance): 20 points
- Secondary target industries (Retail, Manufacturing, Education): 10 points
- Other industries: 5 points

COMPANY SIZE
- 201-500 employees: 15 points
- 51-200 or 501+ employees: 10 points
- 1-50 employees: 5 points

BUDGET
- $50K+: 25 points
- $20K-$50K: 20 points
- $5K-$20K: 10 points
- Under $5K: 5 points

TIMELINE
- Immediately: 20 points
- 1-3 months: 15 points
- 3-6 months: 10 points
- 6+ months: 5 points

JOB TITLE
- Decision-maker (CEO, Director, VP): 15 points
- Influencer (Manager, Team Lead): 10 points
- Other roles: 5 points

LEAD INFORMATION:
Name: {{2.Name}}
Email: {{2.Email}}
Company: {{2.Company}}
Job Title: {{2.`Job Title`}}
Company Size: {{2.`Company Size`}}
Industry: {{2.Industry}}
Budget Range: {{2.`Budget Range`}}
Timeline: {{2.Timeline}}
Pain Points: {{12.`pain-points`}}
How did you hear about us: {{12.source}}

Calculate the total score and provide a brief qualification assessment:
- Hot Lead (70-100 points): Immediate sales contact
- Warm Lead (40-69 points): Nurturing with sales follow-up
- Cold Lead (0-39 points): Marketing nurturing only
This will instruct the AI to analyze the lead data and generate specific insights based on the collected information. The OpenAI model will process the form submission details and return structured results that you can use in subsequent steps of your automation.
Step 8 – Filter the Result
Add a “Match Pattern” module to extract the lead score value from the GPT-4 response. This module uses regular expressions to identify and isolate specific information from text. Configure it to find the numerical lead score value within the AI’s analysis. This extracted score will then be available in your final automation steps, allowing you to route leads based on their quality.

In the text field of the “Match Pattern” module, insert the variable containing the AI’s response. Select the output from your GPT-4 module to ensure the pattern matching analyzes the correct text. This directly connects the AI’s analysis to your pattern-matching logic, ensuring the lead score is accurately extracted from the comprehensive response.

Step 9 – Update the Row
Add the final “Update a Record” module to complete your automation workflow. This module includes the recordId parameter to identify which specific lead record should be updated. This ensures the AI-generated lead score and any other processed information get saved back to the correct entry in your Airtable database. The update action will enrich your original lead data with valuable scoring insights generated by your automation.
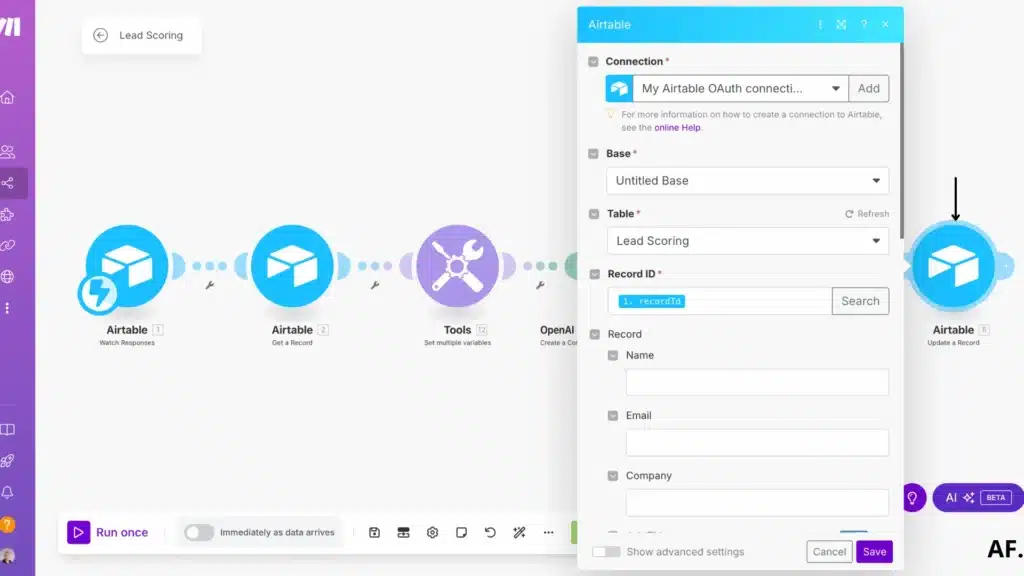
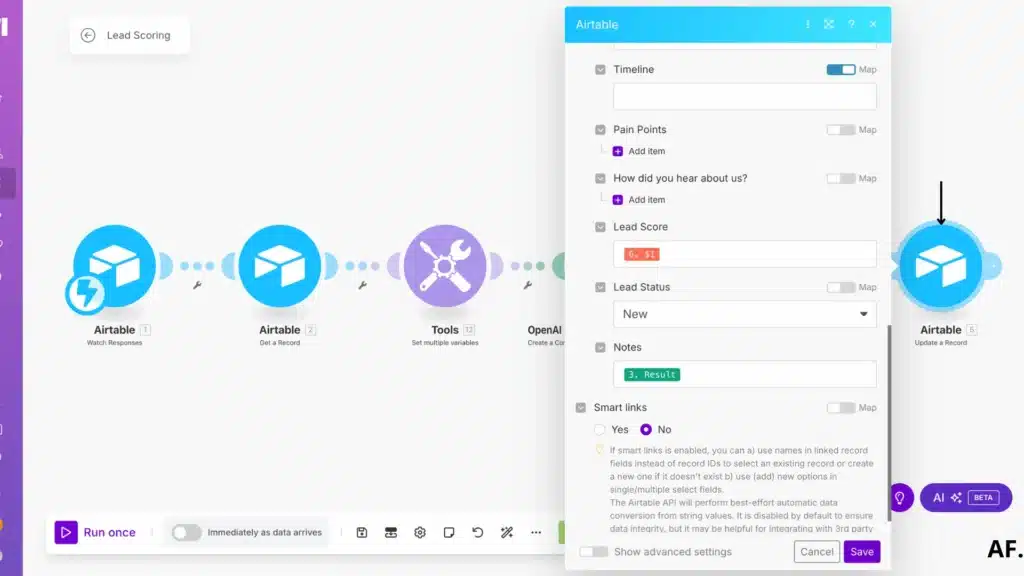
Add the parsed text result from your pattern matcher to the lead score field. Then, set the lead status field to “New” for all incoming submissions. Add the complete AI analysis result for the Notes field to provide context for your sales team. This gives them valuable insights about each lead directly in Airtable without checking multiple systems.
Step 10 – Save and Run the Scenario
Save your completed scenario and click the “Run” button to test your automation. This will process any existing form submissions through your workflow to confirm everything works correctly. Watch the execution to see each module activate in sequence. Your Airtable records will update with lead scores, statuses, and AI-generated notes if successful. Make adjustments before setting your scenario to run automatically with each new form submission.

Results
Excellent! Your automation is working perfectly. The form data has successfully transferred to your Airtable, and the AI has generated lead scores as designed. This confirms that your workflow functions correctly, from form submission to data processing and AI analysis.
With this setup, your team now has an automated lead qualification system that:- Captures prospect information through your custom form
- Processes the data through Make’s automation platform
- Analyzes lead quality using GPT-4
- Updates your Airtable with scores and insights
- Prepares leads for immediate follow-up
This automation will save your team significant time while ensuring consistent lead evaluation. You can now focus on engaging with the most promising prospects rather than manually scoring and prioritizing leads.

Step 11 – Automate the Scenario
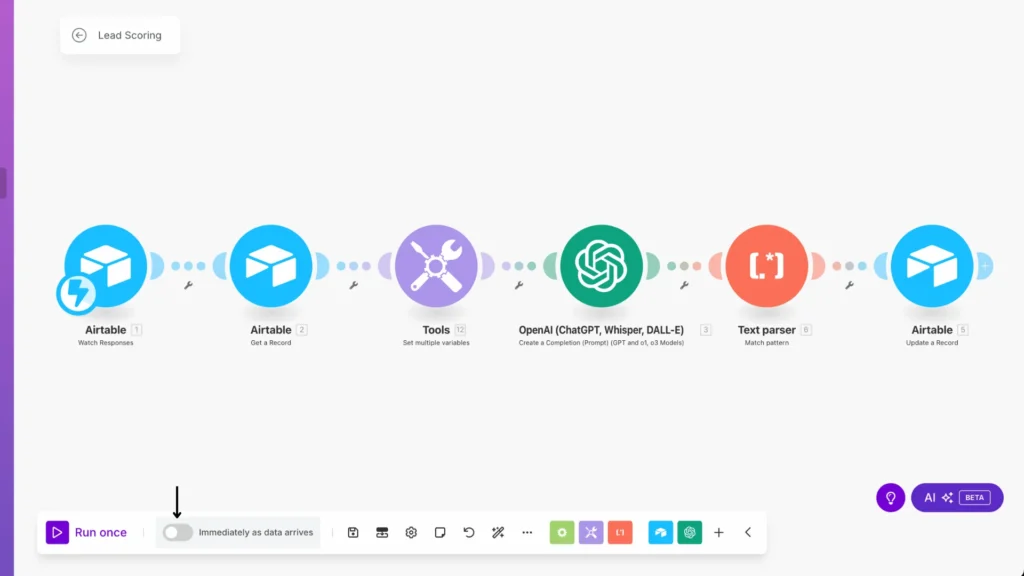
Setting your scenario to “Immediately as data arrives” ensures your lead scoring process runs automatically without manual intervention. This real-time processing means every form submission will trigger your automation instantly. Your sales team will always have up-to-date lead scores and AI insights when prospects submit their information.
This final configuration transforms your system into a truly automated lead qualification engine. Now, your team can focus entirely on following up with qualified leads rather than managing the scoring process. Combining Airtable’s form capabilities, Make’s automation, and GPT-4’s analysis creates a powerful, hands-off lead management system that scales with your business.
How can this automation help You?
Implementing automation for lead scoring can transform your sales and marketing efforts. Instead of manually sorting through leads, this system does the heavy lifting for you—analyzing data, assigning scores, and prioritizing the most promising prospects.
Here’s how it benefits your business:✅ Saves Time – No more manual lead qualification. Automation instantly processes and scores leads, allowing your team to focus on closing deals.
✅ Improves Accuracy – AI evaluates leads based on consistent criteria, reducing human bias and ensuring only the best prospects move forward.
✅ Boosts Sales Efficiency – Your sales team spends more time engaging with high-quality leads than chasing unqualified ones.
✅ Enhances Personalization – By understanding a lead’s pain points, budget, and readiness, you can tailor your outreach for higher conversion rates.
✅ Real-Time Updates – As new leads enter your system, they are scored and categorized instantly, keeping your database current.
This automation integrates Make, Airtable, and AI to ensure your lead qualification process is faster, smarter, and more effective.
Final Thoughts
Automating your lead scoring with Make and AI isn’t just about efficiency – it’s about transforming your entire lead qualification process. By implementing the strategies we’ve discussed, you can identify and prioritize high-quality leads more accurately than ever. Remember, continuously optimizing and refining your automated system is the key to success. Ready to revolutionize your lead scoring? Get started with these automation techniques today!
FAQs
How is AI used for lead scoring?
AI analyzes lead data points like company size, budget, and timeline. It assigns numerical scores based on your criteria. The system automatically categorizes leads as hot, warm, or cold. This happens in real-time without human intervention.
How to use AI for lead generation?
Create forms to capture lead information. Connect them to AI through automation tools like Make. Set up scoring criteria based on your ideal customer profile. Let AI evaluate leads as they come in. Focus your sales efforts on high-scoring prospects.
How to calculate lead scoring?
Assign point values to different lead attributes. Give higher points to ideal characteristics. Lower points go to less desirable traits. Add up the points for a total score. Set thresholds for hot, warm, and cold categories.
How do you create a lead scoring model?
Identify your best customers’ common traits. Determine which factors predict buying readiness. Assign point values to each factor. Set up scoring ranges for lead qualification. Test and refine your model regularly. Automate the process using tools like Airtable and Make.

Further Ressources
- How To Automate Expense Reports with Make in 9 Steps
- How to Use Midjourney to Create AI-Generated Images in Make
- How to Automate Data Entry with Make: Step-By-Step Guide
- How To Send Emails From Google Sheets Using Make
- How to Automate Your Follow-Up Emails in Make
- How To Automate Lead Nurturing Workflows In Make
- How to Automatically Write Blog Posts With Make and AI
- How to Use Leonardo AI Image in Make: Step-By-Step Guide

