How to Automatically Write Blog Posts With Make and AI
Have you ever felt overwhelmed by the constant need to produce fresh blog content? You’re not alone! In today’s modern times, content creation is more demanding than ever. The good news? Combining Make (formerly Integromat) with cutting-edge AI technology can automate your blog post-writing process like never before. According to recent statistics, 60% of content marketers struggle to produce content consistently, but that’s about to change! In this comprehensive guide, I’ll show you how to automatically write blog posts with Make and AI, saving time while maintaining quality. Get ready to revolutionize your content creation workflow!

Let’s Start!
Setting Up Your Make Blog Automation Workflow
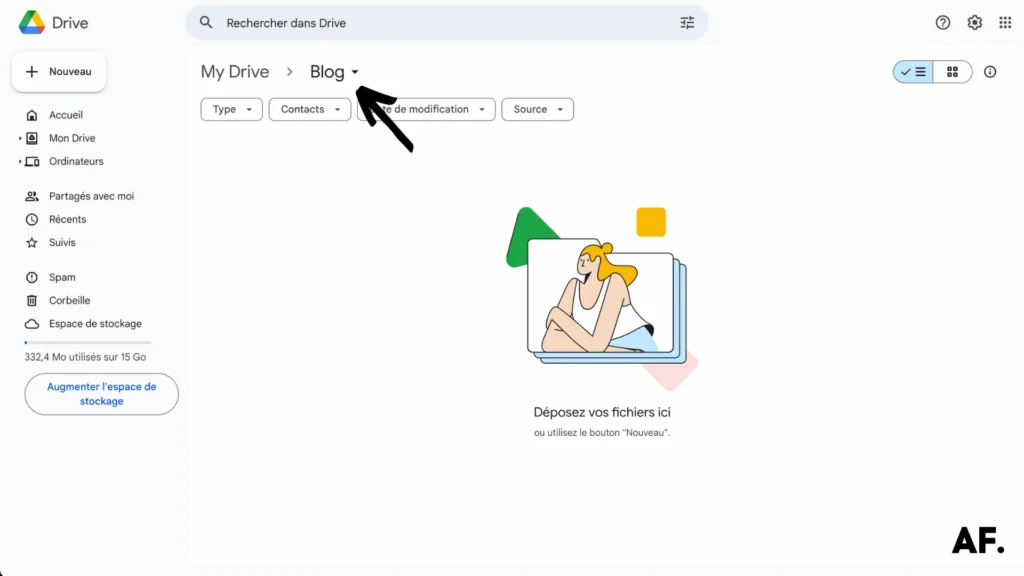
Step 1: Create a Folder on Google Drive
Log in to Google Drive. Click “+ New” in the top-left corner. Select “New Folder” from the dropdown. To organize your content, name it “Blog” or “Automated Blog Posts.“
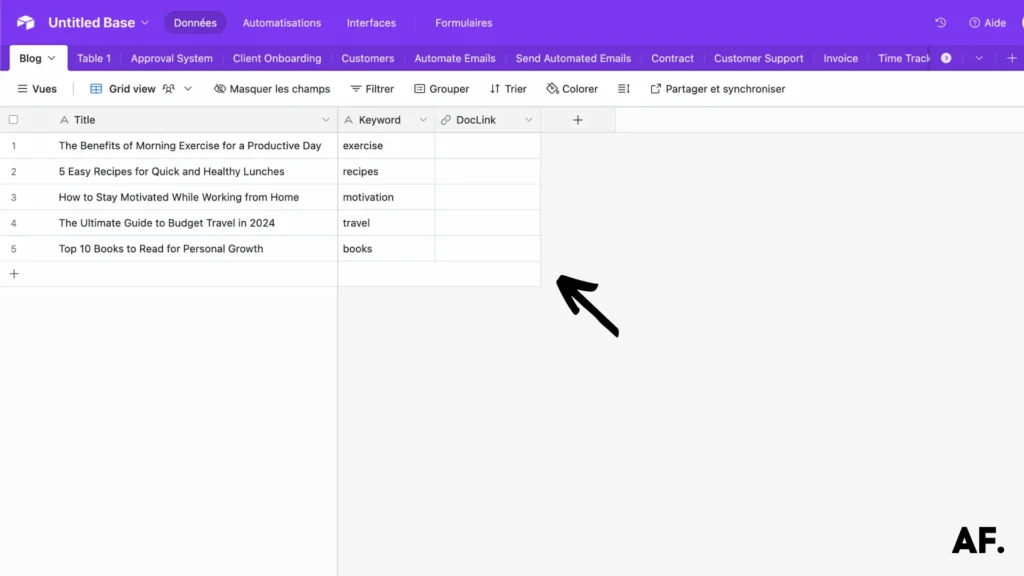
Step 2: Create a Table in Airtable
Sign in to Airtable. Click “+ Add a base” to create a new workspace. Name it “Blog Content Automation” or similar.
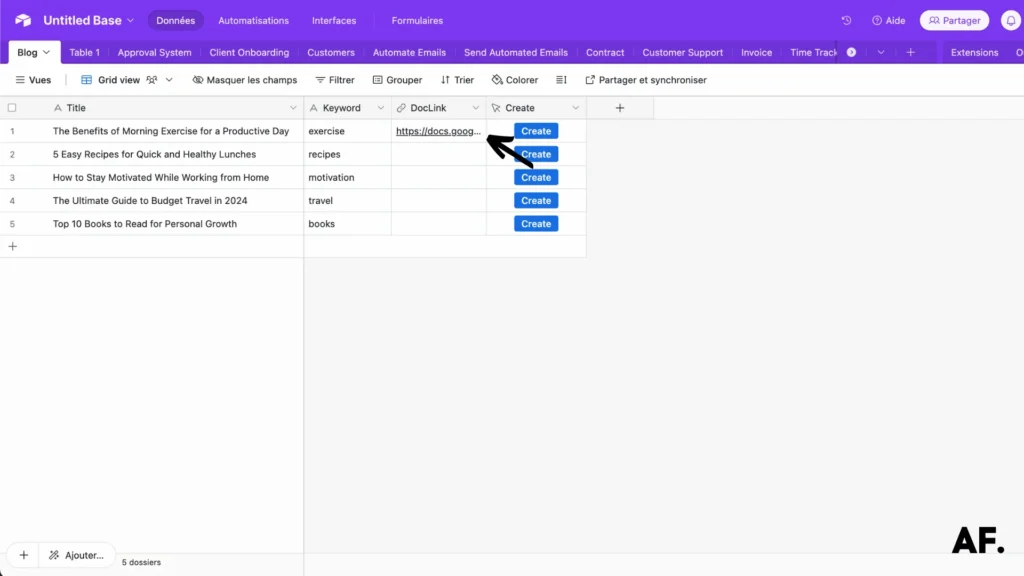
Set up your table with these essential columns:- Title (Single line text)
- Keywords (Single line text)
- Google Doc Link (URL)
Step 3: Create Your Scenario in Make
Time to bring some automation magic into your blogging workflow! First, log into your Make account (don’t have one yet)? No worries – they offer a free tier with 1,000 monthly operations, perfect for getting started with this system.
Click the “Create a new scenario” button. Name it “Blog” or “Automated Blog Post Creator” for your automation workflow.
Step 4: Add a Trigger
In Make, search for and add the “Custom webhook” module from the Webhook category. This will serve as the trigger that initiates your blog automation workflow.
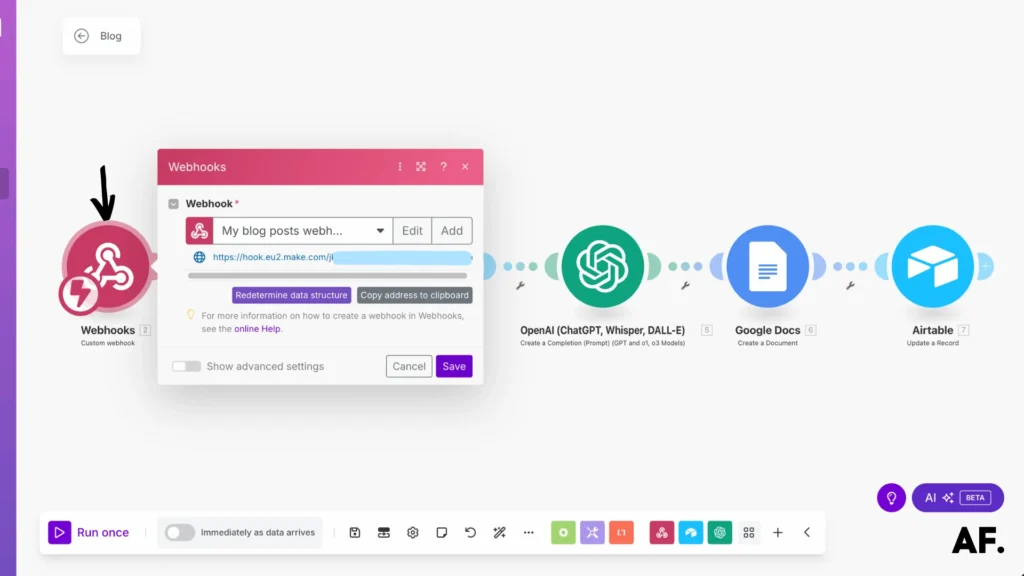
Step 5: Connect Make With Airtable
In Airtable, add a new Formula column named “Create“. Enter this formula:
“<your_webhook_url>?ID=”&RECORD_ID()
This connects your Airtable record to the Make webhook, bypassing the record ID as a parameter.
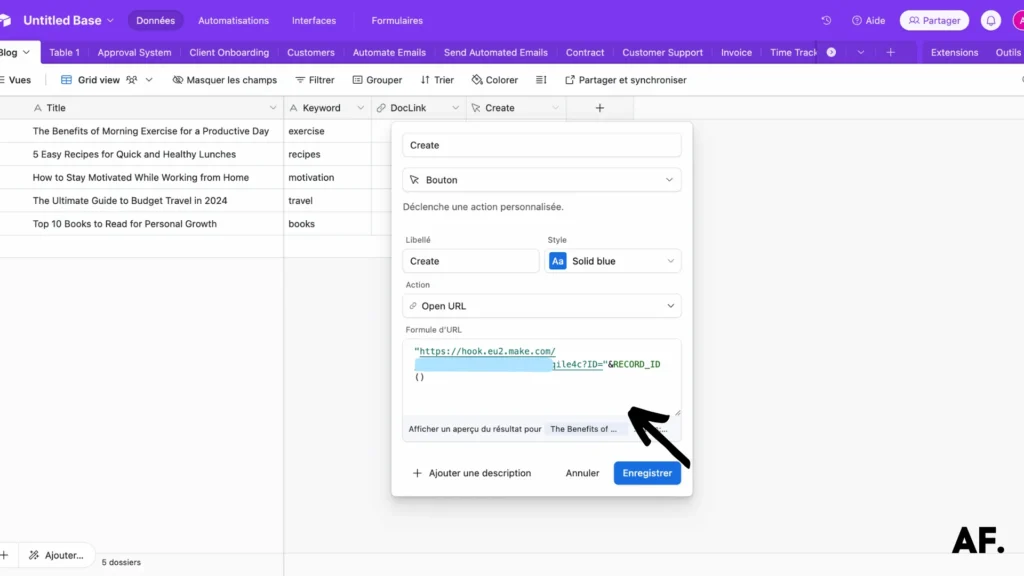
- Title
- Keywords
- Google Doc Link
- Create (formula column with a webhook)
Each row will represent a blog post in your automated workflow.
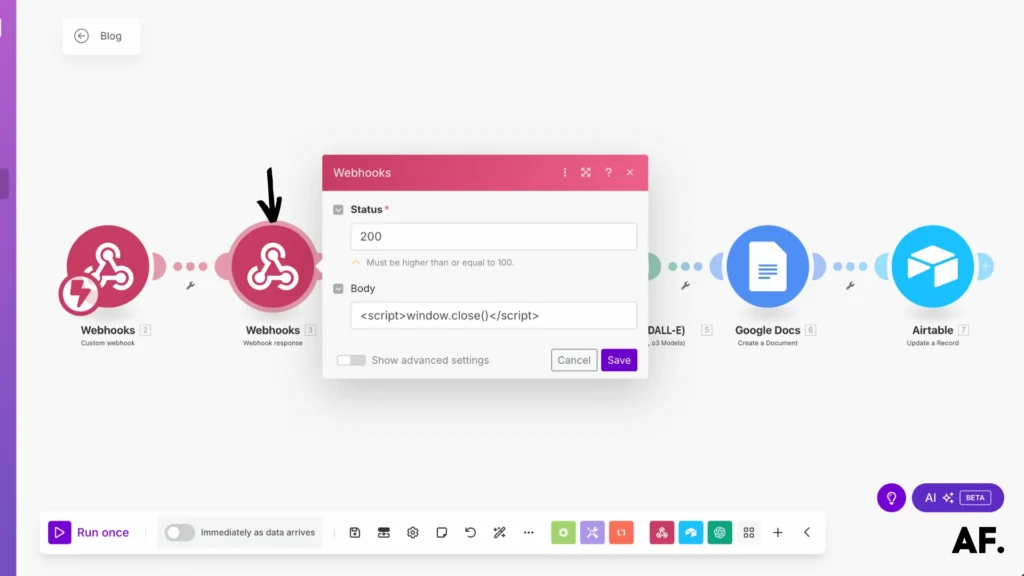
In Make, add a “Webhook response” module from the webhooks category. After clicking the Create button, the secondary success window will automatically close.
Copy the script, like the image below, into the webhook response module. This ensures your automation provides feedback after running and properly finishes the process without opening any windows.
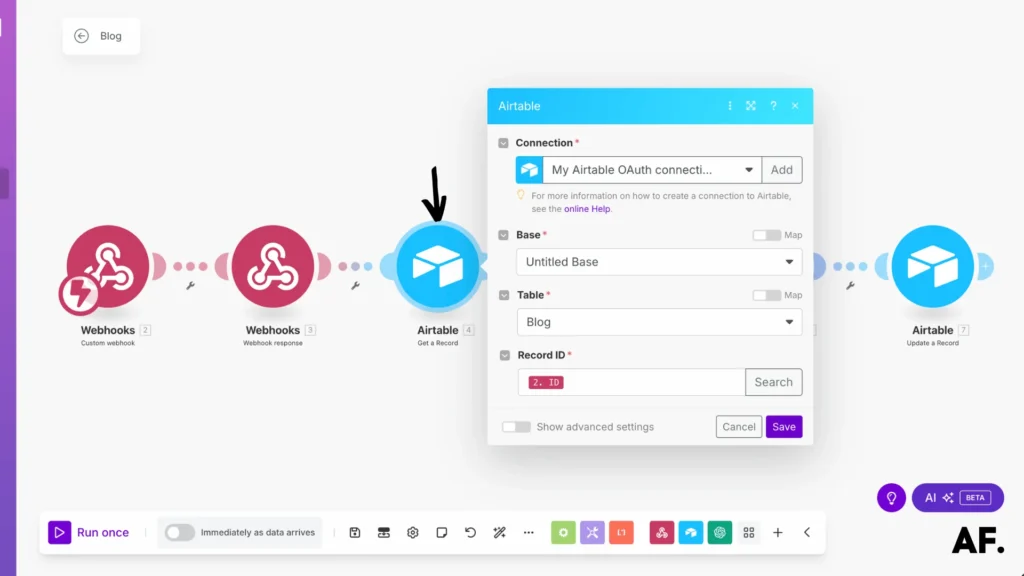
In Make, click the “+” icon after your current module. Search for “Airtable” and select the “Get a record” operation.
Configure this module to retrieve data from your Airtable base by mapping the Record ID from your webhook trigger to this Airtable module. This connects your trigger to the specific blog post data.
Step 6: Add ChatGPT Integration
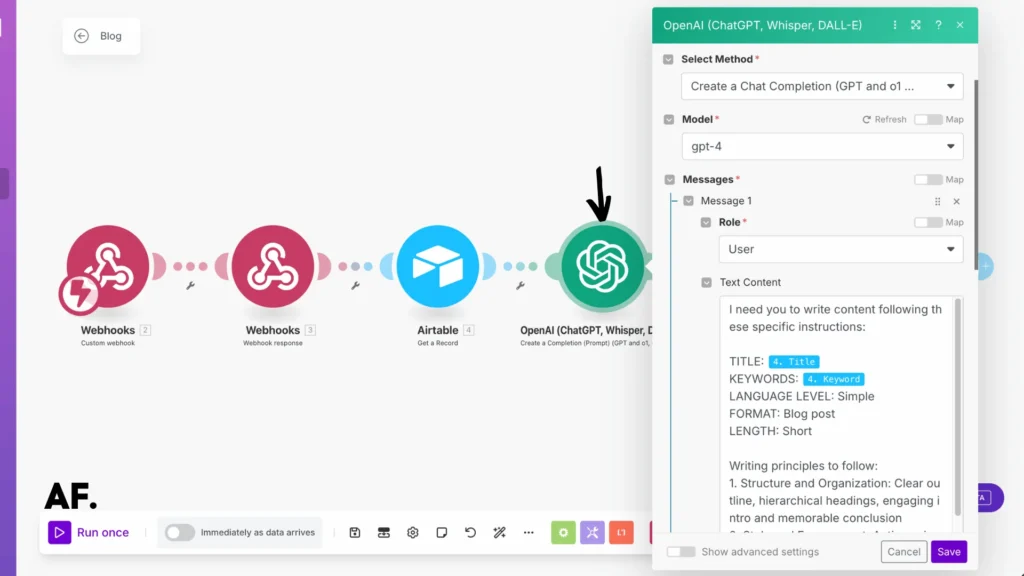
Click the “+” icon after your Airtable module. Search for “ChatGPT” and select it. Choose the “Create Completion” operation.
Connect to your OpenAI account and select your preferred ChatGPT model based on your quality and budget needs.
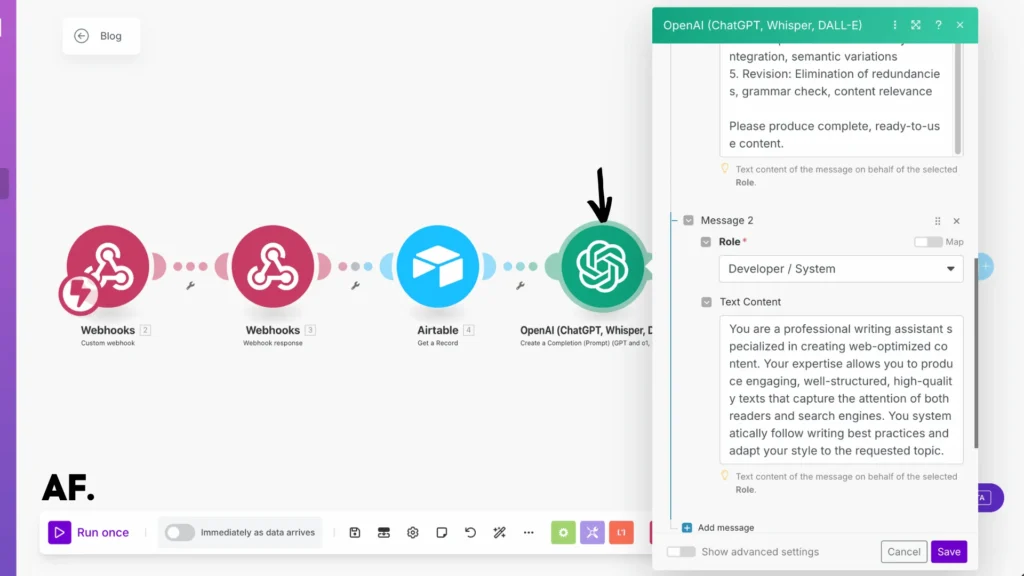
Configure your prompt template with:- System prompt (instructions for how ChatGPT should behave) :
You are a professional writing assistant specialized in creating web-optimized content. Your expertise allows you to produce engaging, well-structured, high-quality texts that capture the attention of both readers and search engines. You systematically follow writing best practices and adapt your style to the requested topic.- User prompt (specific instructions for each blog post) :
I need you to write content following these specific instructions:

TITLE: [Insert your title here]

KEYWORDS: [Insert your keywords here]

LANGUAGE LEVEL: [Choose: Simple/Intermediate/Advanced]

FORMAT: [Choose: Blog post/How-to guide/Product description/Email/Other]

LENGTH: [Choose: Short/Medium/Long]

Writing principles to follow:

1. Structure and Organization: Clear outline, hierarchical headings, engaging intro and memorable conclusion

2. Style and Engagement: Active voice, sentence variation, tone adapted to audience

3. Readability: Short paragraphs, bullet points when needed, well-spaced layout

4. SEO Optimization: Natural keyword integration, semantic variations

5. Revision: Elimination of redundancies, grammar check, content relevance

Please produce complete, ready-to-use content.- Title field to {1}
- Keywords field to {2}
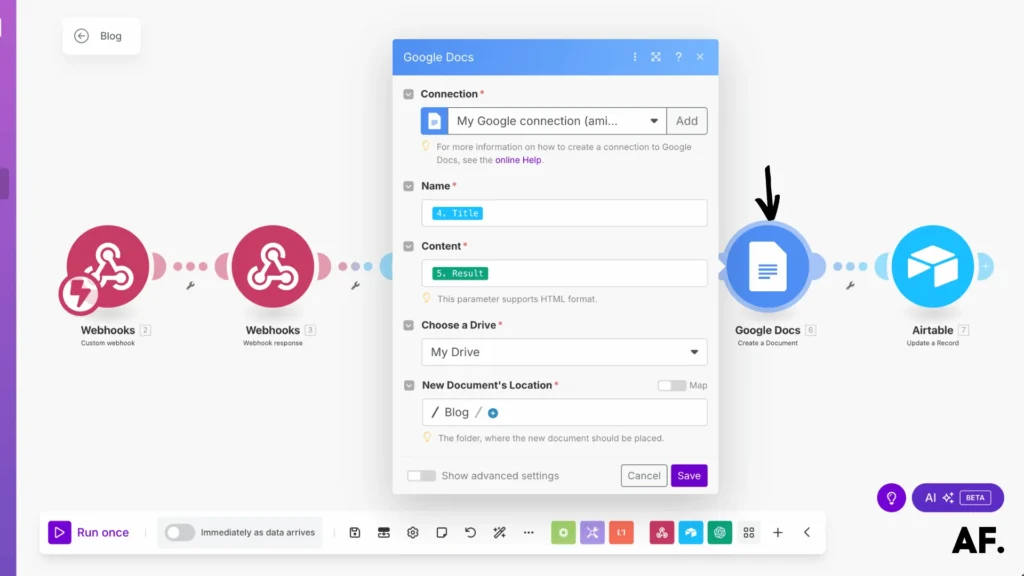
Step 7: Create a Google Doc
Click the “+” icon after your ChatGPT module. Search for “Google Docs” and select it. Choose the “Create a Document” operation.
Connect to your Google Drive account and configure:- Title: Map from your Airtable Title field
- Folder ID: Set to your “Blog” folder created earlier
- Content: Connect to the output from your ChatGPT module
This automatically creates a formatted Google Doc with your AI-generated content.
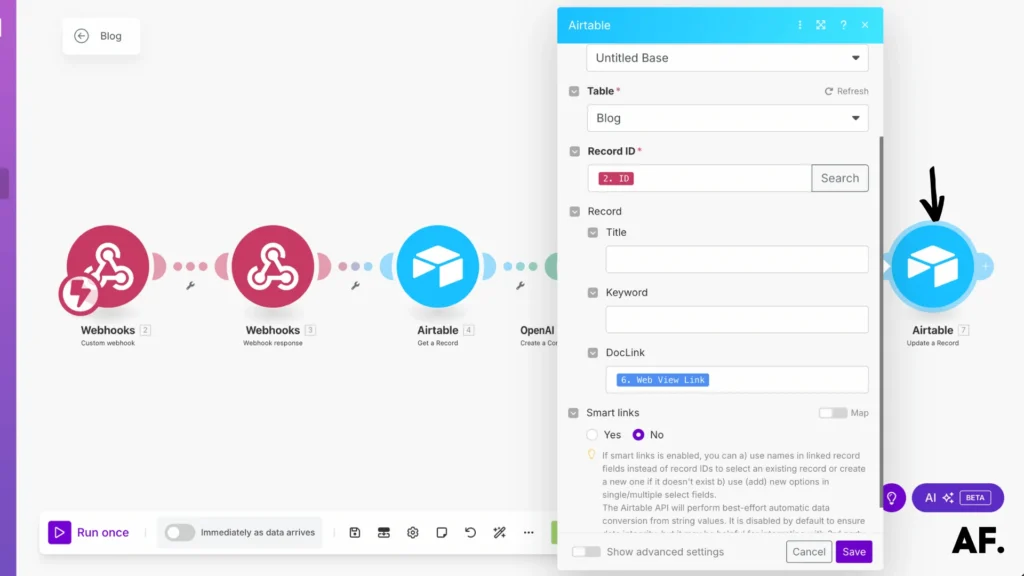
Step 8: Update the Table automatically
Click the “+” icon after your Google Docs module. Search for “Airtable” and select the “Update a Record” operation.
Configure this module to update the original Airtable record by mapping the Google Doc URL from the previous step to the “Google Doc Link” field in Airtable.
This completes your automation cycle, turning your Airtable base into a content management system with direct links to each finished document.
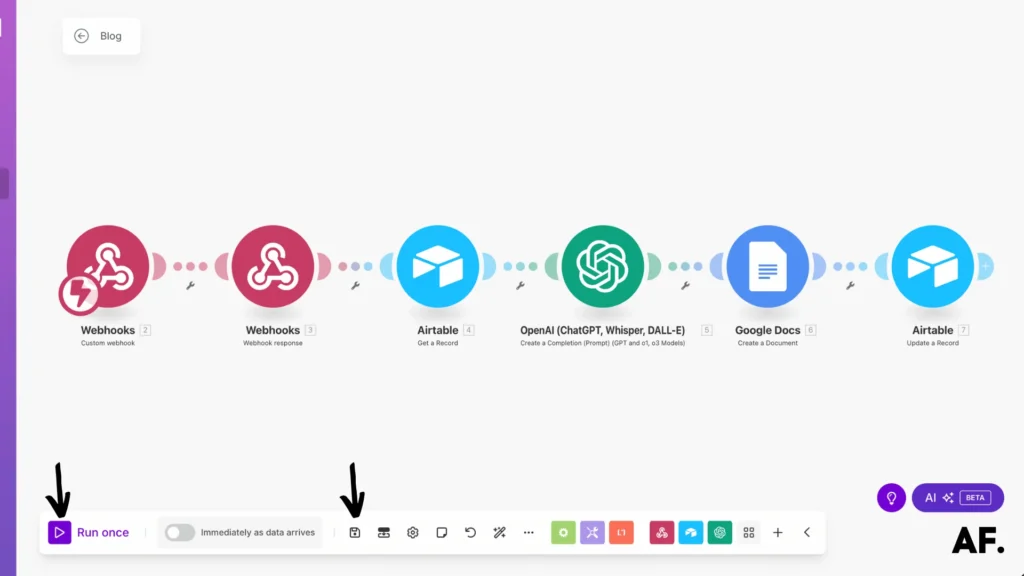
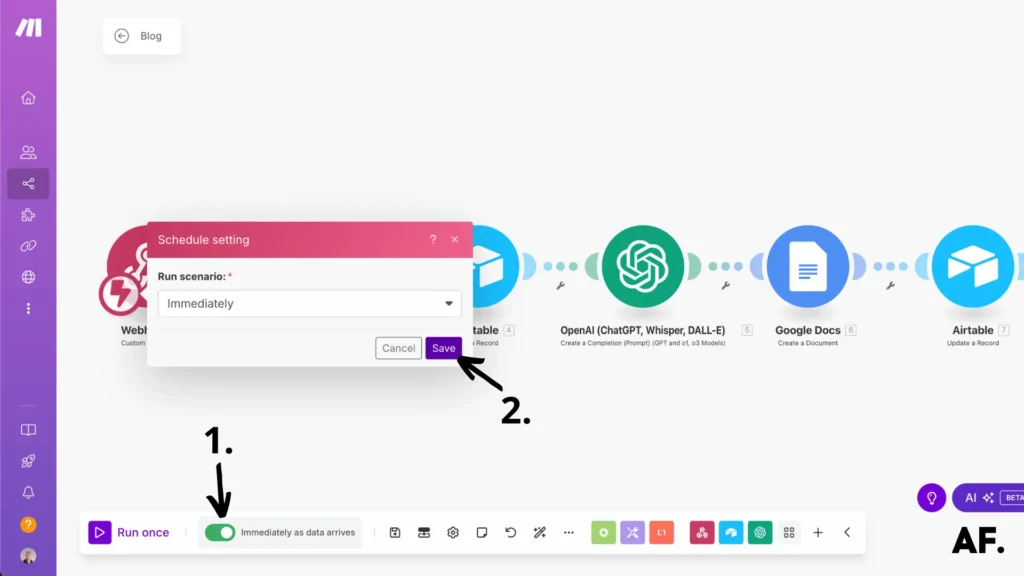
Step 9: Save And Run
Click “Save” at the bottom to preserve your automation workflow.
Go to your scenario dashboard and flip the toggle switch to “On” to activate your workflow.
Run a test using the manual run option with a sample Airtable record before fully implementing it.
Check your Airtable base and Google Drive folder to verify:- A new Google Doc was created with AI-generated content
- The Airtable record is updated with the Google Doc link
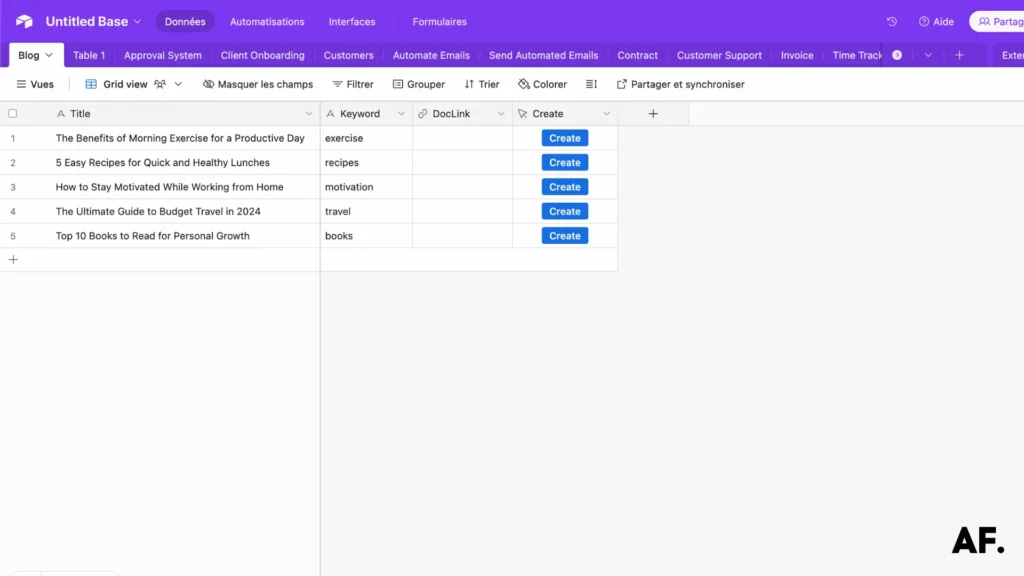
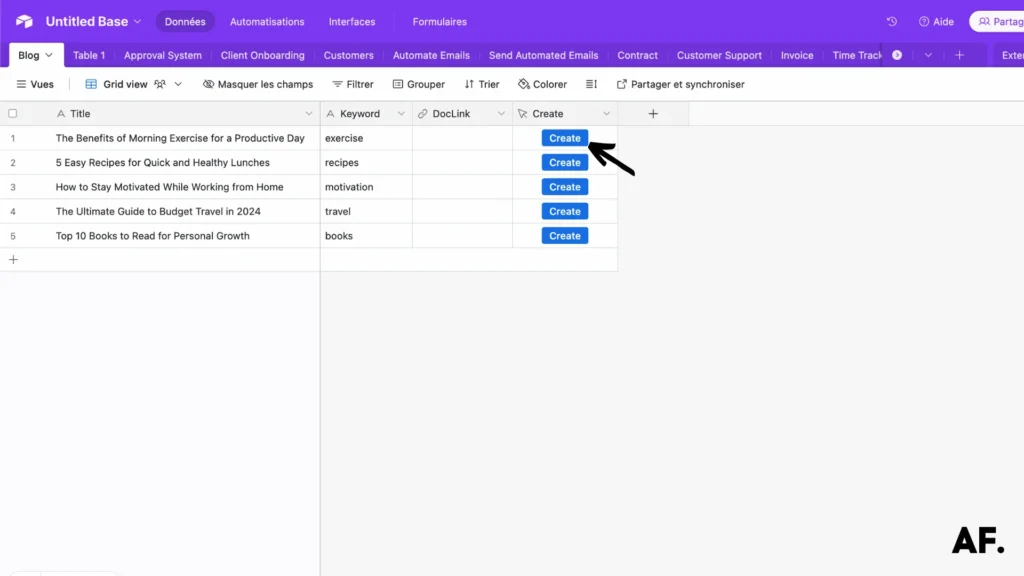
To use your completed automation:
1. Browse your Airtable base for a blog topic you want to write about.
2. Click the “Create” button in that row.
3. The automation will:- Pull your topic and keywords.
- Generate content with ChatGPT.
- Create a Google Doc
- Update Airtable with the document link.
You can transform your ideas into complete first drafts with a single click.
Results
Once your system is running smoothly, you’ll experience these benefits:- Automated blog drafts whenever you add topics to Airtable
- Google Docs is automatically created for each post
- Document links are automatically added to Airtable for easy access
- Significant time savings on initial drafts
- More consistent publishing as the blank page hurdle is removed
- Shift from content creator to content curator/editor
- Named according to your Airtable entry
- Filled with AI-generated content ready for your editing
- Created without manual writing effort
- The result of your custom automation system
- Time and energy saved that you can redirect to other priorities

- Well-structured content based on your topic and keywords from Airtable
- Coherent paragraphs, sections, and points
- A solid foundation ready for your editing and personal voice
- Content that puts you immediately in editing mode rather than starting from scratch
- A draft that needs only your expertise and perspective to finalize

– Monitor for new data in your webhook
– Create blog drafts automatically when you add topics to Airtable
– Requires no manual intervention between the idea and the draft
– Let you focus solely on content planning and refinement
- Scale it up by connecting to WordPress for direct publishing
- Add notifications to inform your team on Discord or Slack when drafts are ready
- Start simple and expand the system gradually as you become comfortable with it
Remember always to edit the AI-generated content to add your voice and expertise before publishing.
With this foundation in place, the possibilities are virtually infinite. Each small improvement will make your content workflow even more efficient.
Get this scenarioQuality Control and Human Touch
Let me share something I’ve learned: You can’t just rely on AI and automation to create truly outstanding content. Trust me, I learned this lesson the hard way when scaling our content operations.
I remember launching an ambitious blog project in which we tried to automate everything fully. The content was technically accurate, but lacked that special spark that made readers want to keep scrolling. Our engagement metrics tanked, and I quickly realized we needed to rethink our approach.
Here’s what I’ve found works best for quality control: Start with a solid review process that includes at least two sets of human eyes. I like to have our subject matter expert review for technical accuracy first, then have our senior editor review for flow and engagement. It’s incredible what subtle tweaks to tone and structure can do for readability.
Consistency is key to maintaining content quality. We use a detailed content checklist that covers everything from basic grammar to brand voice guidelines. But here’s the secret: Leave room for personality to shine through. Some of our best-performing pieces came from writers who weren’t afraid to inject their unique perspectives and real-world experiences.
Adding personal insights doesn’t mean going off-topic or being unprofessional. Instead, think about specific examples from your experience that could help readers better understand the concept. For instance, when editing a piece about digital marketing, I suggest adding a brief anecdote about a surprisingly flopped campaign, and what we learned from it.
The sweet spot between automation and authenticity comes from using tools strategically while preserving human creativity. Use AI tools for research and initial drafts, but always have experienced writers and editors shape the final product. They’ll catch nuances that machines miss and add those invaluable “I’ve been there” moments that readers connect with.
Remember: Quality content isn’t just error-free—it’s about being genuinely helpful and relatable to your audience. No algorithm can fully replicate that —at least not yet!
Conclusion
Automating your blog post writing doesn’t mean sacrificing quality for quantity. By leveraging Make and AI technology, you can create a powerful content creation system that saves time while maintaining your unique voice. Remember to regularly review and refine your automation workflow to ensure optimal results. Ready to transform your content creation process? Start implementing these strategies today! Subscribe to our newsletter to be the first to receive updates about automation and tutorials, giving you a competitive edge in implementation.
FAQS
How to automate blog posts using AI?
You can automate blog posts using AI by setting up a workflow in Make (formerly Integromat). First, create a folder in Google Drive and a table in Airtable to organize your content. Then, build a scenario in Make that connects Airtable, ChatGPT, and Google Docs. When you add a topic to your Airtable, the system automatically uses AI to generate content and create a Google Doc. You’ll still need to review and edit the AI-generated content to add your personal touch before publishing.
Is it OK to use AI to write blog posts?
Yes, using AI to write blog posts is OK, but you should always review and edit the content. AI is excellent for creating first drafts and overcoming writer’s block, but the article emphasizes that human input is essential for quality. The best approach is to use AI as a starting point and then add your expertise, personal experiences, and unique voice to make the content engaging and authentic.
Is it legal to use AI for blog posts?
Yes, it’s legal to use AI for blog posts. There are no laws prohibiting the use of AI in content creation. However, you should still follow standard content guidelines, such as avoiding plagiarism and respecting copyright. You’re responsible for the final content you publish, so review AI-generated content for accuracy and appropriateness before sharing it with your audience.
Will AI take over blogging?
No, AI won’t completely take over blogging. While AI can generate drafts and help with writing, the article clearly states that human input remains crucial for quality content. AI lacks personal experience, emotional connection, and the nuanced understanding human writers bring. The most effective approach combines AI efficiency with human creativity – using automation for initial drafts while relying on human writers and editors to add authentic perspectives and ensure the content truly connects with readers.

Further Ressources
- How To Automate Expense Reports with Make in 9 Steps
- How to Use Midjourney to Create AI-Generated Images in Make
- How to Automate xAI Grok with Make : Comprehensive Guide
- How To Send Emails From Google Sheets Using Make
- How to Automate Your Follow-Up Emails in Make
- How to Use FLUX AI Image Generator in Make: Step-By-Step
- How to Automate Perplexity AI with Make
- How to Use Leonardo AI Image in Make: Step-By-Step Guide