How to Use Leonardo AI Image in Make

Have you ever wondered how to harness the power of Leonardo AI’s incredible image-generation capabilities within Make (formerly Integromat)? You’re in for a treat! Leonardo AI has revolutionized the way we create digital art and images, and when combined with Make’s automation capabilities, the possibilities are truly endless. In this guide, we’ll walk you through everything you need to know about integrating Leonardo AI images into your Make workflows. Whether you’re a beginner or just starting, this step-by-step guide will help you get the full potential of these powerful tools.

Let’s dive in and transform your creative workflows!
What is Leonardo AI?
Leonardo AI is an advanced artificial intelligence tool that generates high-quality images, art, and design assets. It’s especially popular among digital artists, game developers, and content creators because it can create detailed, customizable visuals with just a few clicks.
Unlike traditional design software, which requires manual effort and artistic skills, Leonardo AI uses advanced machine learning models to bring ideas to life instantly. Users can input text prompts, tweak settings, and generate everything from concept art and character designs to textures and marketing materials.
One of Leonardo AI’s standout features is its focus on precision and style control. It allows users to fine-tune their creations, making it a favorite alternative to other AI art platforms like MidJourney and Stable Diffusion. Plus, it’s designed to be user-friendly, making AI-powered creativity accessible to beginners and professionals alike.
In short, Leonardo AI is an exciting tool that helps turn imagination into stunning visuals with minimal effort. Whether you’re a designer, a marketer, or someone who loves experimenting with AI art, it’s a game-changer!
Setting Up Your Make Scenario for Leonardo
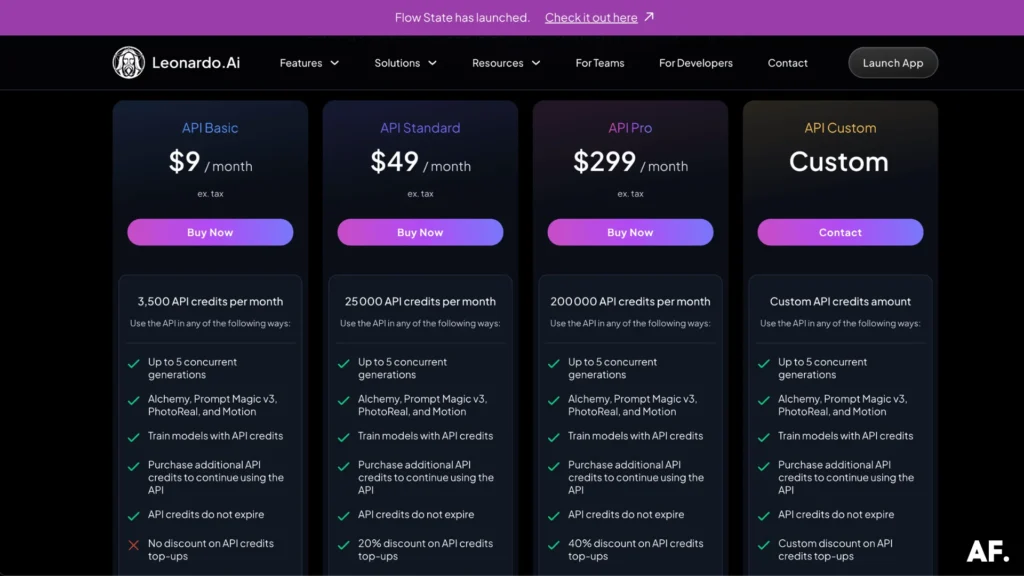
Step 1 – Choose Your API Plan
Ready to get started with Leonardo.ai? Visit their website and check out their subscription plans. If you’re beginning your AI art journey, I recommend starting with their $9 starter plan. It’s perfect for exploring the platform and familiarizing yourself with their API without a big commitment. Think of it as dipping your toes in the water before diving deeper!
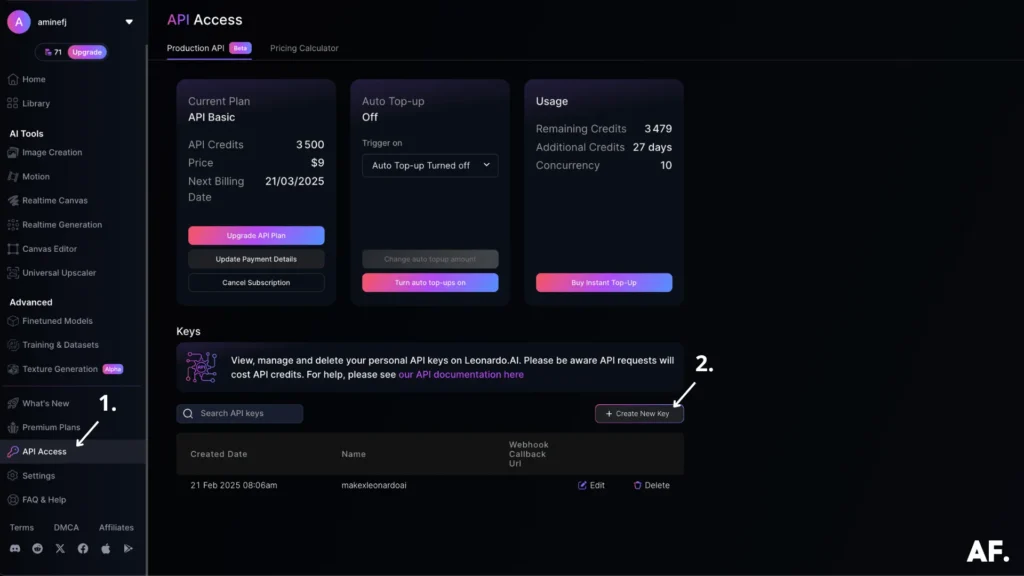
Step 2 – Create Your Token
Now that you’ve set up your account, let’s grab your API key – this will be your special access pass for all the cool stuff we’re about to create! Navigate to the API Access section in your dashboard and click ‘Create New Key.’ Here’s the important part: when your shiny new API key appears, copy it immediately and store it somewhere secure (I keep mine in a password manager). Trust me, you’ll want this key handy for the exciting projects we’ll tackle next!
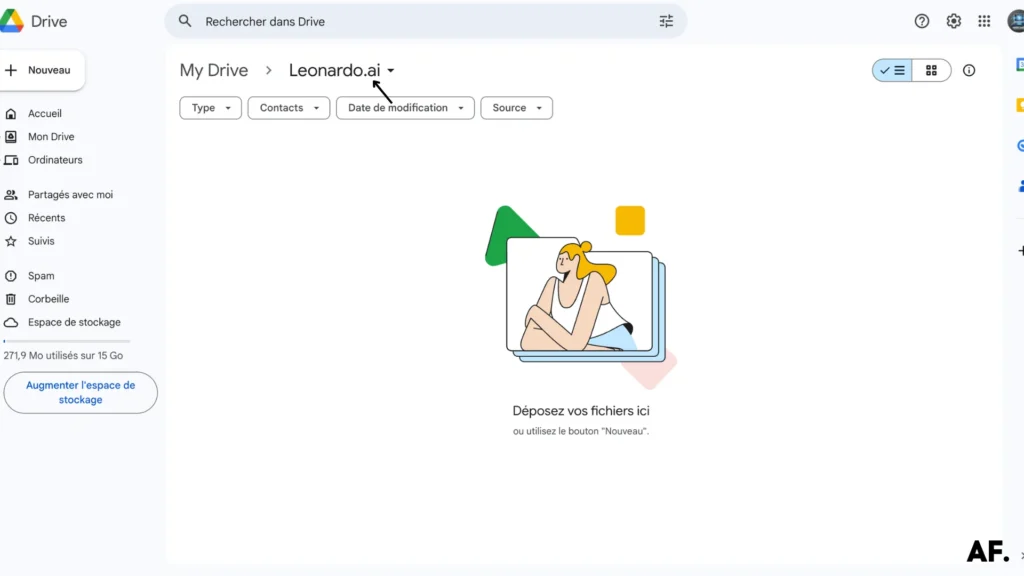
Step 3 – Folder On Google Drive
Before we dive into creating AI art, let’s get organized! Create a dedicated Leonardo.ai folder in your Google Drive. This will be your gallery for all your AI-generated masterpieces. A central storage space makes tracking your creative journey and accessing images from any device easy.
Step 4 – Create Your Scenario
It’s time to set up the automation! Head over to make.com, and let’s create a scenario—imagine building a digital assembly line that will connect Leonardo.ai with your Google Drive. Don’t worry if you’re new to Make—we’ll go through this step-by-step, and before you know it, you’ll have a seamless workflow that saves you tons of time, trust me.
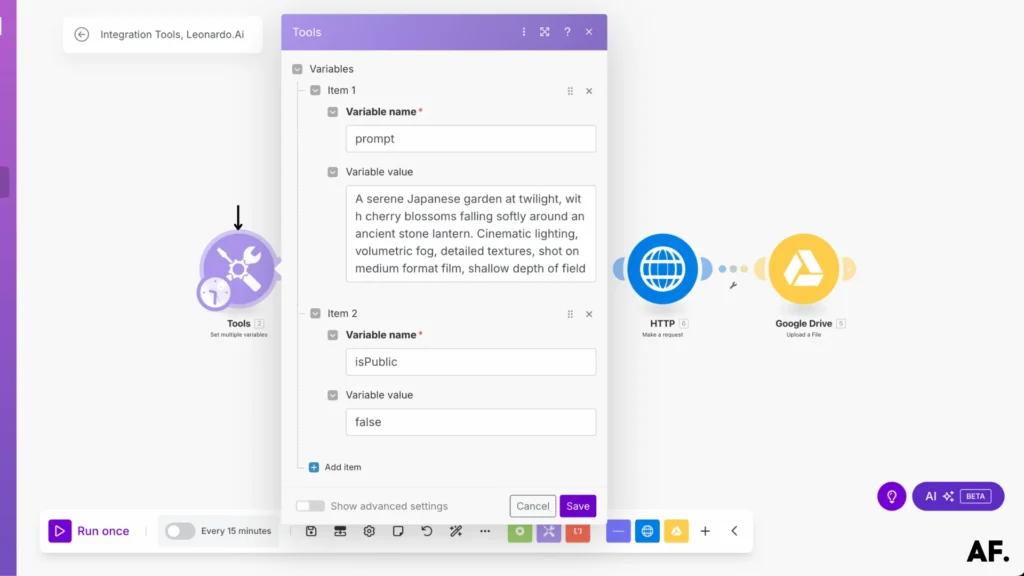
Step 5 – Add Your First Module
Let’s start building our automation with something simple but powerful. In Make, our first building block will be the ‘Set Multiple Variables‘ module – you’ll find this under the Tools section. We’ll keep things straightforward by setting up just two key variables:- ‘prompt‘ – this is where we’ll store our image description
- ‘isPublic‘ – a simple true/false switch that controls whether your creations are visible to others
Think of these variables as little storage containers that will help us tell Leonardo.ai precisely what we want it to create and how we want to share it.
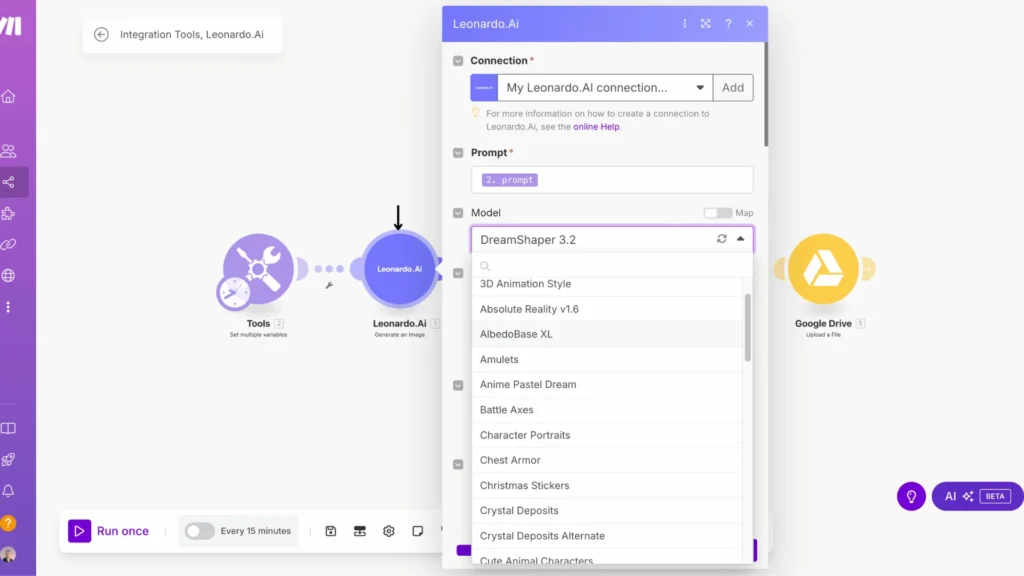
Step 6 – Add Leonardo AI Module
Now for the exciting part: connecting Leonardo.ai to our automation! Add the ‘Leonardo AI Generate Image‘ module as your next step. Remember that API key we saved earlier? Here’s where it comes in handy! Click ‘Add Connection‘ and paste it into your token to link everything up.
Once connected, we’ll configure two key settings:- Connect your ‘prompt‘ variable to the prompt field – this will tell Leonardo what kind of image to create
- For the AI model, we’ll use DreamShaper 3.2. It’s my go-to choice for beginners because it creates stunning and versatile images.
Pro tip: Think of model selection as choosing different artistic styles. Each has a unique personality when interpreting your prompts!
Next, you’ll need to tell Leonardo.ai how many images to create per prompt. You can set your desired amount in the ‘Number of Images to generate‘ field. I usually choose one image per generation, which gives you enough variations without overwhelming your storage space. Remember, each image counts toward your monthly generation limits, so choose wisely!
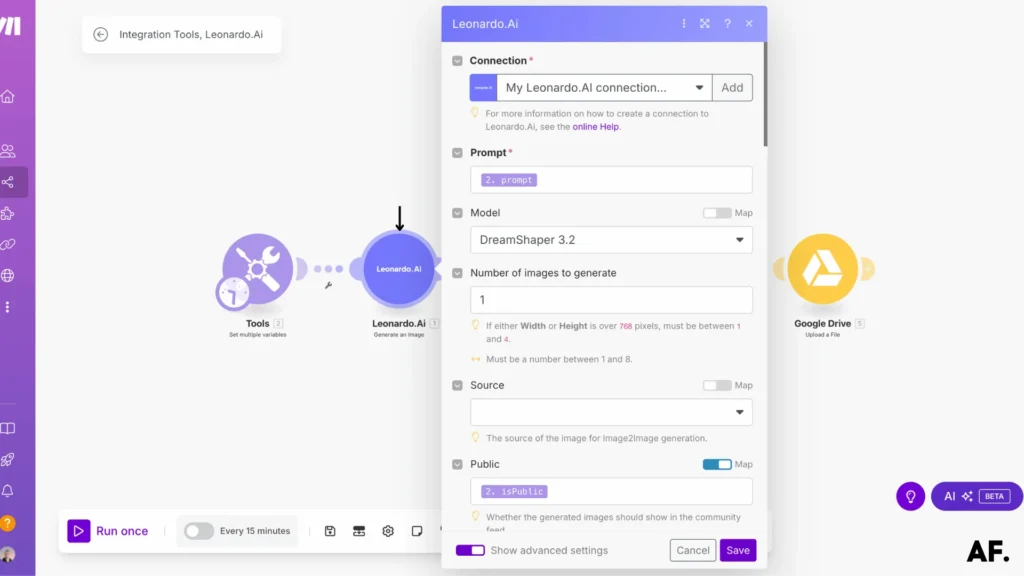
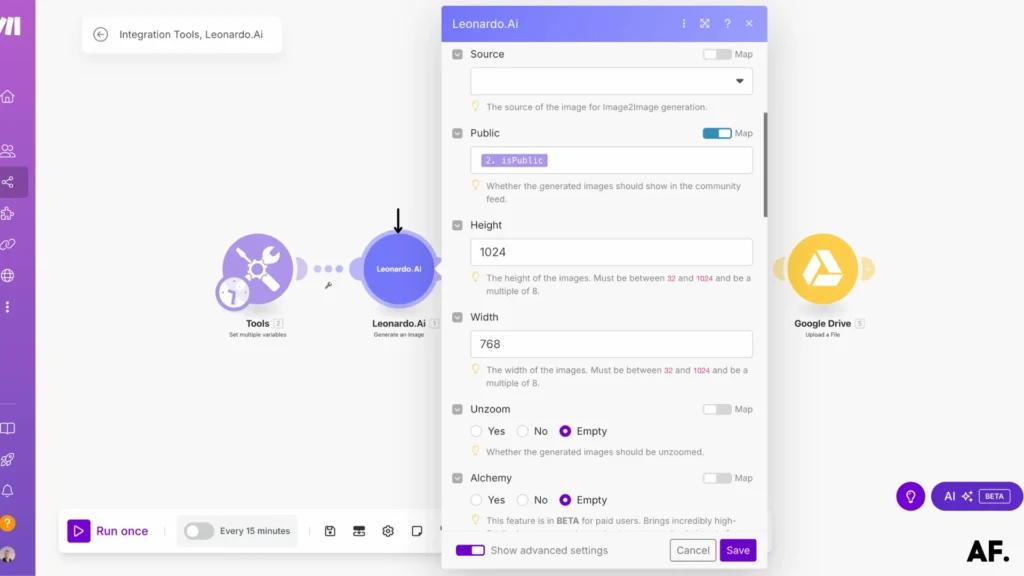
Now, let’s fine-tune your image settings! Connect your ‘isPublic‘ variable to the Public field. This lets you control whether your creations are visible in the Leonardo.ai community. Next comes the fun part: choosing your image dimensions. I typically select 768×1024 pixels for portrait images—it’s a sweet spot for quality and versatility. But feel free to experiment! Just remember that larger dimensions might take more time to generate.
A quick tip: If you plan to share your images on social media, consider platform-specific dimensions, such as 1080×1920 for Instagram stories or 1200×628 for Facebook posts!
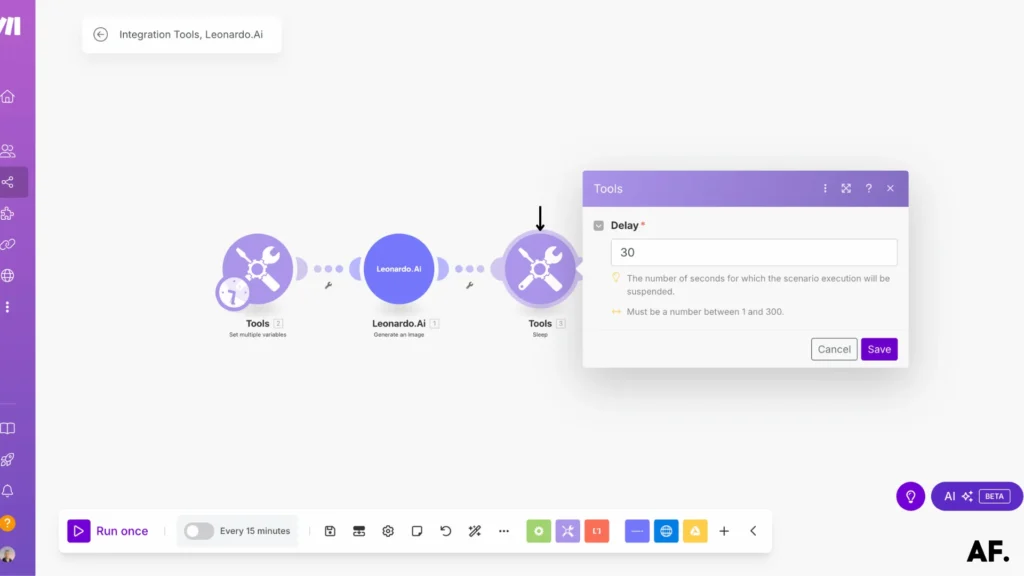
Step 7 – Delay
Many overlook the crucial step of adding a Delay module (found in Tools) and setting it for about 20-30 seconds. Think of this as giving Leonardo.ai a creative breather—it needs a little time to work its magic and generate your images. Without this pause, our automation might move forward too quickly and miss catching your freshly created artwork!
I usually set mine to 25 seconds—the ‘Goldilocks zone’ works just right. This gives enough time for most generations while keeping your automation running smoothly.
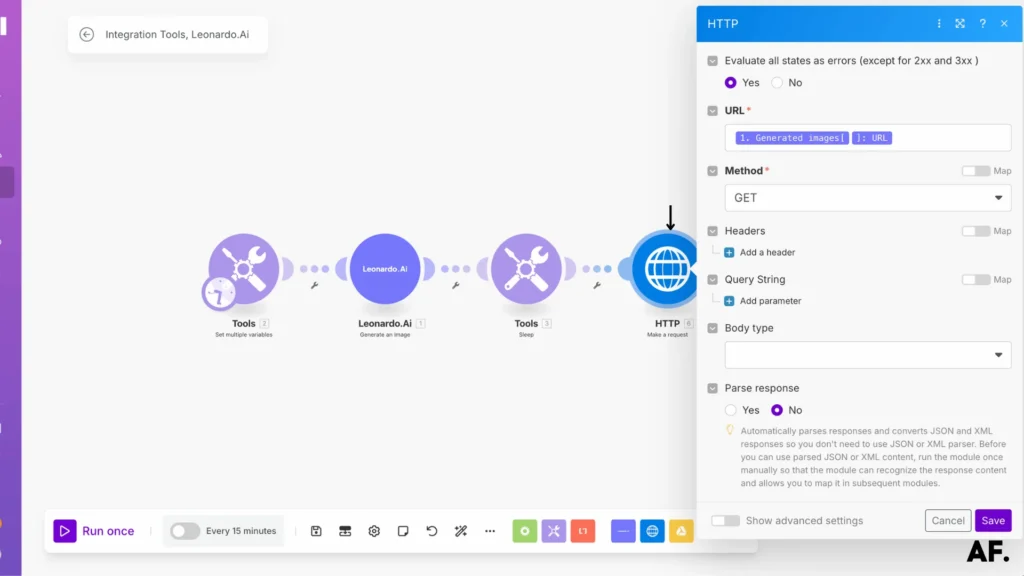
Step 8 – Get The File
Now it’s time to grab your freshly generated image! Add the ‘Get File‘ module from the Leonardo.ai app as your next step. Here’s the key part: in the module settings, you’ll only need to connect the ‘Image URL‘ field – this is where the magic happens. The module will automatically convert the image URL into binary data (think of it as packaging your image into a format that’s perfect for storage and sharing).
A quick tip: Make sure you map only the URL field. The other fields can stay empty since we only need the image data!
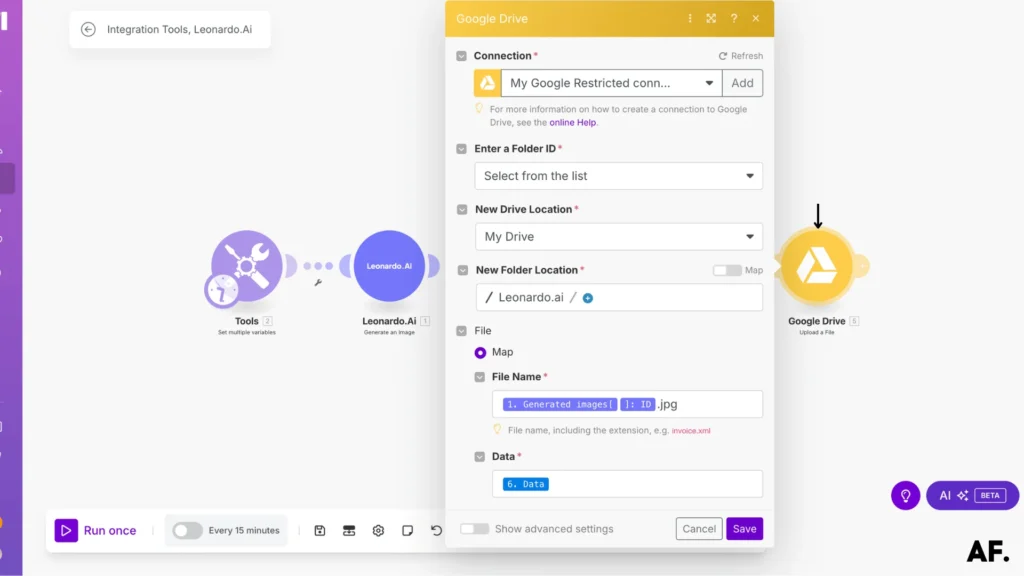
Step 9 – Upload The File
Time to give your AI creation a home in Google Drive! Add the ‘Upload a File‘ module, and let’s connect the dots:- For the File field, use the binary data we just grabbed from the previous module
- Point to your ‘Leonardo.ai‘ folder we created earlier
- Here’s a pro tip for the filename: end it with ‘.jpg‘ – this tells Google Drive it’s an image file!
To keep things organized, I like to name my files with a timestamp or description of the prompt. Something like ‘space_unicorn_001.jpg’ makes it easy to find specific images later. The best part? Once this runs, your AI masterpiece will automatically land in your designated folder!
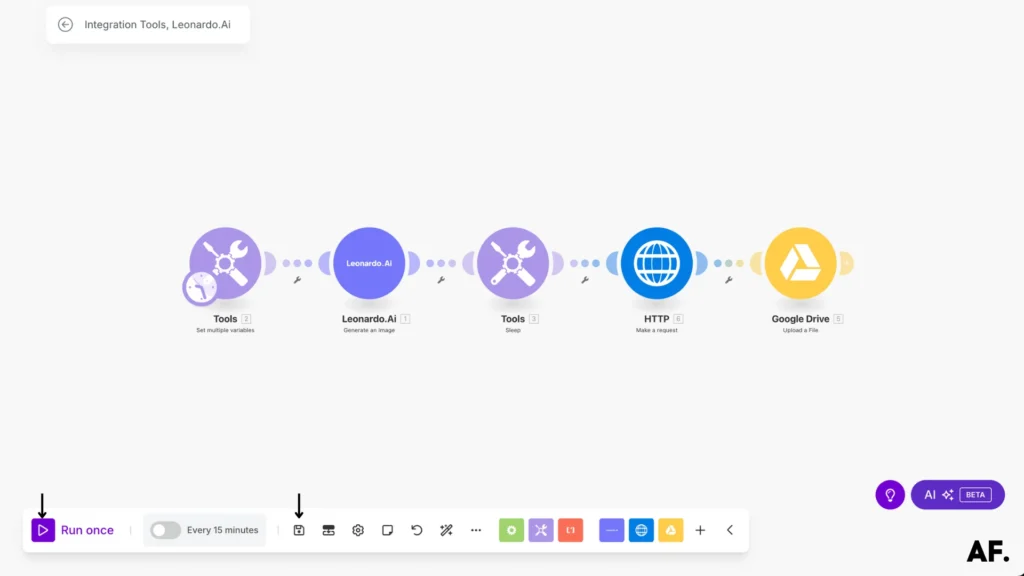
Step 10 – Save And Run
It’s time for the exciting finale—let’s bring your automation to life! Click the ‘Save‘ button to preserve all your hard work, then hit ‘Run‘ to watch your creation spring into action. In just a few moments, you’ll see the whole process unfold, from the prompt to AI generation to your image appearing neatly in your Google Drive folder.
Pro tip: To ensure everything is adequately connected during your first test run, try a simple prompt, such as ‘sunset over mountains.’ This is perfect for testing the waters!
Results
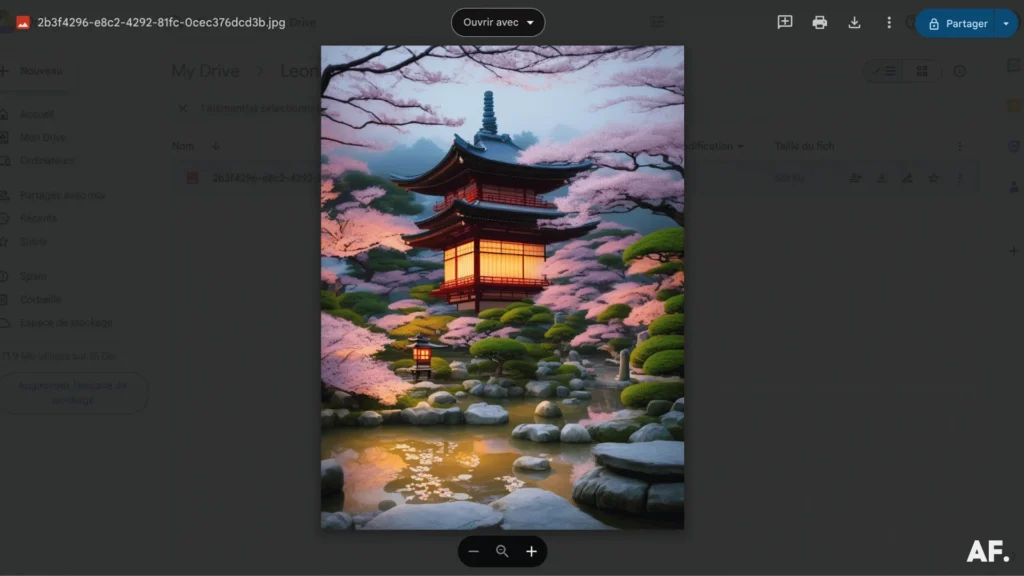
Success! The first magical moment you’ll notice is your AI-generated image appearing automatically in your Google Drive folder—no manual downloading or uploading needed. It’s like having a personal art assistant who delivers your creations straight to your digital gallery! Check your Leonardo.ai folder; you should see your first masterpiece safely stored and ready for use.
Take a moment to appreciate what you’ve built: a completely automated pipeline that takes your creative ideas from concept to stored artwork with just a few clicks. It’s pretty cool.
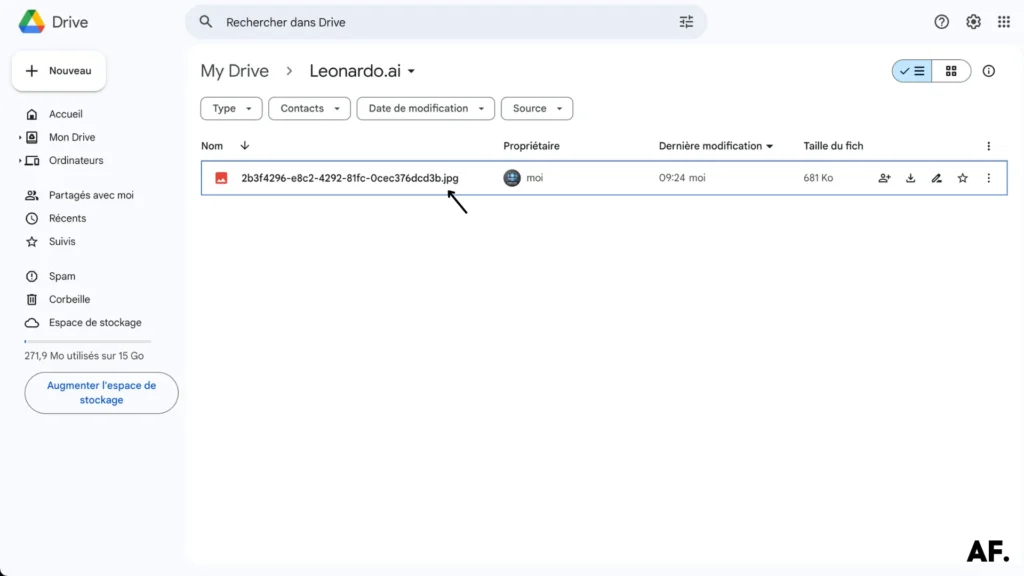
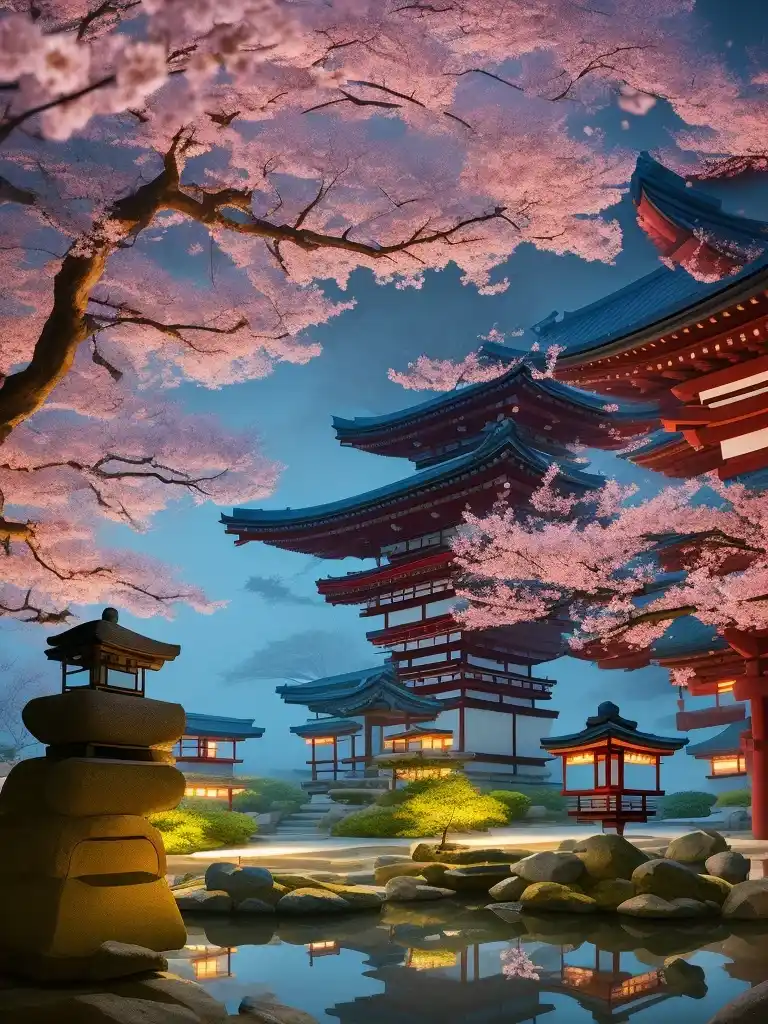
Double-click your newly generated image in Google Drive, and voilà – feast your eyes on your AI-created artwork in all its glory! This is where you see your prompt transformed into a visual masterpiece. When you open a new creation, it’s like unwrapping a gift from your personalized art generator!
Here’s a terrific alternative way to view your creations: head to the Library section in Leonardo.ai! This is your personal AI art gallery where you can browse through all the images you’ve generated via your Make automation. It’s handy for tracking your creative journey and seeing how your prompts translate into different visual styles. Plus, everything in one place makes it easy to compare different generations or track how your prompts have evolved.
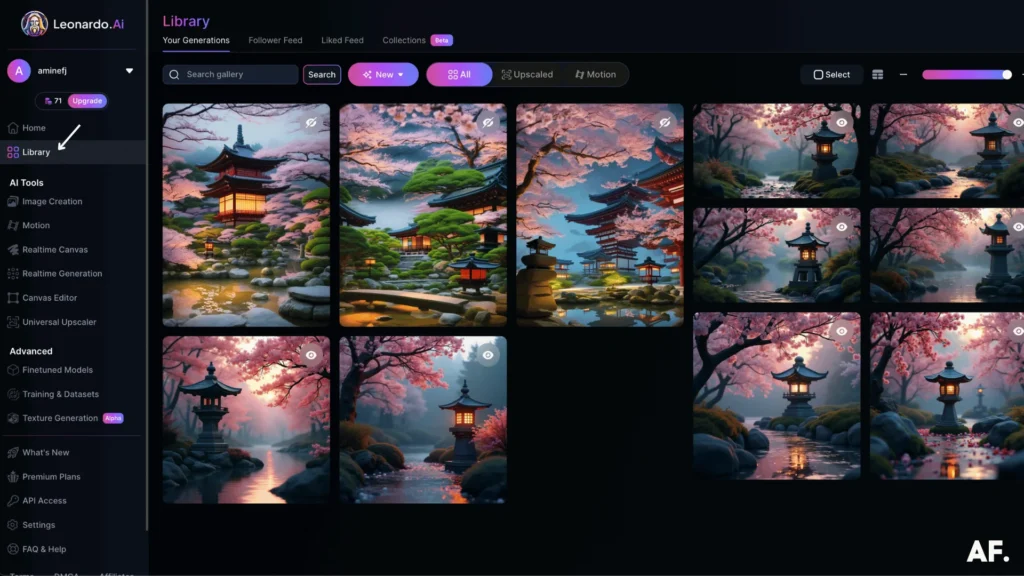
Here is what I generated with Leonardo AI using Make


Why Choose Leonardo AI Over Others?
With so many AI image generators, you might wonder: What makes Leonardo AI unique? Here’s why it stands out from the crowd:
Unmatched Creative Control
Leonardo AI gives users a high level of customization, allowing for fine-tuned adjustments to style, composition, and details. Whether you need hyper-realistic renders or stylized artwork, it provides more precision than many alternatives like MidJourney or Stable Diffusion.
Fast & Efficient
Speed matters! Leonardo AI is known for its quick generation times, which means you can create high-quality images faster than other AI models. No more long waits—just instant creativity at your fingertips.
Designed for Professionals & Beginners
Unlike some AI tools that cater mainly to tech-savvy users, Leonardo AI balances power and ease of use. Whether you’re a pro game designer or a beginner exploring AI art, its intuitive interface makes creating stunning visuals simple.
Consistent & High-Quality Outputs
Many AI tools struggle with consistency, especially when generating characters or maintaining a specific style across multiple images. Leonardo AI excels at keeping outputs aligned with user preferences, making it ideal for projects that require uniformity.
Free & Accessible
While some AI platforms require expensive subscriptions, Leonardo AI offers a generous free plan, making it accessible to creators on a budget. Plus, its paid plans provide even more features for those who need professional-grade results.
Specialized Models for Different Needs
Leonardo AI provides specialized models for creative fields, from game assets to concept art and product design. This gives users a more refined and industry-specific toolset than one-size-fits-all AI generators.
How Can Leonardo AI Help You?
Leonardo AI isn’t just another AI image generator—it’s a creative powerhouse designed to make your life easier, whether you’re an artist, marketer, game developer, or someone who loves experimenting with AI. Here’s how it can help:
For Artists & Designers
- Generate stunning concept art, illustrations, and digital paintings in minutes.
- Experiment with different styles and color schemes effortlessly.
- Speed up your creative workflow using AI as an idea generator or sketching tool.
For Game Developers
- Create high-quality assets like characters, backgrounds, and textures without a massive design team.
- Generate variations of objects, props, or scenes quickly.
- Maintain consistency across multiple game elements using AI-powered refinements.
For Marketers & Content Creators
- Design eye-catching social media graphics, ads, and branding materials.
- Generate unique visuals for blog posts, presentations, and marketing campaigns.
- Save time and money by reducing the need for stock images or hiring designers for small tasks.
For E-Commerce & Businesses
- Create high-quality product mockups and promotional visuals.
- Generate professional-looking marketing materials even without design experience.
- Stand out with unique, AI-enhanced branding and advertising content.
For Anyone Who Loves Creativity
- Explore AI-generated art just for fun or inspiration.
- Turn simple text prompts into beautiful, share-worthy images.
- Experiment with different styles without prior design skills, from realism to fantasy.
What Types of Businesses Can Use Leonardo AI?
Leonardo AI is a versatile tool that can benefit businesses across various industries. Whether you’re in marketing, gaming, e-commerce, or even real estate, this AI-powered platform can help streamline design processes, enhance creativity, and reduce costs. Here’s how different businesses can leverage Leonardo AI:
Game Development Studios
- Generate high-quality character designs, environments, and textures.
- Speed up the prototyping phase with AI-generated concept art.
- Maintain consistency across in-game assets while reducing design time.
E-Commerce & Retail
- Create eye-catching product mockups and promotional images.
- Design unique branding materials and social media content.
- Generate realistic lifestyle images without expensive photoshoots.
Marketing & Advertising Agencies
- Design professional-looking ad creatives, banners, and social media posts.
- Create visually engaging content for blogs, presentations, and campaigns.
- Develop unique brand assets that stand out in the crowded digital space.
Real Estate & Interior Design
- Generate stunning property visualizations and interior design mockups.
- Create realistic staging images for property listings.
- Offer virtual renovation previews to clients.
Publishing & Content Creation
- Design book covers, illustrations, and promotional graphics.
- Generate unique visuals for articles, blogs, and social media.
- Speed up the creative process while maintaining high-quality output.
Entertainment & Media
- Create movie concept art, storyboards, and promotional materials.
- Generate unique visuals for music albums, posters, and digital content.
- Enhance storytelling with AI-assisted imagery.
Education & E-Learning
- Design engaging educational materials, infographics, and presentations.
- Create custom illustrations for courses and training programs.
- Make learning visually appealing with AI-generated visuals.
Conclusion
Now, you have all the tools and knowledge to seamlessly integrate Leonardo AI’s image generation capabilities with Make’s powerful automation platform. Try various prompts and settings for optimal results for your specific needs. Start small, test thoroughly, and gradually expand your automation workflows. The combination of Leonardo AI and Make opens up endless possibilities for creative and efficient image-generation processes!
FAQs?
How to use images in Leonardo AI?
In Leonardo AI, you can generate images by entering a text prompt, selecting an AI model, and customizing settings like style and resolution. Once generated, you can download, save, or share your images directly.
How do we use AI to create images?
AI image generators, like Leonardo AI, transform text descriptions into visuals. You simply type what you want and adjust settings for details, and the AI creates unique images for you in seconds.
How to use Leonardo AI effectively?
To get the best results, use clear and detailed prompts, experiment with different AI models, and adjust settings like lighting and resolution. Save your favorite settings for consistency in your creations.
How to create with Leonardo AI?
Sign up, access the image generator, enter a descriptive prompt, choose a model, and tweak the settings. Then, hit “Generate,” and Leonardo AI will create your artwork in moments!

Further Ressources
- How to Convert a PDF to Text in Make
- How to Run Custom Code on Make: Step-by-Step Guide
- PDF to Google Sheets: Quick Automation with Make & ChatGPT
- How to Automate xAI Grok with Make : Comprehensive Guide
- How To Use Deepseek AI In Make: Step-By-Step Guide
- How to Convert Videos into Blog Posts Automatically with Make
- How to Use FLUX AI Image Generator in Make: Step-By-Step
- How to Automate Perplexity AI with Make