How to Automate Customer Onboarding in Make
Did you know businesses can reduce their customer onboarding time by up to 60% through automation? Whether scaling your business or looking to streamline your operations, automating your customer onboarding process in Make (formerly Integromat) can be a game-changer. I’ve helped dozens of businesses transform their manual onboarding nightmares into smooth, automated workflows – and I’m excited to show you exactly how to do it!

Let’s dive into the essential steps and best practices for creating an efficient, automated customer onboarding system.
What You’ll Learn
- Set up automation customer onboarding workflow.
- Send automatic emails.
- Create automatic documents.
- Manage Google Drive automatically.
- Update automatically data on Airtable.
Setting Up Your First Customer Onboarding Automation
Step 1: Create a table on Airtable
To get started, open Airtable and create a fresh table. You’ll need to set up 8 essential columns:- First Name and Last Name for your contacts
- Phone Number to reach them
- The country they’re based in
- Email address
- Company they represent
- Doc Quiz Response (this will store the client’s responses and questions)
- Created At (don’t worry about this one – Airtable handles it automatically!)

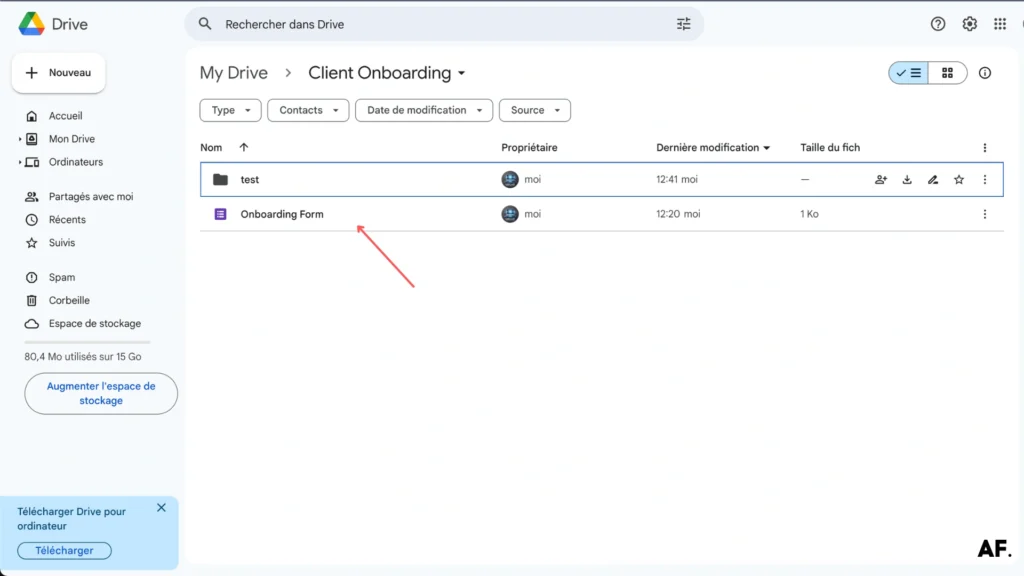
Step 2: Create a Folder on Google Drive
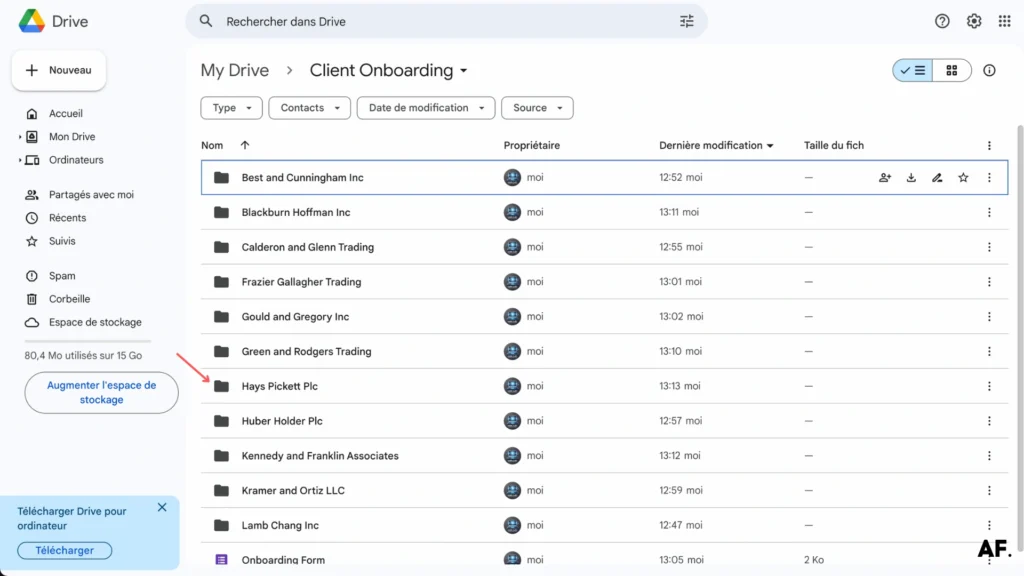
Next, head over to Google Drive and create a new folder. I’ve named mine Client Onboarding. This is where we’ll keep everything organized!

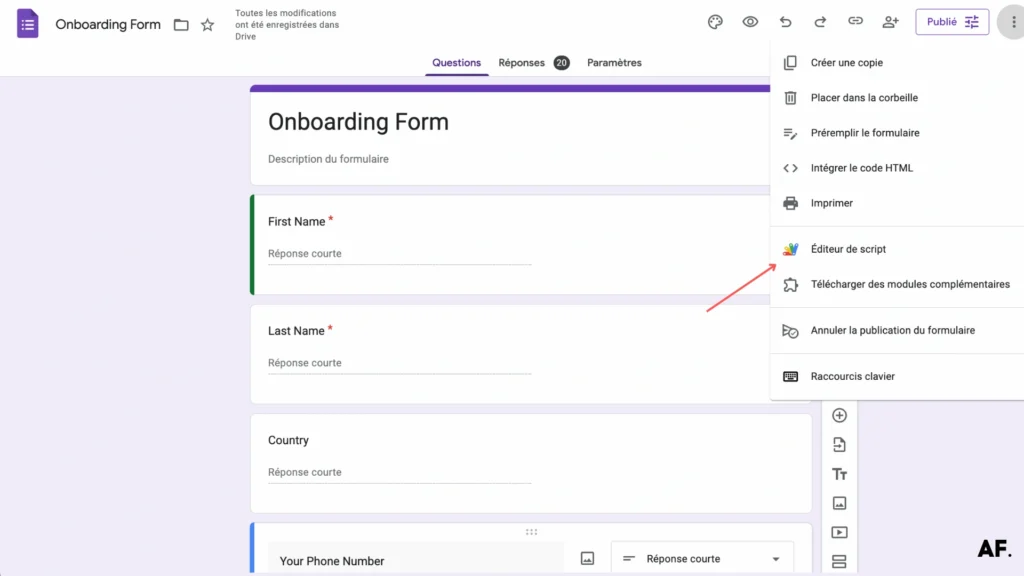
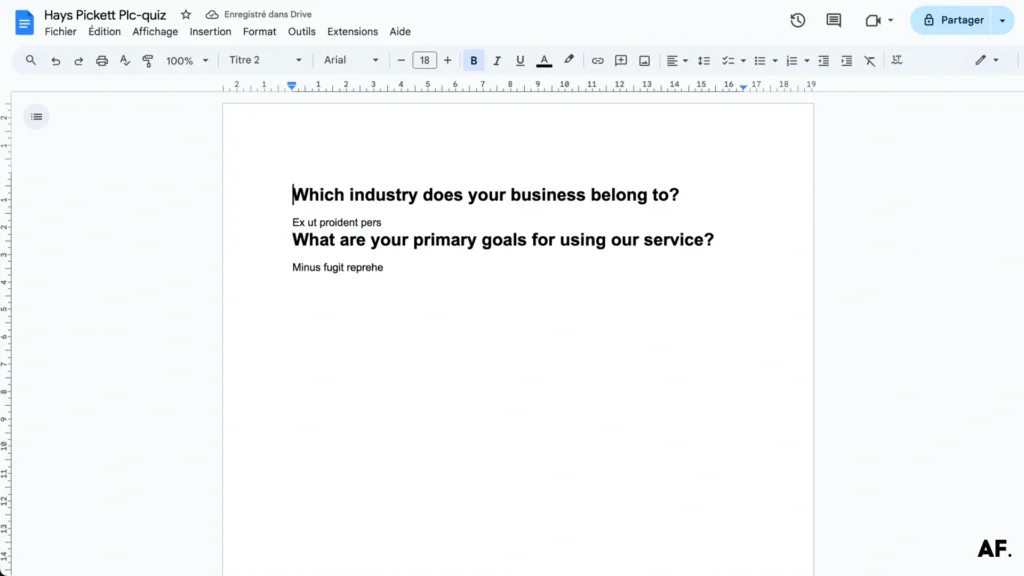
Step 3: Create a Google Form
Create your onboarding form in Google Forms. This will be a professional way to gather client information. Open Google Forms and click the ‘+‘ button to start fresh.
Here’s how mine looks in the image below:

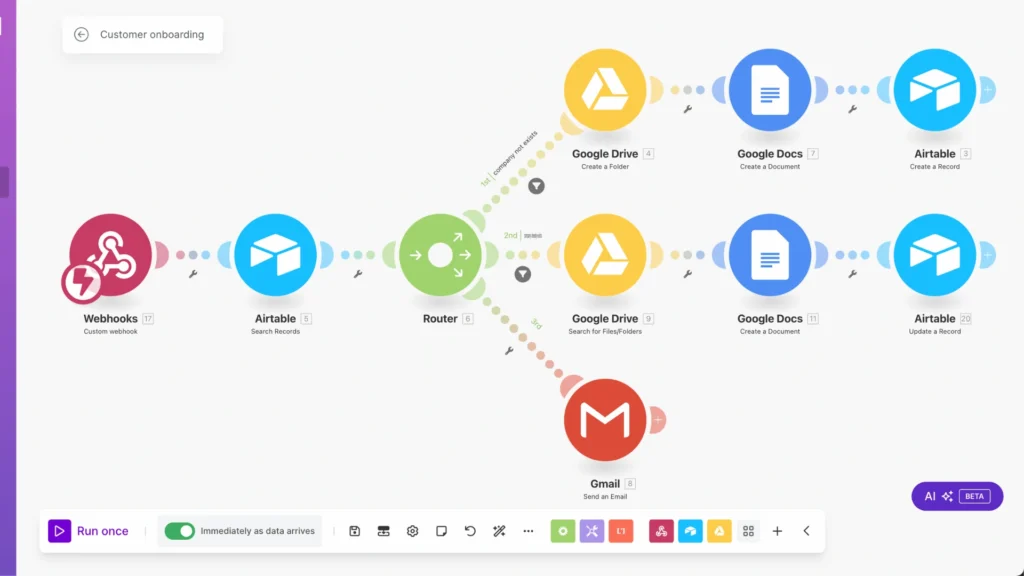
Step 4: Create Your Scenario
Now, let’s head over to Make and create a new scenario!

Step 5: Add Webhook Module
Start by adding a ‘Custom webhook‘ module and click ‘Copy address to clipboard‘ to grab your webhook URL. You’ll need this URL in the following steps.

Step 6: Trigger Webhook From Google Form
Next, open your Google form and find the ‘Script Editor‘ button. This is where we’ll add our code.
Here’s where you’ll add your template code
const POST_URL = "enter your webhook URL";
function onSubmit(e) {
    const form = FormApp.getActiveForm();
    const allResponses = form.getResponses();
    const latestResponse = allResponses[allResponses.length - 1];
    const response = latestResponse.getItemResponses();
    const payload = {};
    for (var i = 0; i < response.length; i++) {
        const question = response[i].getItem().getTitle();
        const answer = response[i].getResponse();
        payload[question] = answer;
    }

    const options = {
        "method": "post",
        "contentType": "application/json",
        "payload": JSON.stringify(payload)
    };
UrlFetchApp.fetch(POST_URL, options);
};
Please replace ‘enter your webhook URL‘ with the webhook link you just copied from Make. This will connect your form to the automation.

After saving your code, create a new trigger to automate the workflow. Click ‘Save‘ to confirm your settings:

Your scenario will trigger automatically once you fill out and submit the form. The data will flow from your form to the automation workflow you’ve set up.

Step 7: Build Your Scenario
Now head back to your Make scenario and add a ‘Search Records‘ module. Configure it as shown in my example. When your Google Form triggers correctly, the webhook data appears here.

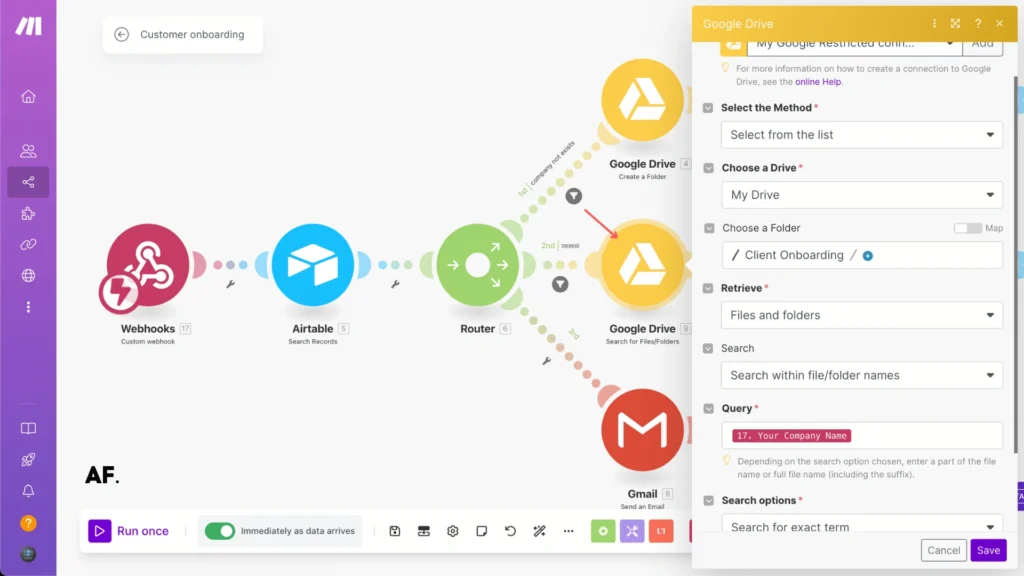
Next, add a router to help direct your data flow based on different conditions.

If the company doesn’t exist in your records, we’ll need to create a new folder in Google Drive to store their information. This creates a dedicated space for each client’s documents.

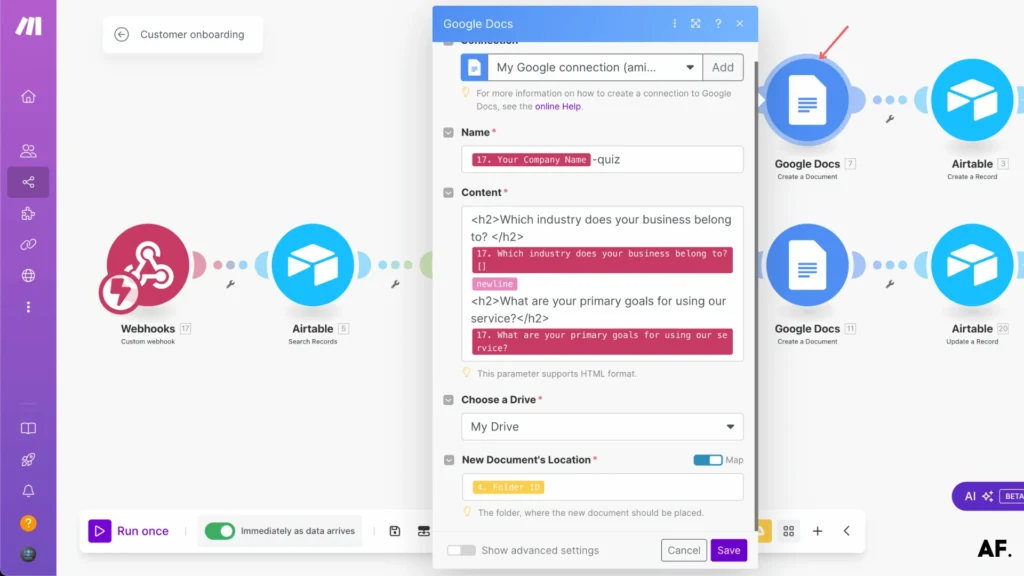
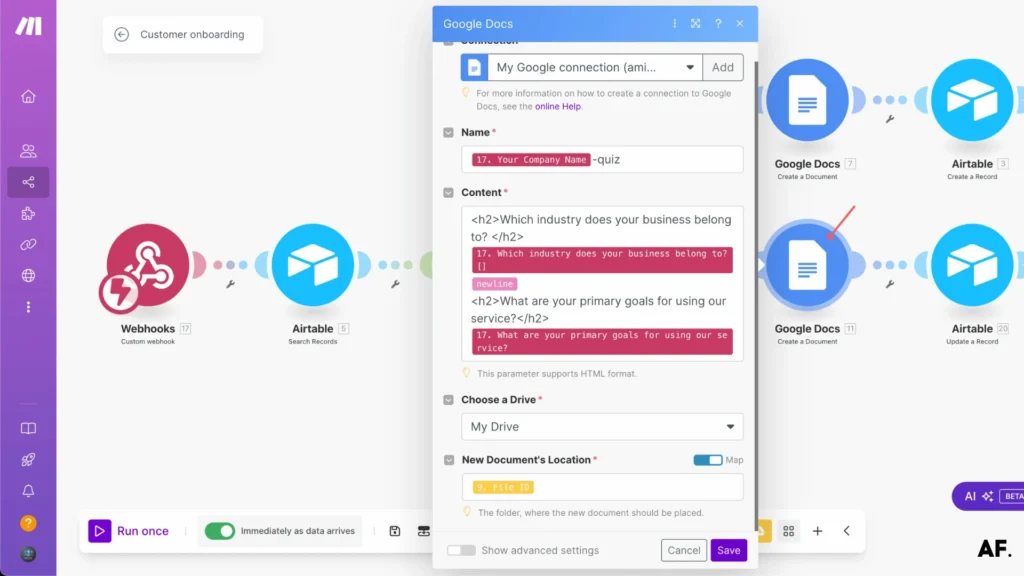
After that, take the form responses and create a new Google Doc with them. Place this doc in the company folder you just created – keeping everything neatly organized.
Next, add a ‘Create a Record‘ module in Make to store the client information in Airtable. This ensures all data is properly tracked.

If the company exists in Airtable, check Google Drive for an existing folder with that company’s name:
Once confirmed, save the form responses in a new Google Doc within the existing company folder :
Next, add an ‘Update a Record‘ module in Make to keep your Airtable database updated with any new information.

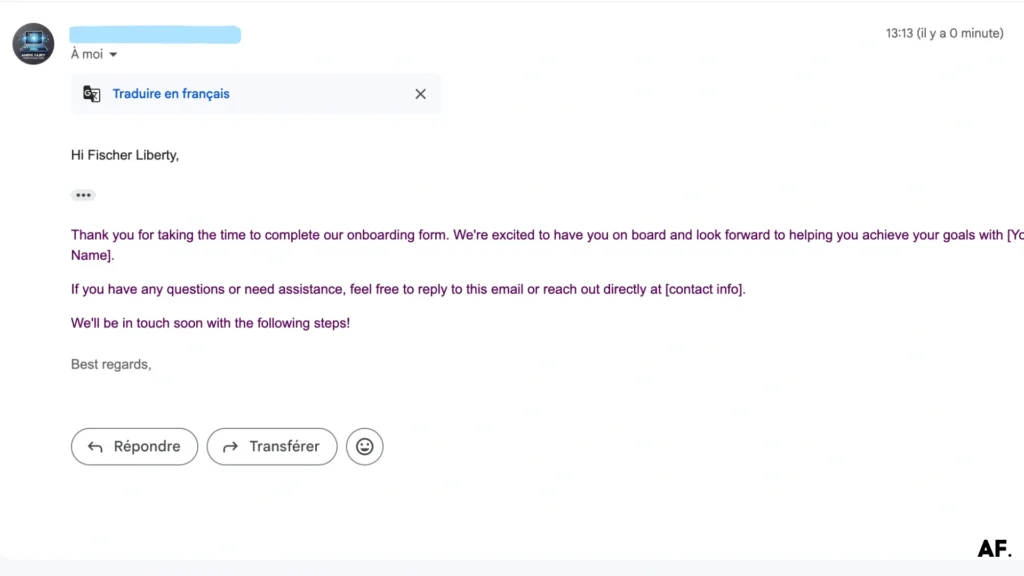
Step 8: Add Gmail Module
Now, let’s set up an automated email for your clients. Add a ‘Gmail‘ module and use HTML formatting for a professional look.
Here’s an example template you can customize:
<!DOCTYPE html>
<html>
<head>
    <style>
        body {
            font-family: Arial, sans-serif;
            line-height: 1.6;
            color: #333333;
            max-width: 600px;
            margin: 0 auto;
            padding: 20px;
        }
        .signature {
            margin-top: 20px;
            color: #666666;
        }
    </style>
</head>
<body>
    <p>Hi {{17.`Last Name`}} {{17.`First Name`}},</p>

    <p>Thank you for taking the time to complete our onboarding form. We're excited to have you on board and look forward to helping you achieve your goals with [Your Company/Service Name].</p>

    <p>If you have any questions or need assistance, feel free to reply to this email or reach out directly at [contact info].</p>

    <p>We'll be in touch soon with the following steps!</p>

    <p class="signature">Best regards,</p>
</body>
</html>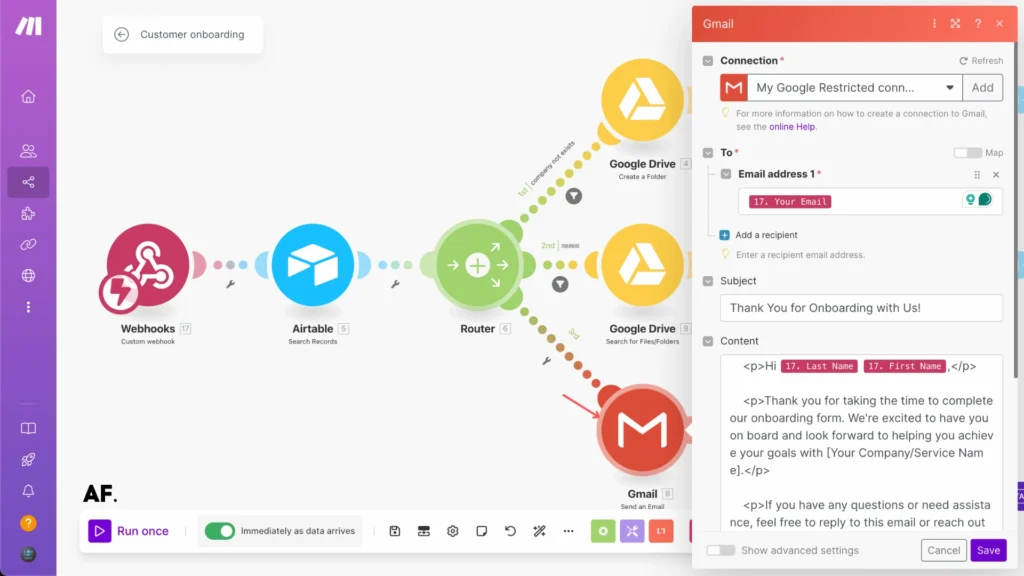
Step 9: Add Filters
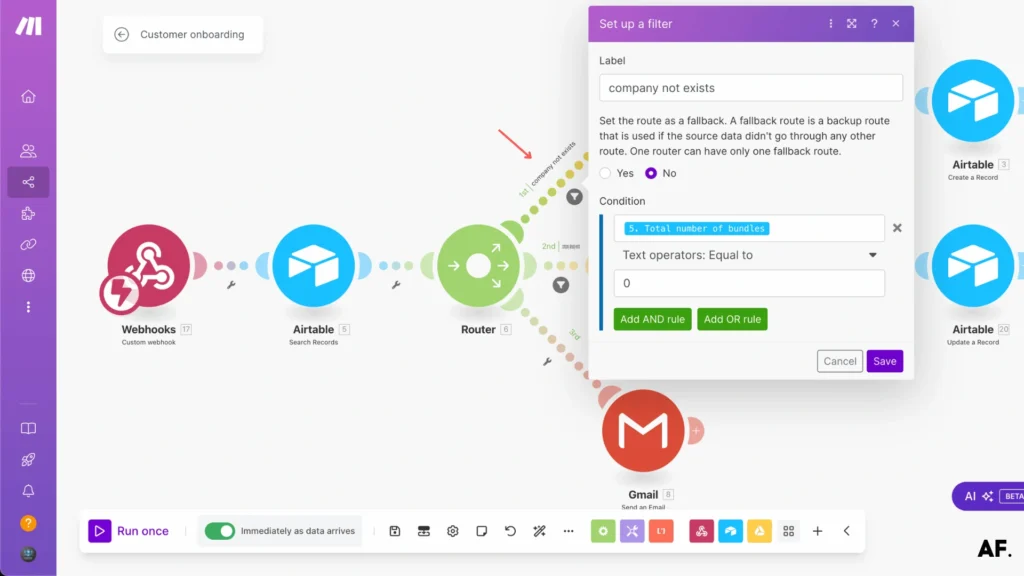
Add a filter after the router to check if the company doesn’t exist. This ensures your automation takes the right path based on whether it’s a new or existing company :
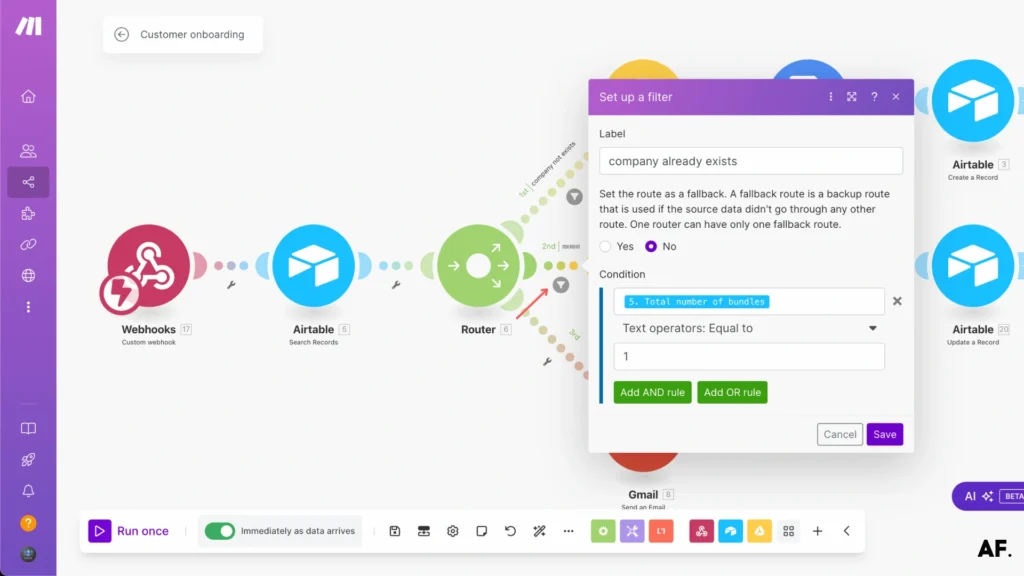
Finally, add another filter to handle cases when the company already exists in your records :
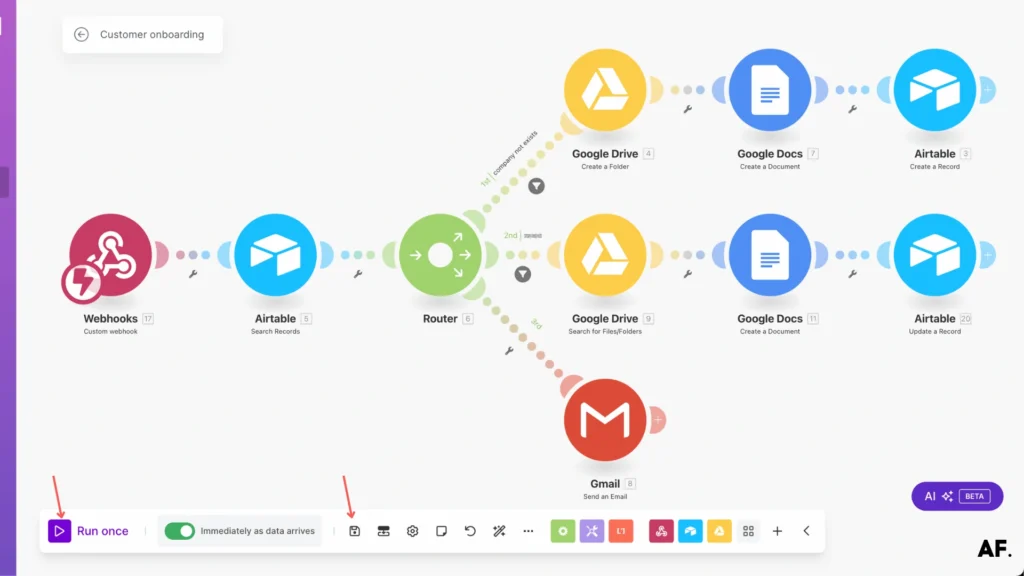
Step 10: Save and Run Scenario
Step 11: Results
1. Airtable

2. Google Drive
3. Google Doc

4. Email
This automation is just the beginning of what’s possible! Think bigger; you can enhance your system by adding Slack notifications to keep your team in the loop, document signing integration for seamless approvals, and even automatic invoice generation. The foundation is set, and the possibilities are endless! 🌟 Feel free to customize and expand based on your unique business needs; this is your automation playground to build upon. 🎯
Get this scenarioConclusion
Automating your customer onboarding process in Make isn’t just about saving time—it’s about creating a scalable, consistent, and professional experience for every new customer. Remember to review and optimize your automation workflows regularly as your business grows. Ready to transform your onboarding process? Start implementing these strategies today!
Join the Newsletter
Subscribe to get our latest content by email.
We won’t send you spam. Unsubscribe at any time.
✅ You’re subscribed!
FAQs
Q: What tools do I need to automate customer onboarding in Make?
A: You need Make, Airtable for data management, Google Drive for file storage, and Google Forms for collecting client information.
Q: How long does setting up an automated onboarding system take?
A: The basic setup can be completed in about 1-2 hours, including creating all necessary forms, folders, and automation workflows in Make.
Q: Can I customize the automated email templates?
A: Yes, you can fully customize email templates in Make using HTML formatting and include dynamic fields from your client data stored in Airtable.
Q: How to automate client onboarding process?
A: Create automated workflows using Make to collect client data through forms, store information in Airtable, manage documents in Google Drive, and send automated welcome emails.
Q: Can onboarding be automated?
A: Yes, onboarding can be automated to reduce processing time by up to 60% through the collaboration of tools like Make, Airtable, and Google Forms.
Q: How to automate customer engagement?
A: Use automated email workflows, create personalized document generation, and set up systematic data collection through forms to maintain consistent customer communication.
Q: What is the most effective method to provide customer onboarding?
A: Implement a combination of automated form collection, organized document storage, and personalized automated emails while maintaining a streamlined workflow in Make.

Further Ressources
- Discord Message Integration with Make: A Complete Guide
- How to Automate Document Approvals with Make
- How to Use Airtable on Make
- How to Use Filters in Make: A Complete Guide
- How to Use JSON in Make: A Comprehensive Guide
- How to Schedule Automations in Make
- How to Automate Photo Pins on Pinterest with Make