How to Automate Photo Pins on Pinterest with Make
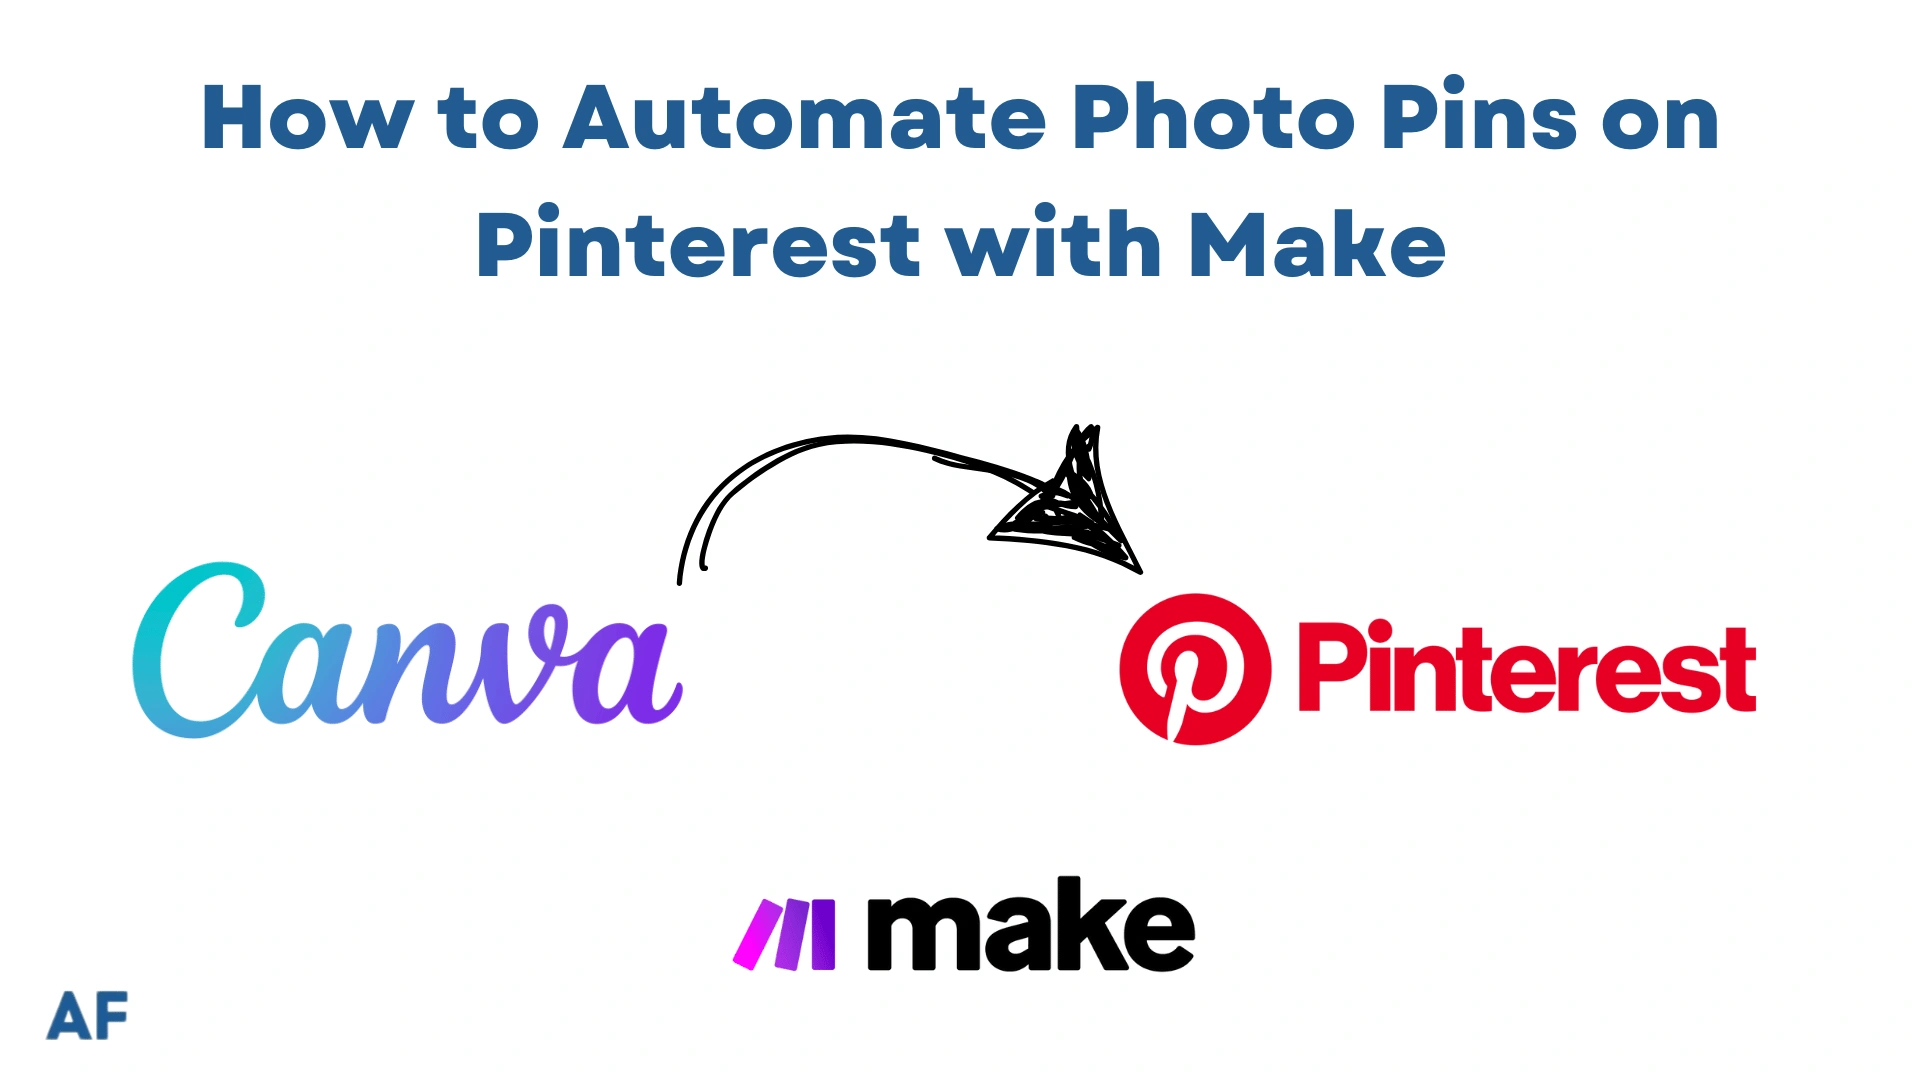
Are you tired of manually posting pins to Pinterest every single day? I get it: managing a Pinterest strategy can be incredibly time-consuming! Here’s some good news: automation will become your new best friend. Did you know businesses using automation tools save an average of 20 hours per week on social media management? In this comprehensive guide, I’ll walk you through exactly how to automate your Pinterest photo pins using Make (formerly known as Integromat), combined with the power of Canva and Pinterest’s integration, helping you maintain a consistent Pinterest presence without the daily hassle. The best part? You don’t need to be a tech wizard to make it work.

Let’s dive in!
What You’ll Learn
This step-by-step guide will show you how to:
- Set up Pinterest automation workflow.
- Connect Canva for automated design publishing.
- Post automatically to the Pinterest
Prerequisites
Before we begin, you’ll only need:- A Make account
- A Pinterest Account
- Canva account for design creation
Remember to save
Pinterest Business Account
- Sign up for a Pinterest business account at pinterest.com/business
- Complete your business profile
- Create at least one board for your automated posts
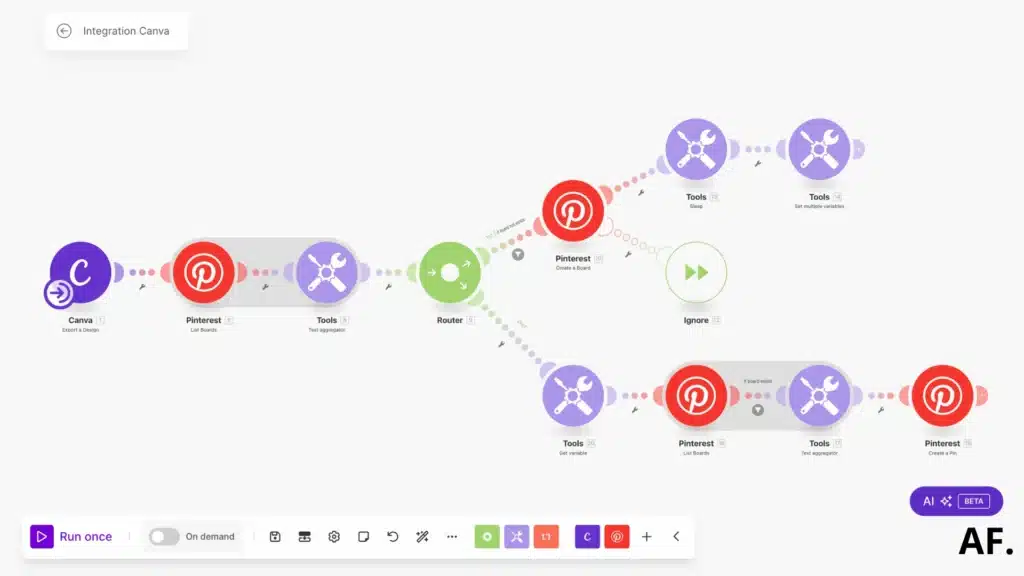
Setting Up Your First Pinterest Automation Scenario
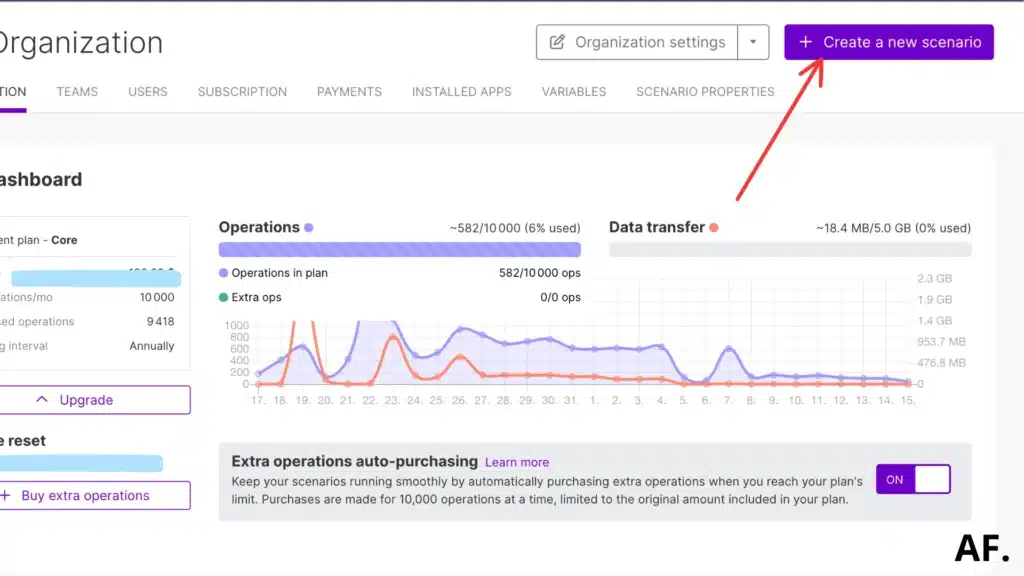
Step 1: Create your scenario
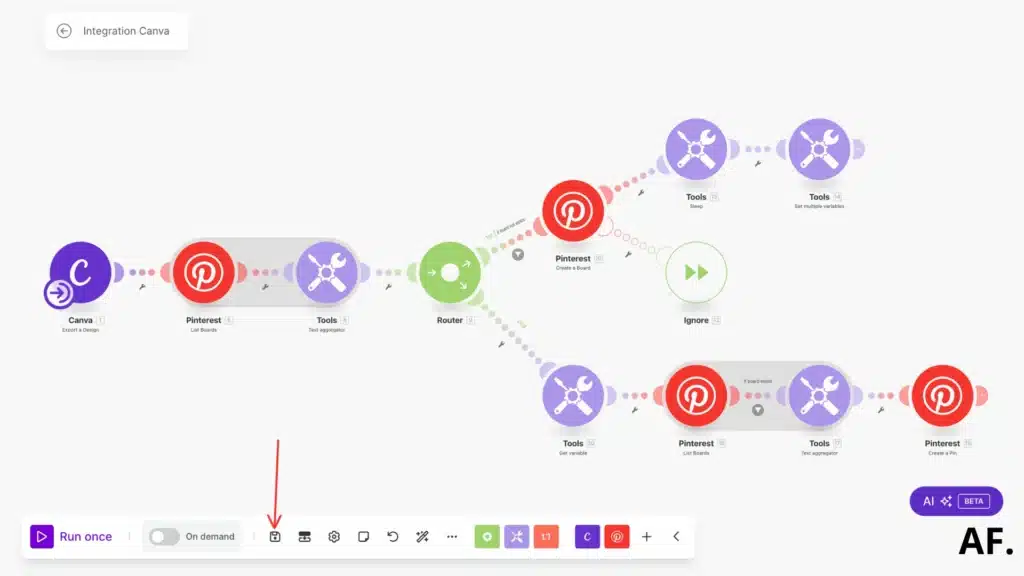
Let’s start by heading over to your dashboard. Once you’re there, we’ll create a new scenario:
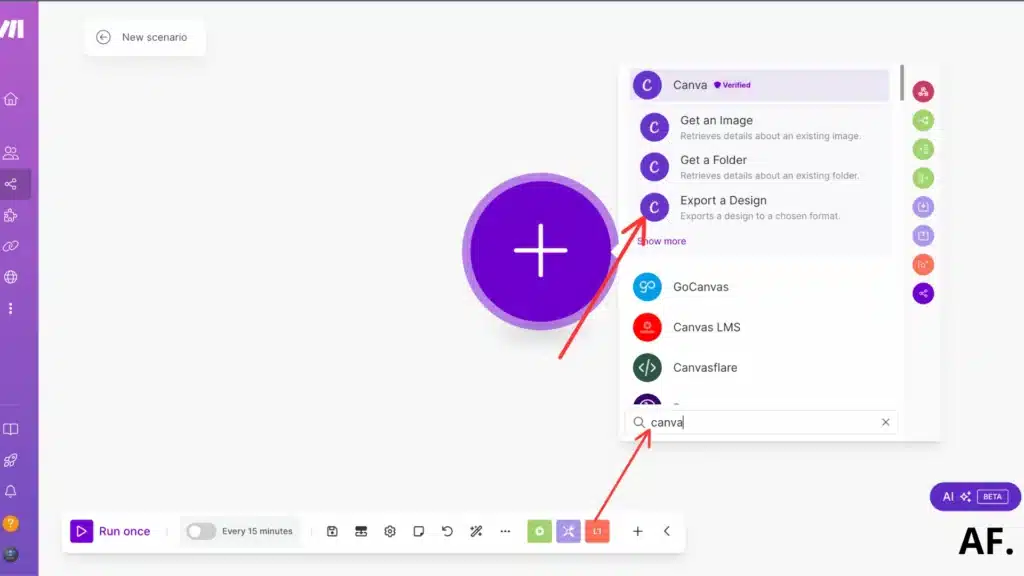
Step 2: Add your first module
Now, let’s create your first module. Just type ‘Canva’ into the search bar and click on ‘Export a Design’ when it pops up:
When the module opens up, here’s what you’ll see on your screen:
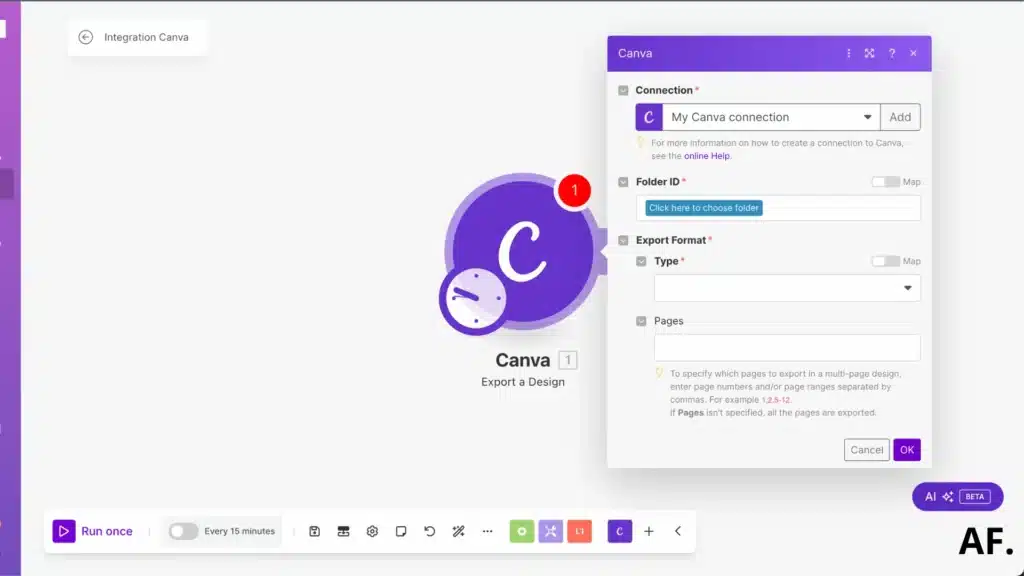
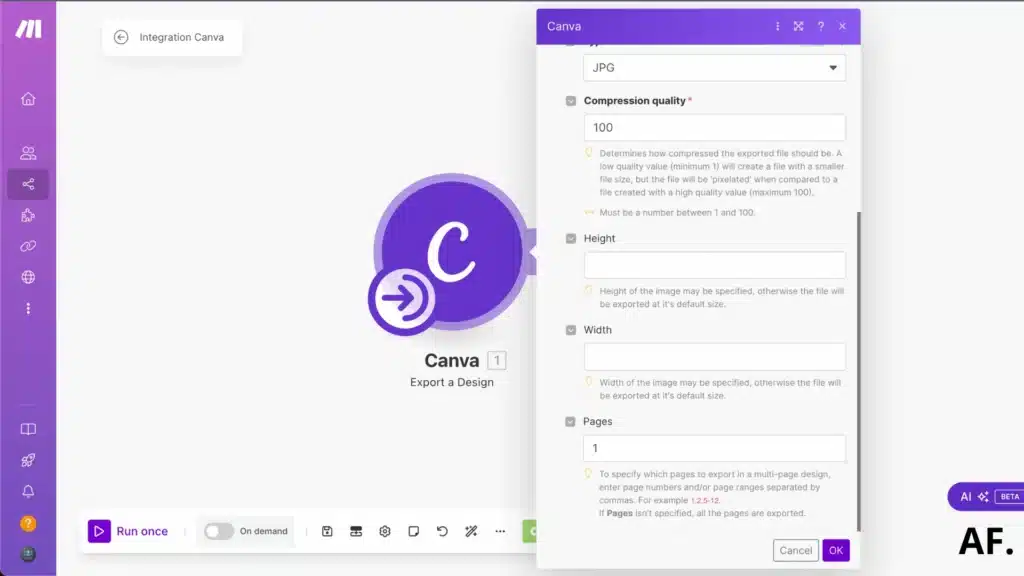
Let me show you how I filled everything out. I selected my Canva folder and picked the design I wanted to use. For the best image quality, I went with JPG format and set the compression quality to 100:
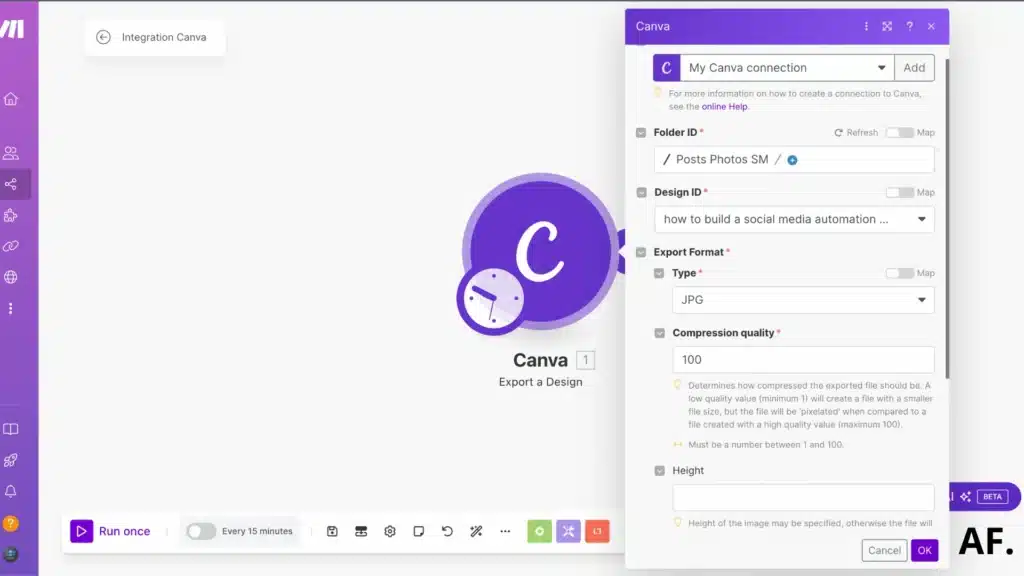
If your design has more than one page, don’t forget to add which page number you want to export:
Step 3: Add a List Of Board Pinterest Module
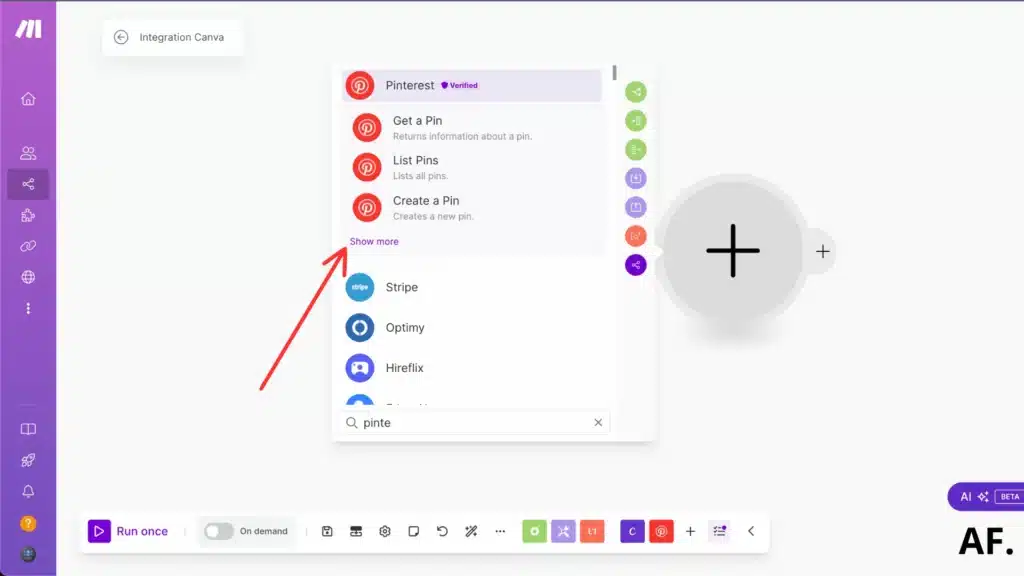
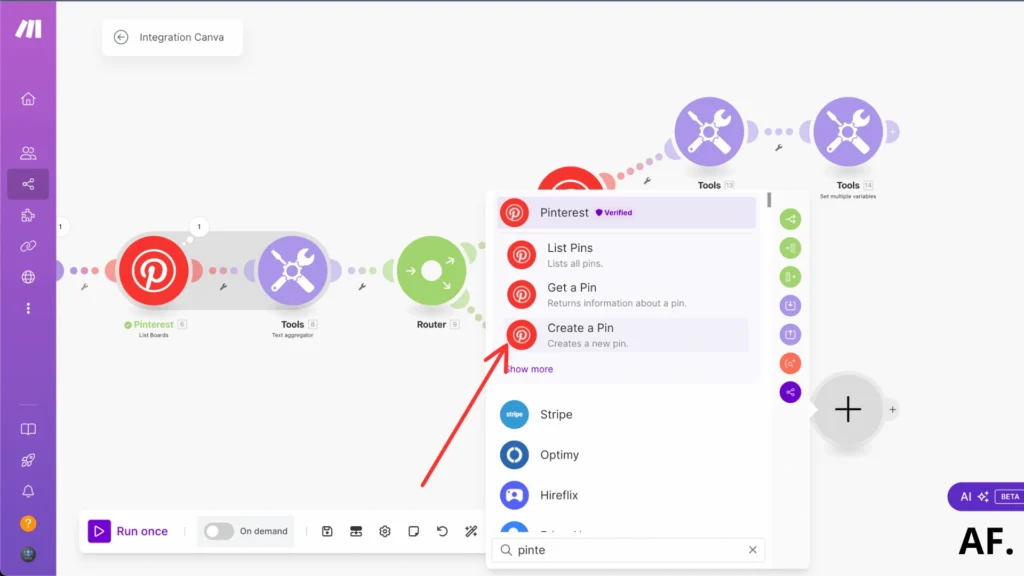
Next up, we need to grab our Pinterest board list. To do this, type ‘Pinterest‘ in the search bar and click ‘Show more‘. This will help us find exactly what we need:
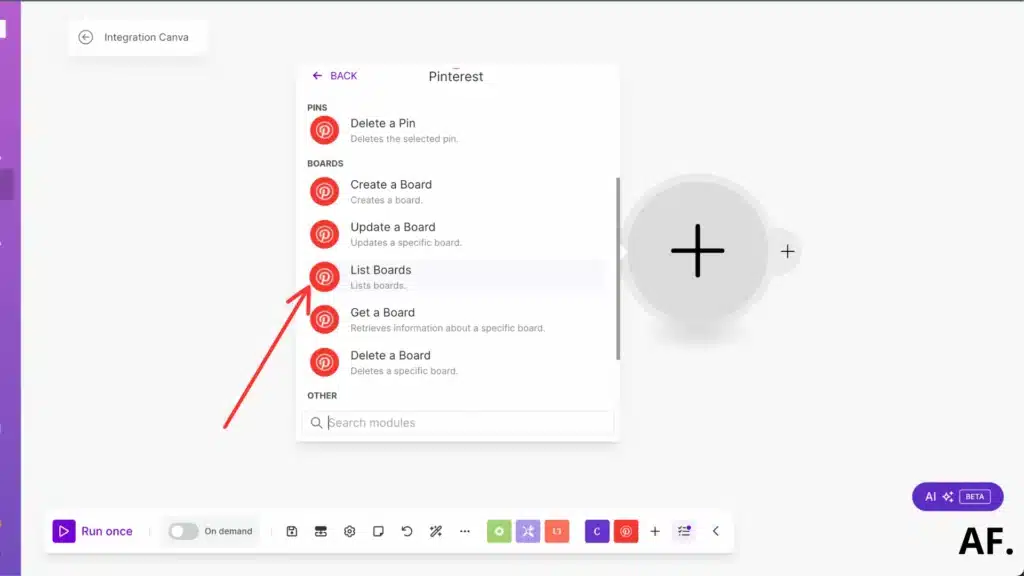
Once you’ve done that, click on ‘List Boards‘ and we’ll be all set:
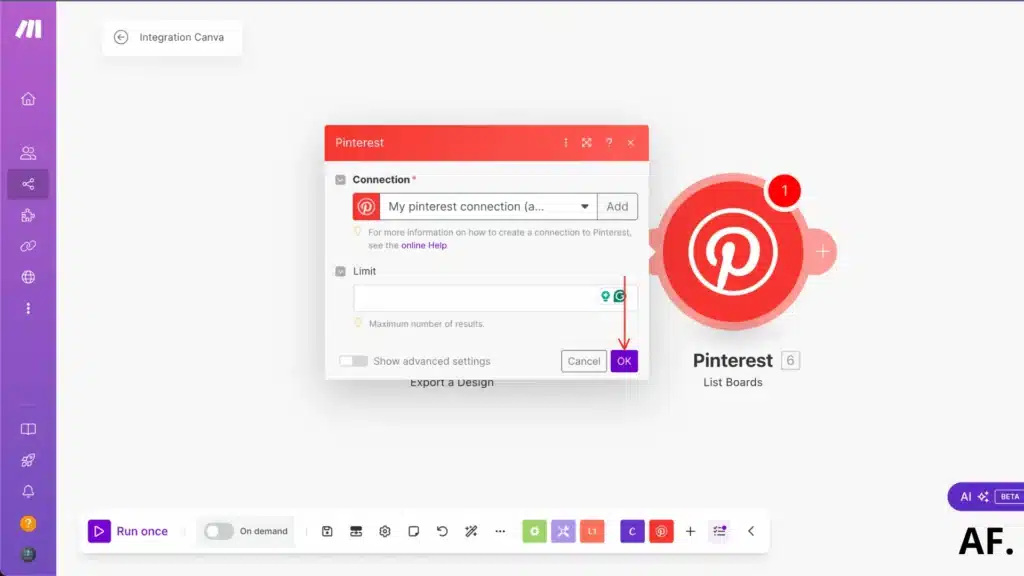
Now, let’s remove that limit and hit ‘OK‘ to move forward:
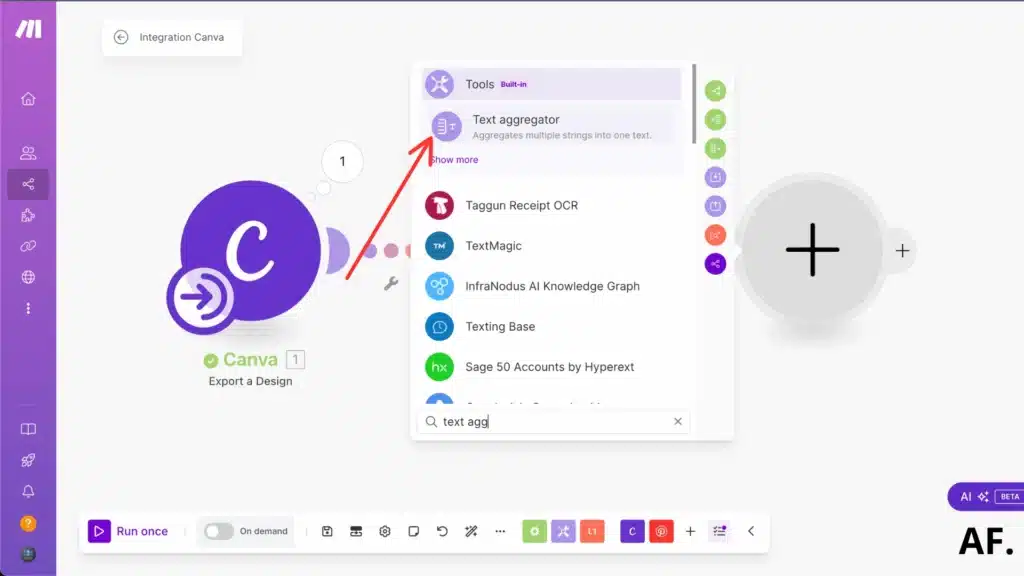
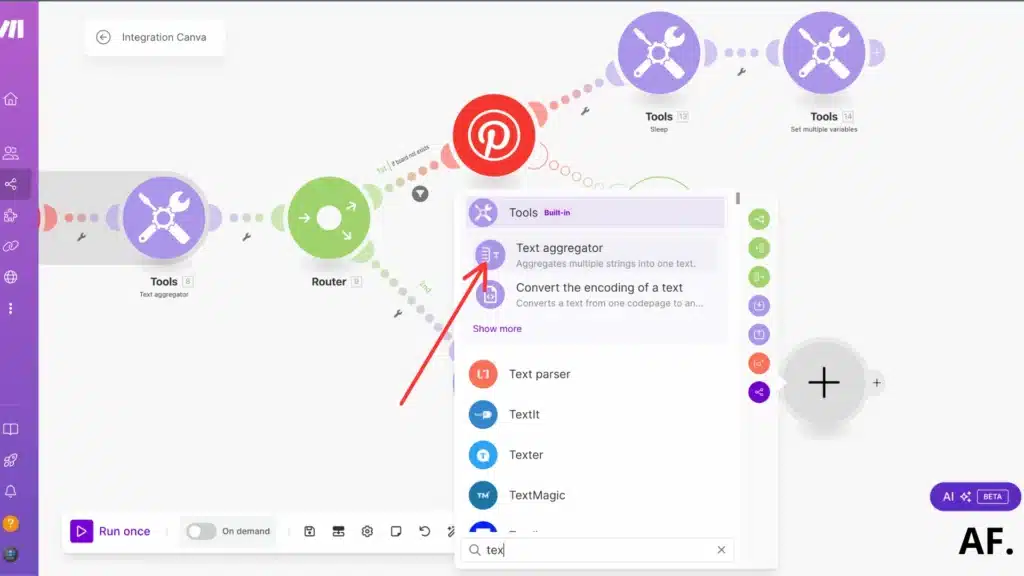
It’s time to add one more module to our setup. For this part, we’ll grab the text aggregator:
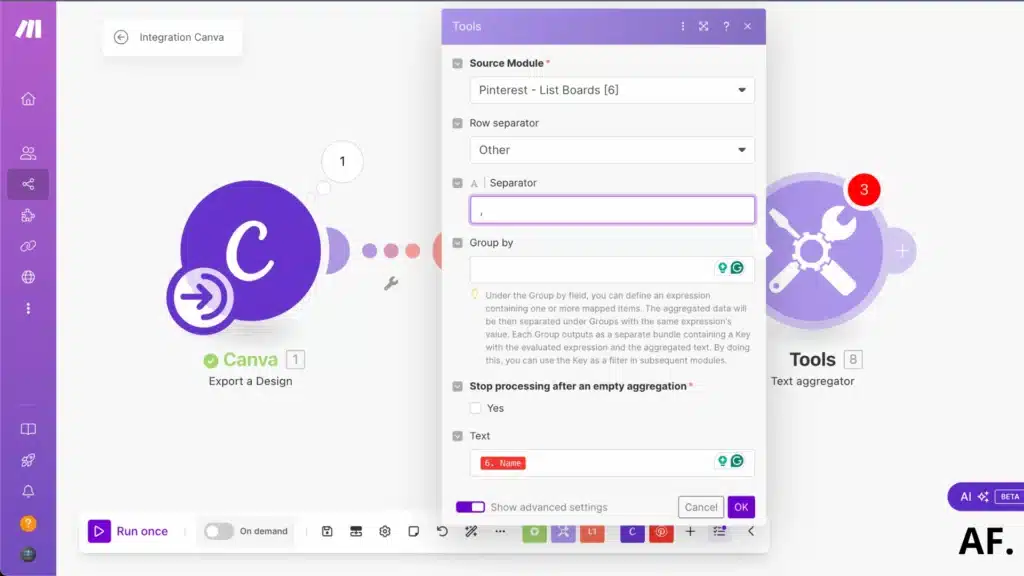
Let’s turn on the advanced setting, flip that switch, and you’ll see some extra options
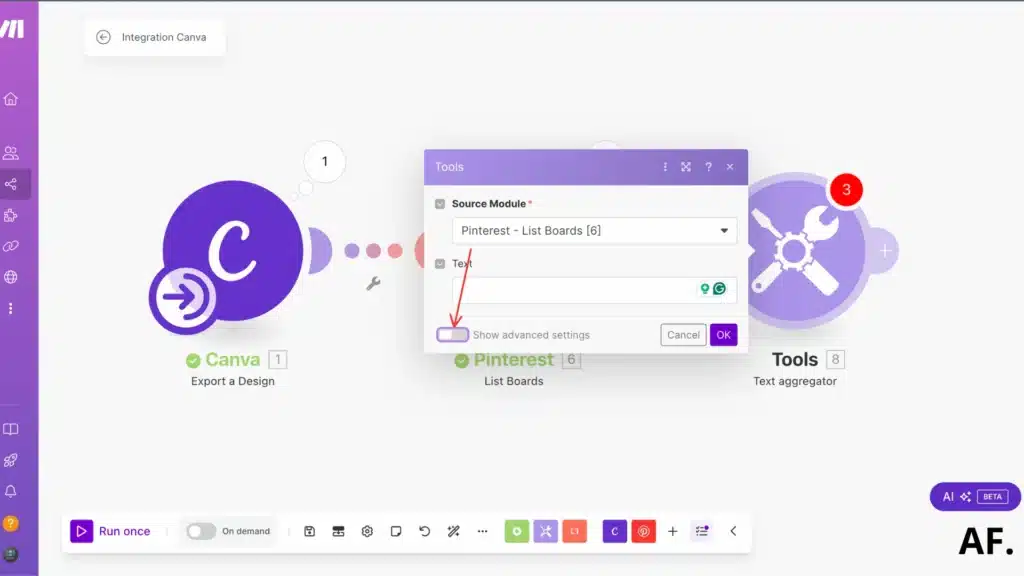
In this step, you’ll want to add your board’s name as the text value:
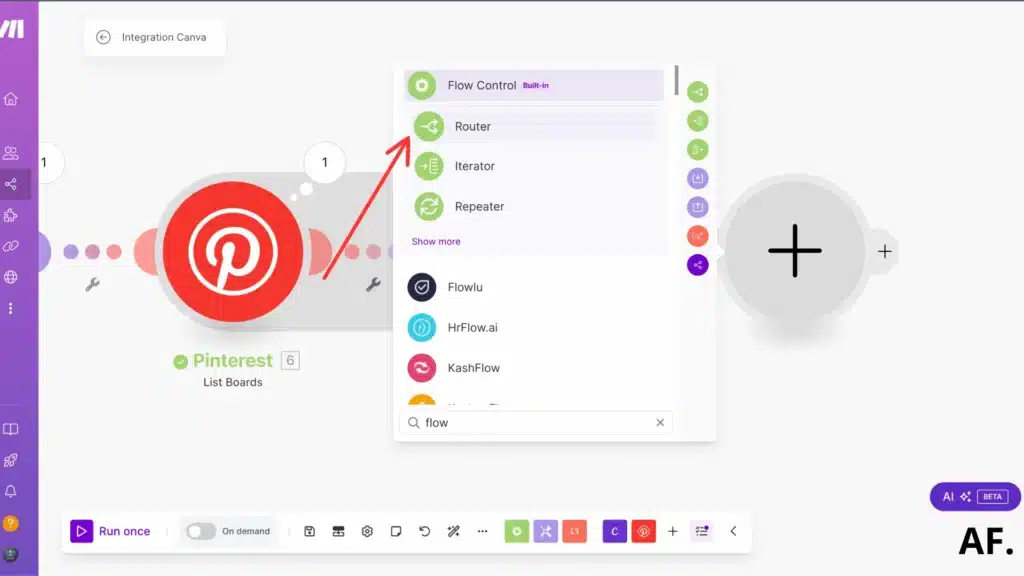
Step 4: Add A Router
Now comes a cool part: let’s add a router to our setup. Just pick the ‘Router‘ module, and we’ll be ready for the next step:
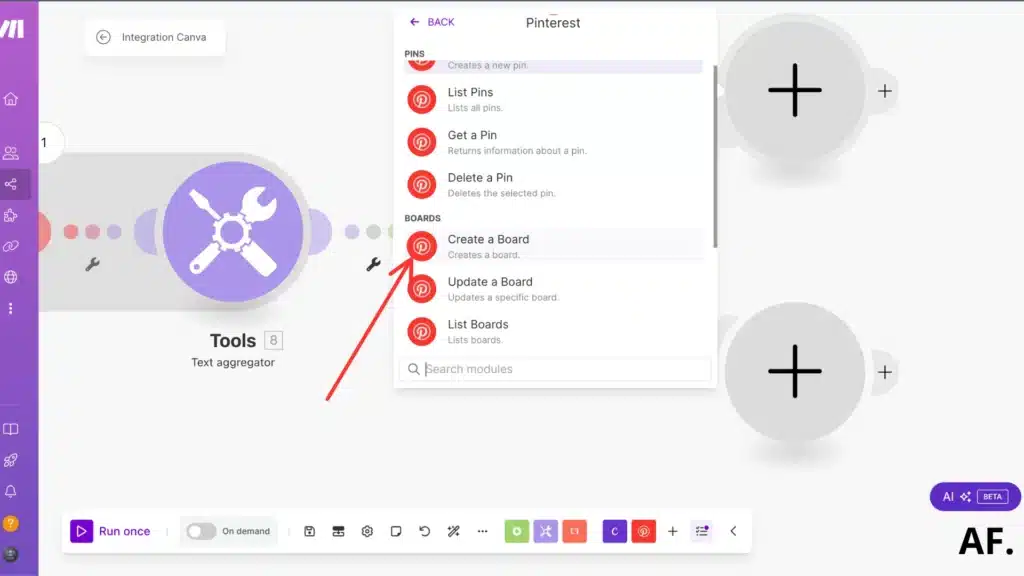
Step 5: Create A Board
Here’s the magic: we will create a brand new board! Just look for the ‘Create a Board‘ option and click on it.
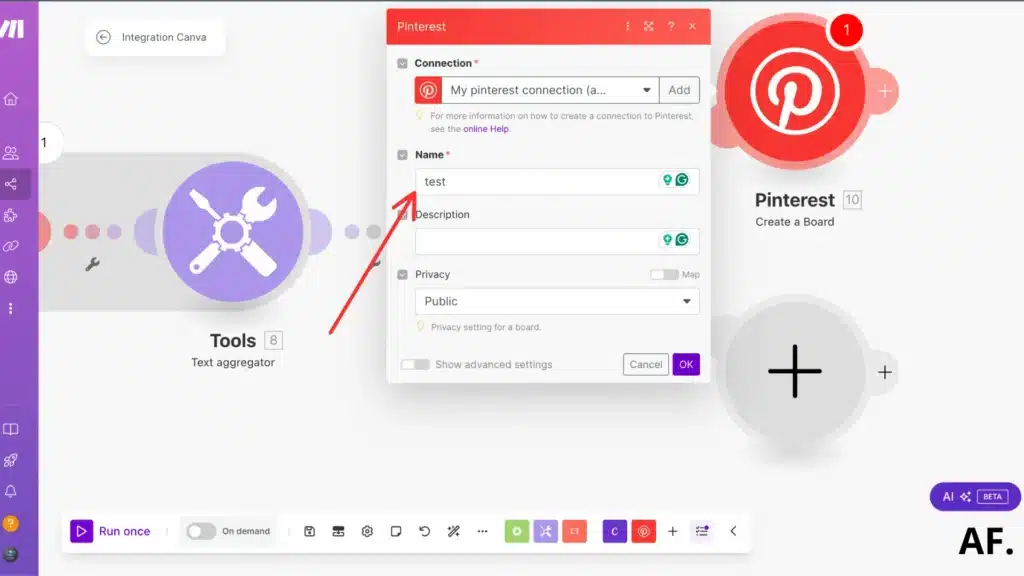
Now, you get to name your new board! I’m going to use ‘test’ as an example here, but feel free to pick any name that works for you:
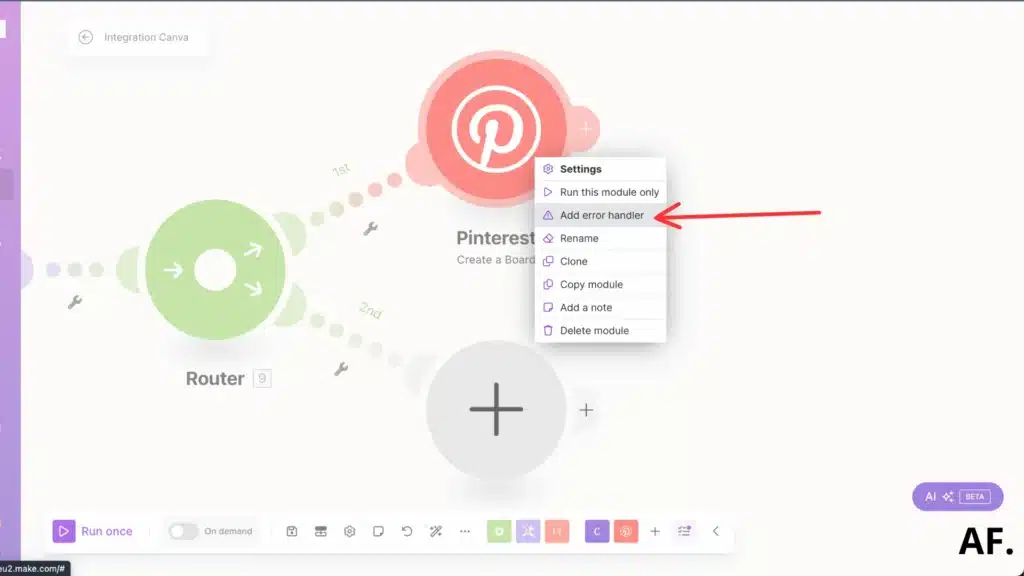
Let’s play it safe and add an error handler to this module; it’ll help catch any issues that might pop up:
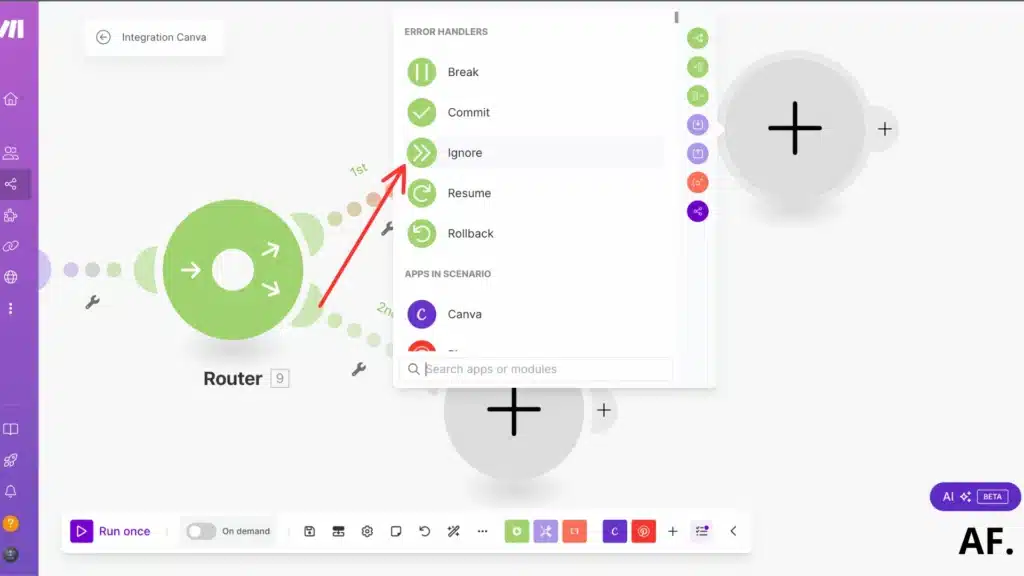
Let’s set the error handler for our backup plan to ‘ignore.’ This way, if something goes wrong with the Pinterest module, it won’t stop everything; it’ll skip over any hiccups and continue the rest of the process.
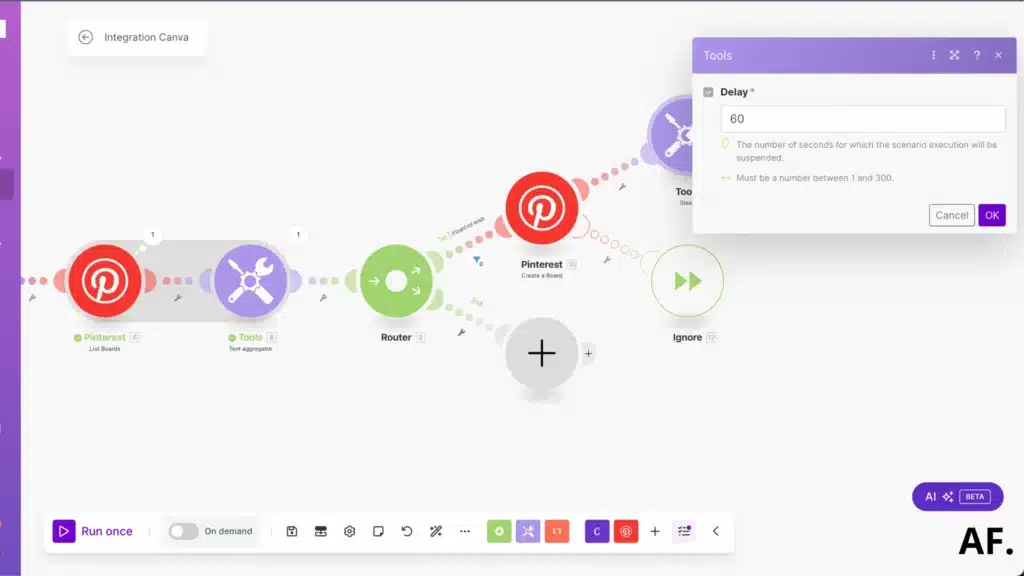
Let’s give our automation a quick breather by adding a sleep module right here:
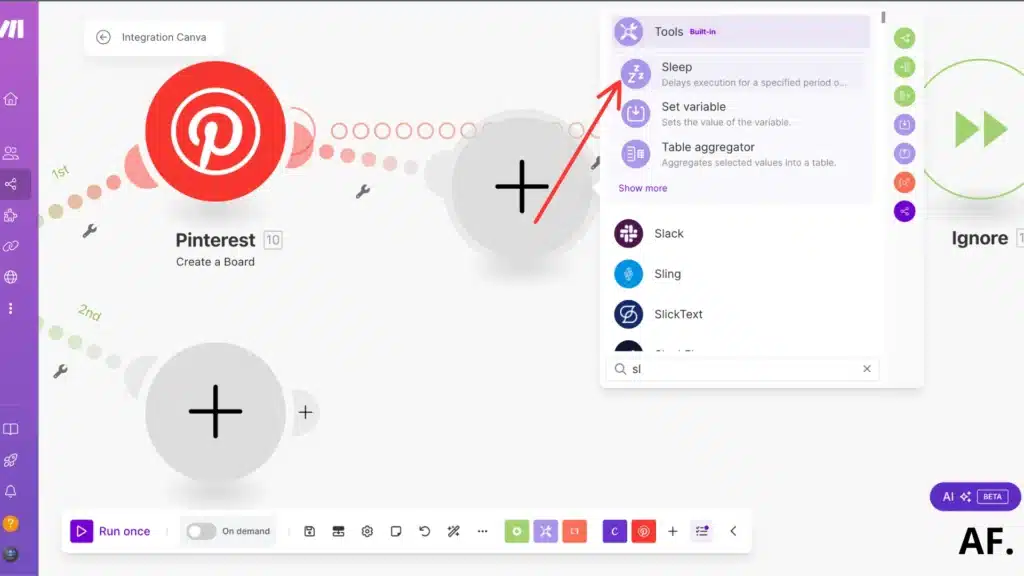

I’m setting this to wait for 60 seconds – this gives Pinterest enough time to create your board without rushing things. Think of it as giving Pinterest a minute to do its thing correctly! :
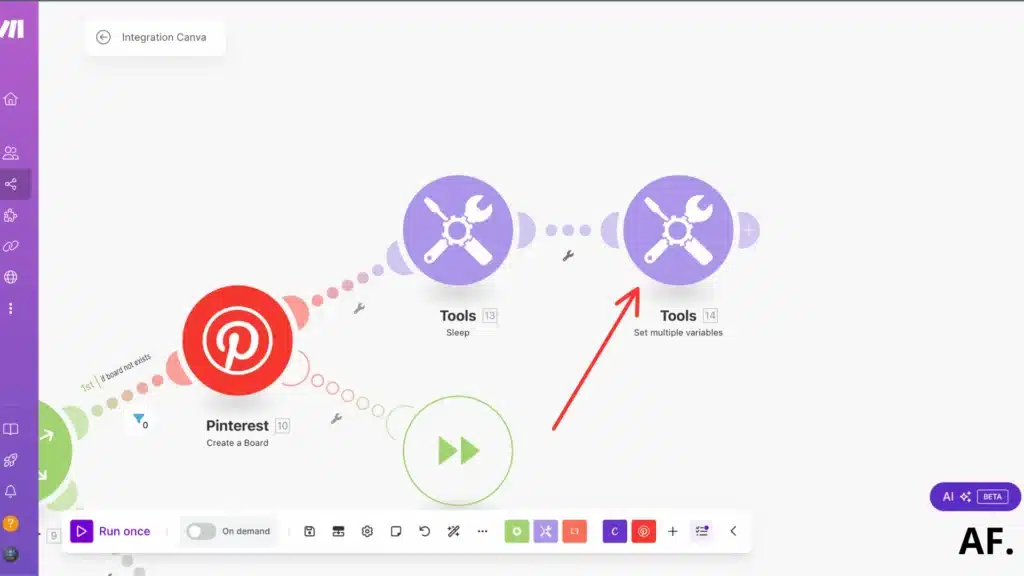
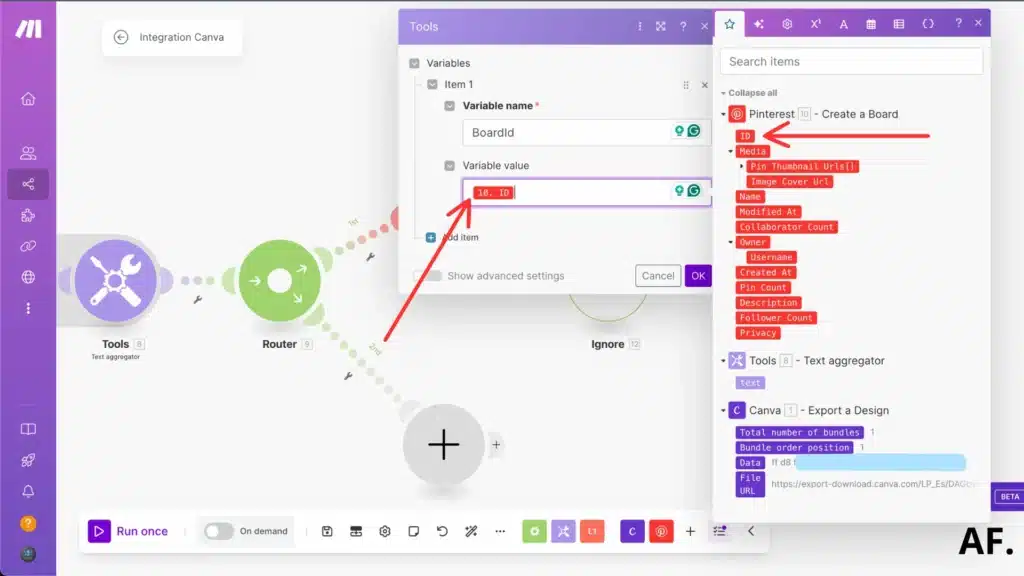
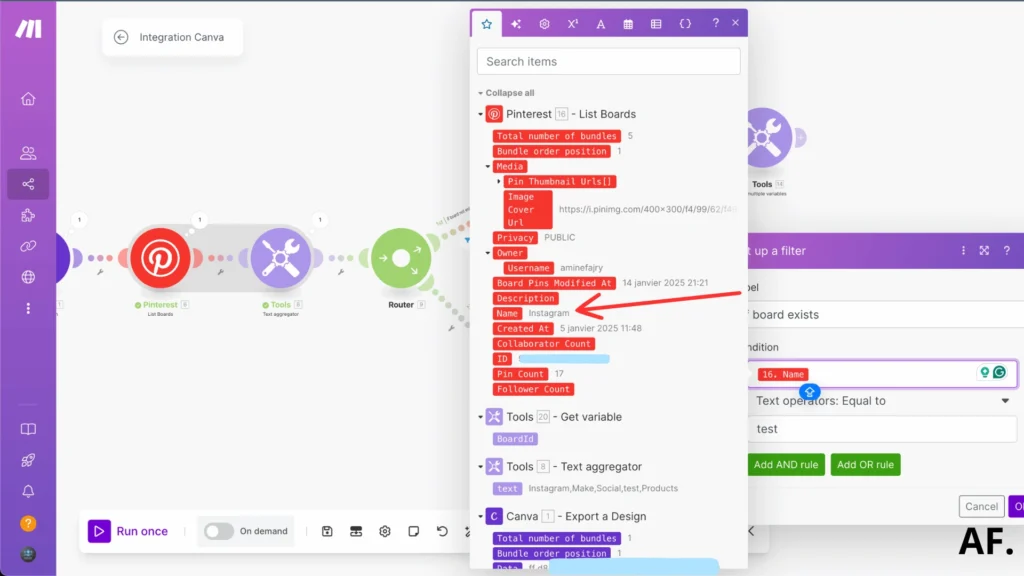
We will add a set of “multiple variables”, where we will store all the important information we need.
We’ll need to keep track of our newly created board’s ID since we’ll use it later. Let’s save that as our value for now:
Step 6: Create a pin
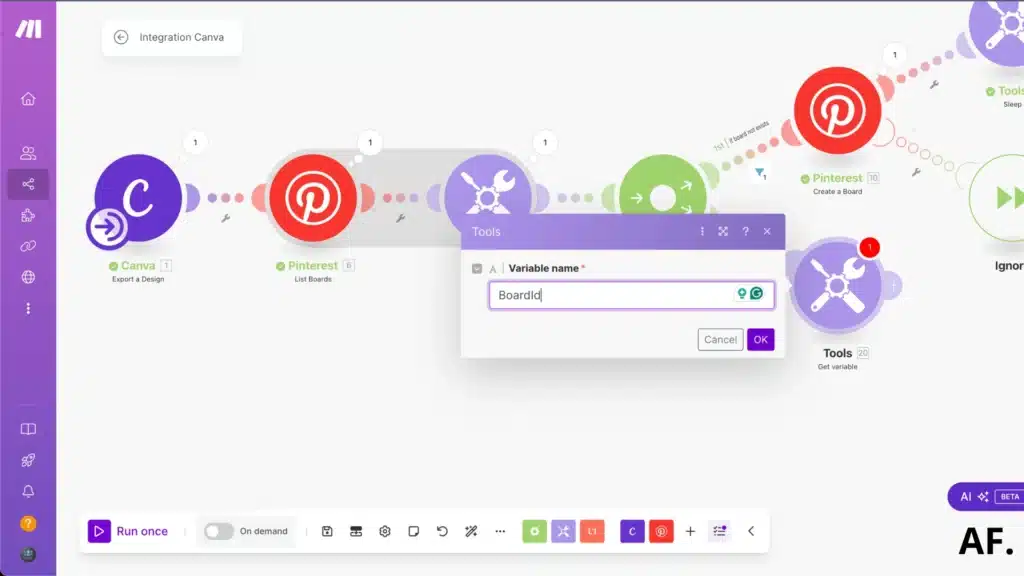
First things first, let’s go ahead and pick ‘Get a variable‘ from our options. This is where we’ll grab what we need:
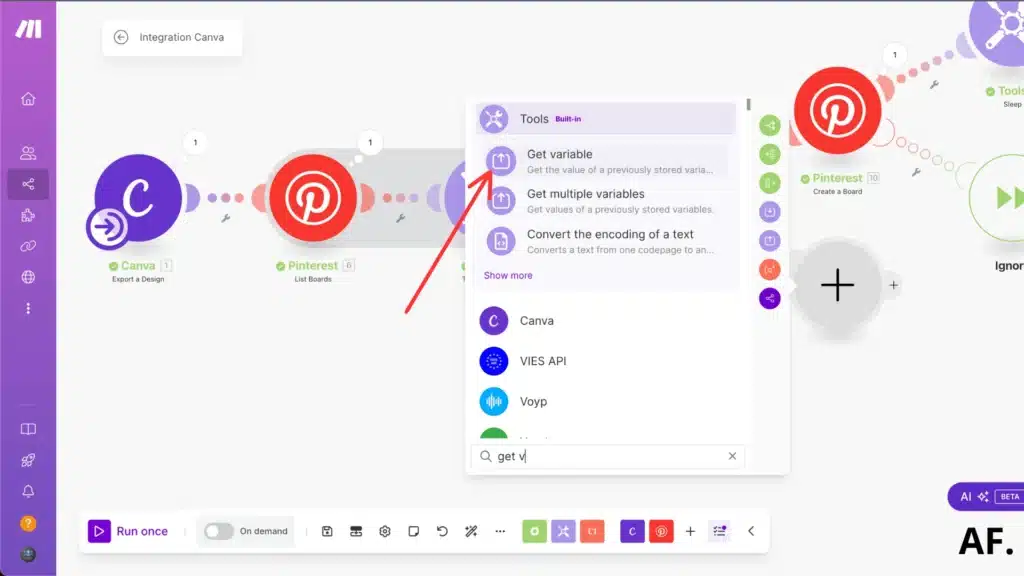
Here’s where we’ll put ‘BoardId‘; this will store the ID of the board we just created. It’s like giving our new board a unique tracking number!
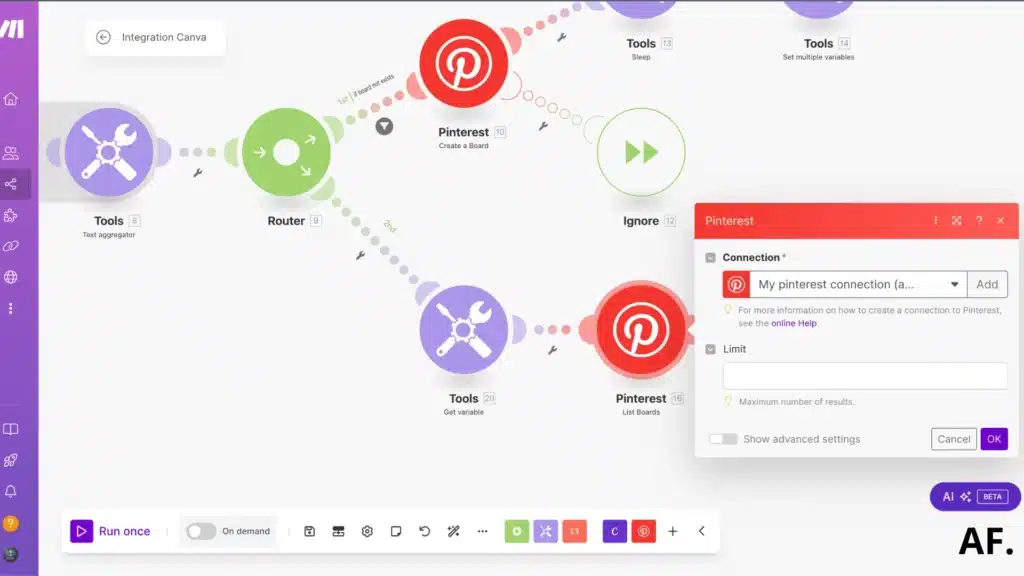
Now, you can add the ‘List of Boards‘ module. If you want to set a limit, I skip this part since I like to see all my boards, but you can do whatever works best for you!
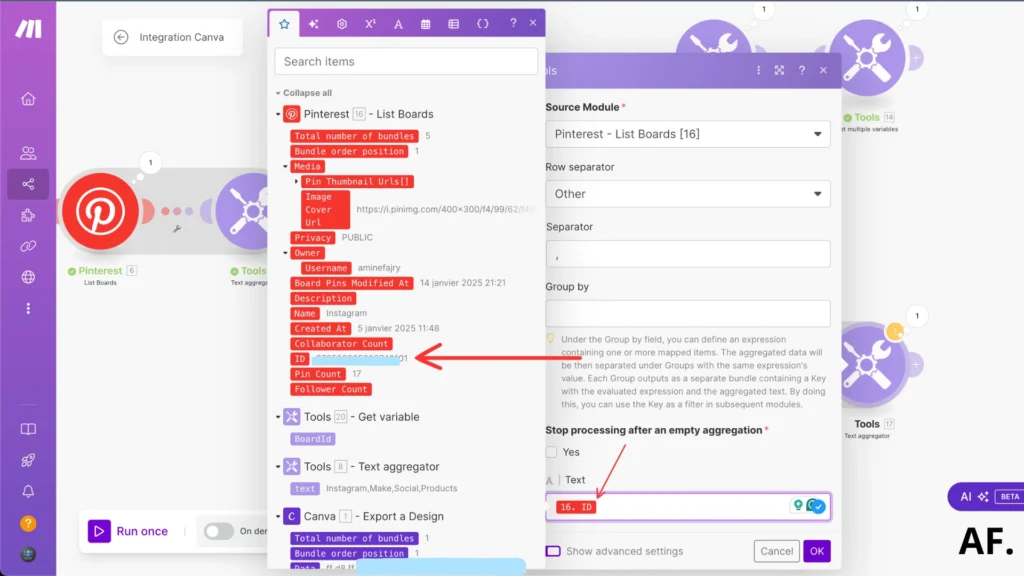
After we get our list of boards, let’s pop in a text aggregator module right here. This will help us organize everything nicely
We’ll want to put the text value in the board’s ID here. This lets us keep track of which board we’re working with:
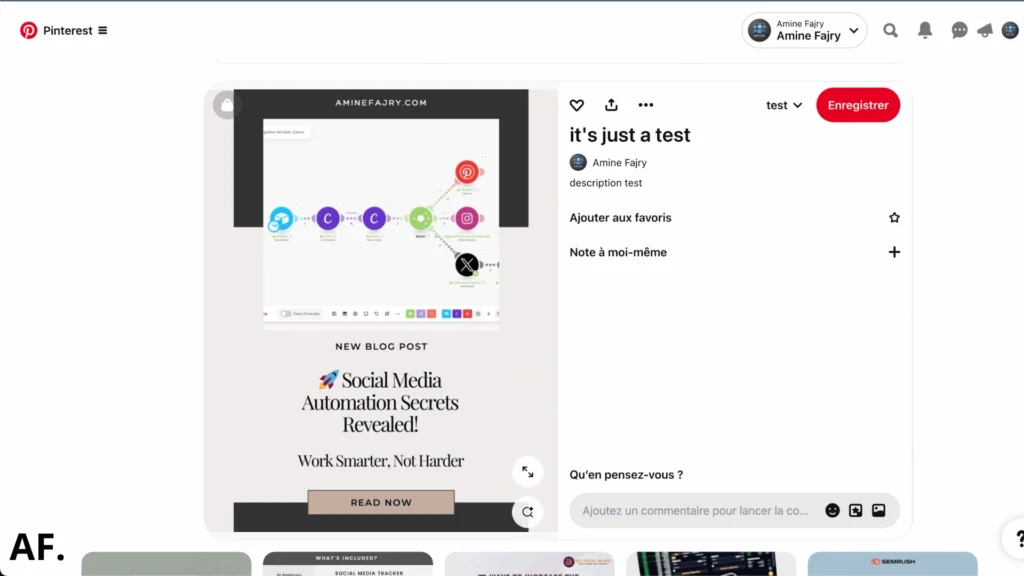
Now comes the fun part: let’s add the ‘Create a Pin‘ module! This is where the whole is about
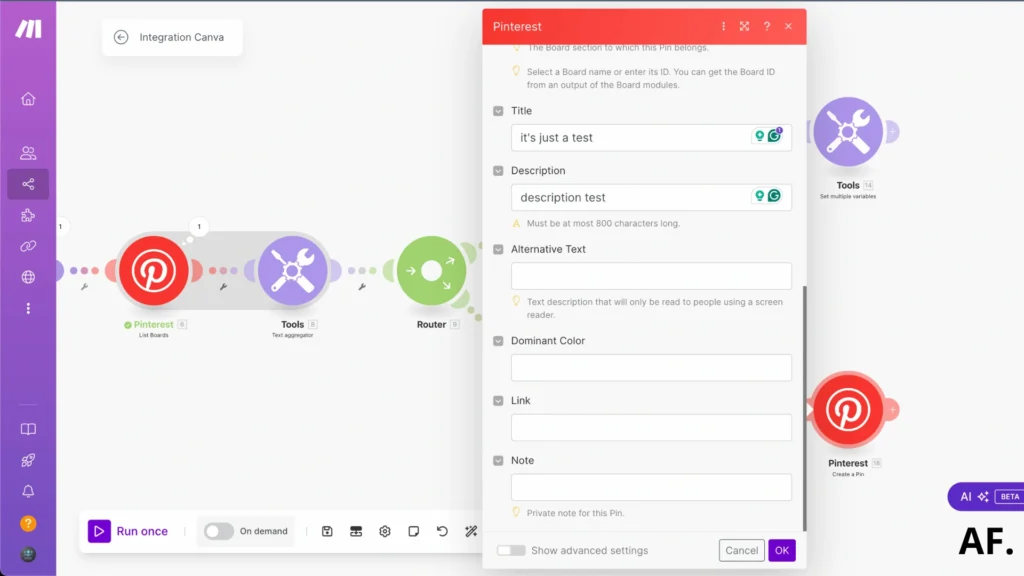
For the image URL, we’ll grab the File URL we got from Canva earlier. This will tell Pinterest which image to use for your pin:

This is where you can get creative! I added a title and description, but feel free to fill in any details you think will make your pin stand out:
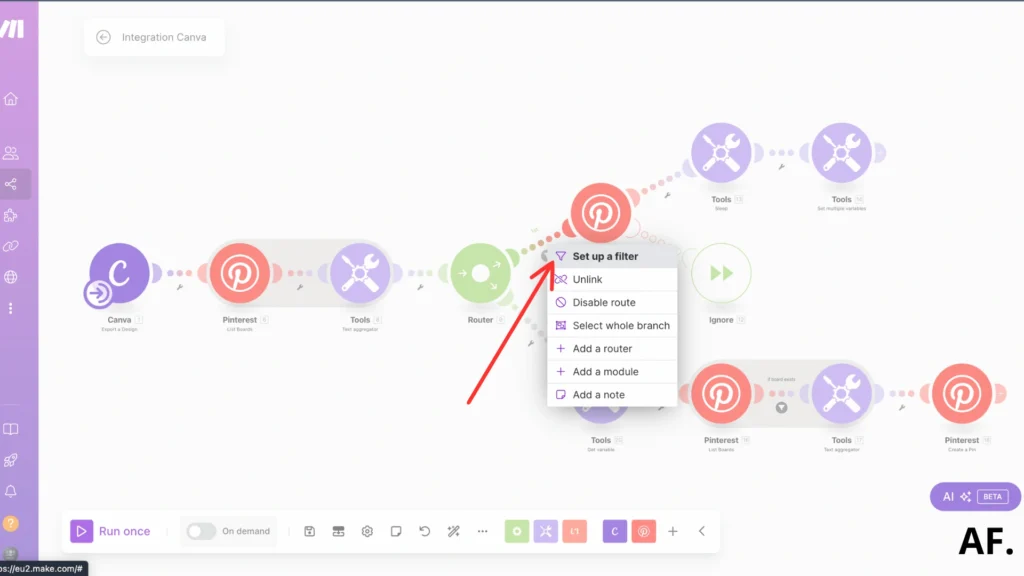
Step 7: Set Up Filters
let’s add some filters to fine-tune everything:
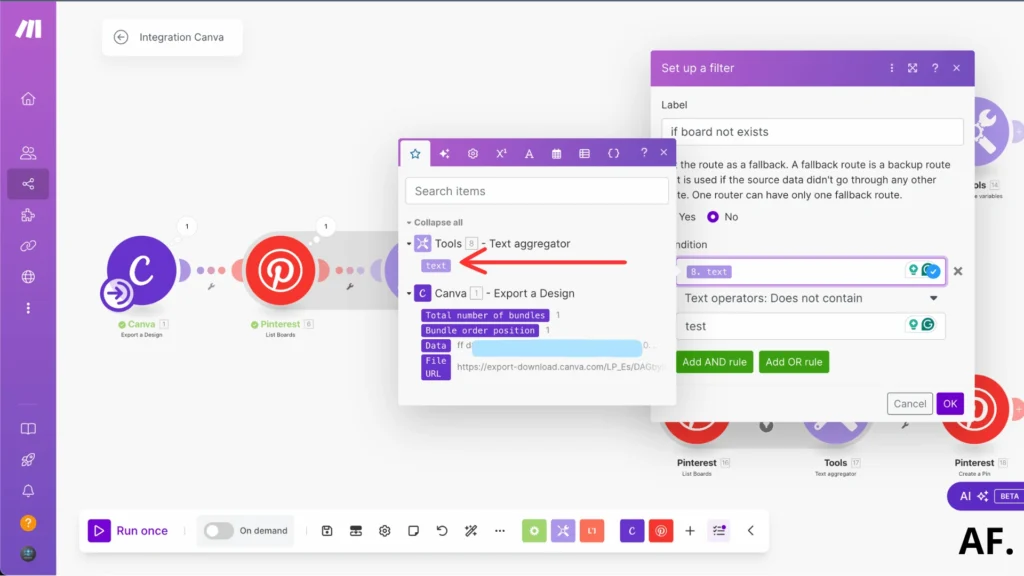
Let’s set up a little check here by adding an ‘if board not exist’ condition. Consider it a quick double-check: if a board named ‘test‘ is already out there, we won’t accidentally create another one. Here’s how I set this up:
Now, we’ll add one more filter to make everything work just right
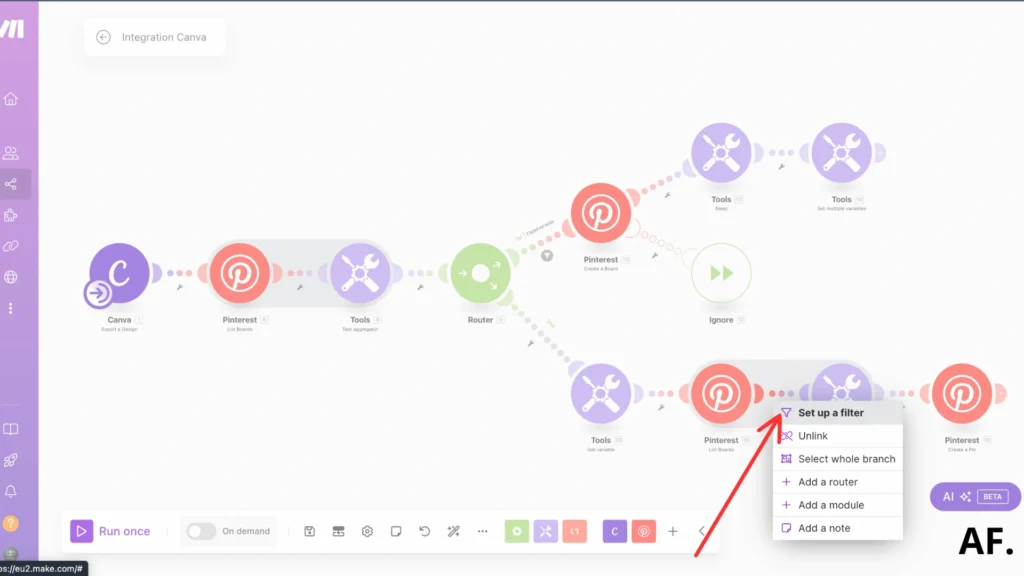
Let me show you how I made this condition work. We’re basically telling it to check two things: first, does the board already exist? And if it does, is it named ‘test‘? It’s like having a double-check system in place:
Step 8: Result
Please take a look at what happened; it worked like a charm! The board was successfully created, just as we planned.
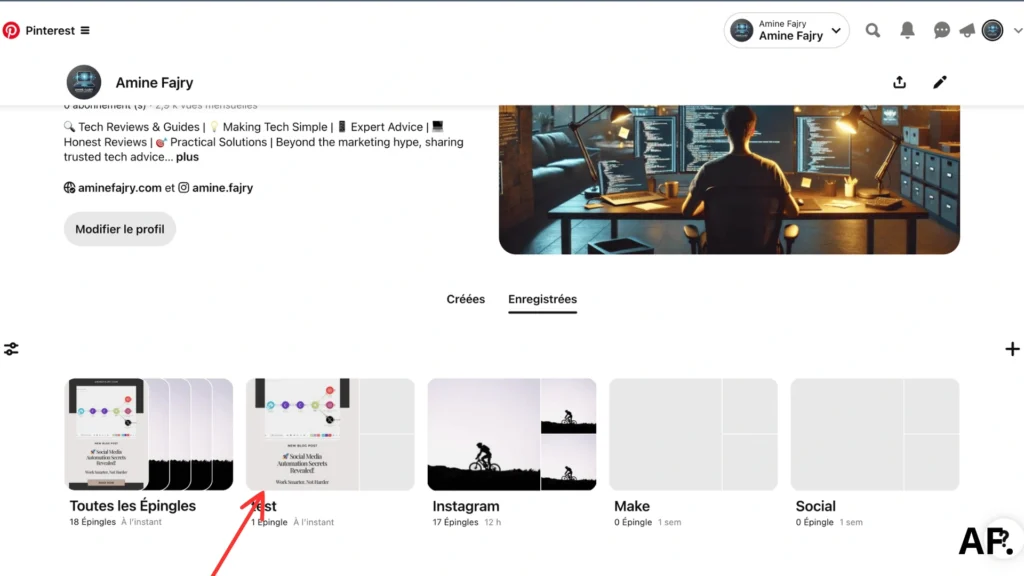
And here’s the exciting part: check out the pin our automation just created! This is what all our hard work looks like in action.
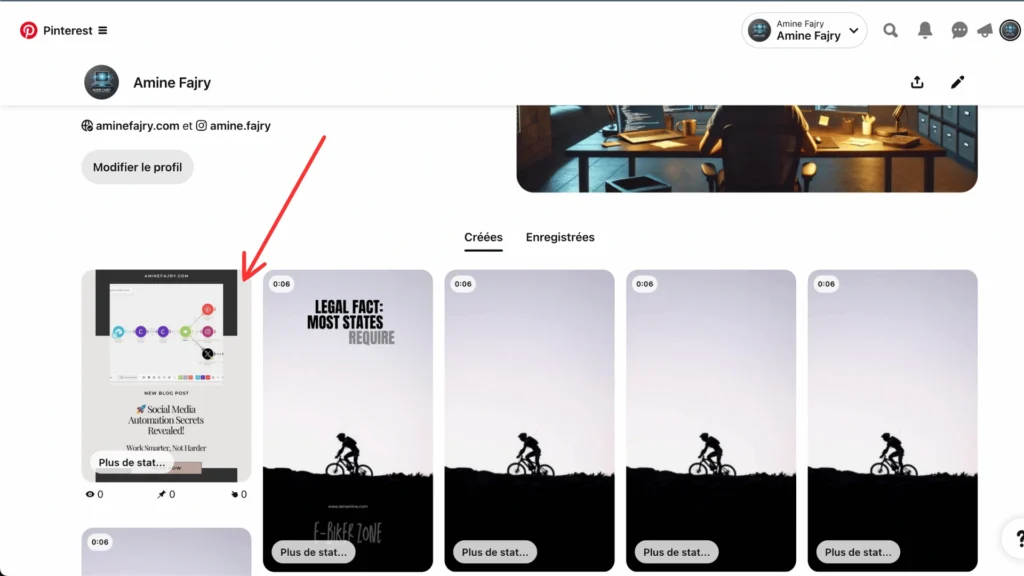
And voilà – you can see how our title and description perfectly appear on the pin. Pretty neat, right
Step 9: Schedule Your Automation
This final step focuses on scheduling. I’ve made out everything you need to know in this article below, with an example to implement scheduling into your automation:
Great job – you’ve got the basic automation set up and running! But here’s where it gets even more exciting: you can take this to the next level in many incredible ways. Try connecting it to Airtable to keep all your Canva designs organized, or spice things up with AI to generate catchy descriptions and hashtags.
When scheduling (which is your next step), don’t stress too much about finding the ‘perfect’ time – consistency matters. Here’s what works for me: I schedule 4-5 pins daily, spreading them out between 9 AM and 9 PM. Pro tip: I do all my content prep on Sundays. Trust me, there’s nothing better than starting your week knowing everything’s ready!
One last piece of advice: mark your calendar to review your automation setup once a month. Pinterest likes to change things up with its algorithm pretty often, so what’s working like a charm today might need a little tweaking next month. Watch your analytics—they’ll tell you if you need to adjust your scheduling game.
Get this scenarioMonitoring and Optimizing Your Automated Pinterest Strategy
When I started, I randomly scheduled pins without looking at the analytics, which was a big mistake! I habitually check my Pinterest Analytics dashboard weekly, focusing on impressions, saves, and click-through rates. The engagement metrics tell you which content resonates with your audience.
Here’s what I specifically monitor for the best results:- Monthly viewer trends (looking for patterns in engagement)
- Best-performing pin designs (saves and clicks)
- Top-performing boards
- Peak posting times based on audience activity
I’ve found that comparing manual versus automated pin performance when analyzing automation results is eye-opening. Sometimes, your automation tools might be posting at less-than-optimal times. I had this issue with Tailwind once my pins went out at 3 AM when my audience was sound asleep!
Troubleshooting common issues often comes down to a few key areas. If you’re seeing low engagement, check these elements:- Pin image quality and size (2:3 ratio works best)
- Description Keywords (use specific, searchable terms)
- Board relevance (make sure pins match board themes)
- Posting frequency (avoid overwhelming your followers)
Making adjustments is where the magic happens. I’ve learned to be patient and test one change at a time. For instance, when I noticed my food-related pins performed better with bright, naturally-lit photos, I adjusted my entire content calendar to focus on that style. The results? My click-through rates doubled within a month.
Remember, Pinterest’s algorithm changes frequently, so what worked last year might not work today. Stay flexible and keep testing new approaches. I usually review and adjust my automation strategy quarterly, but I’m always ready to make quick changes if I notice significant drops in engagement.
Conclusion
By now, you should have all the tools and knowledge needed to automate your Pinterest photo pins using Make. Automation isn’t about setting and forgetting; it’s about creating a strategic, efficient system that works for your business. Start small, test your scenarios thoroughly, and gradually expand your automation as you become more comfortable with the platform. Ready to save countless hours on your Pinterest marketing? Take action today and set up your first Make automation scenario!
Join the Newsletter
Subscribe to get our latest content by email.
We won’t send you spam. Unsubscribe at any time.
✅ You’re subscribed!
FAQs
How to automate pins on Pinterest?
The easiest way is to use Make (formerly Integromat). Connect your Pinterest account, set up a simple workflow that pulls images from your content source (like Canva), and schedule your posts. You can post up to 200 pins daily, though I recommend starting with 4-5 pins per day to keep things manageable.
How to make a pin on Pinterest with multiple pictures?
Creating multi-image pins is super simple! On Pinterest, click the “+” button to create a pin, then upload multiple images simultaneously. You can drag and drop to arrange them in any order you want. Pro tip: use 2-3 images max for better engagement – too many can overwhelm viewers.
How to make engaging pins for Pinterest?
Keep it bright and clean! Use a 2:3 ratio for your images (think portrait mode), add clear text that solves a problem, and use eye-catching colors. Write descriptions that include relevant keywords, but keep them natural – nobody likes keyword stuffing. Most importantly, make sure your pin delivers what it promises. Good pins are like good friends – they’re helpful and trustworthy!

Further Resources
- How to Automate Twitter with Make
- How to Automate YouTube Shorts with Make
- How to Automate Facebook Posts with Make
- How to Automate Instagram Posts with Make
- How to Easily Use the Router Module in Make
- How to Automate Photo Posts on Reddit with Make
- How to Set Up Webhooks in Make: Complete Guide
- How to Build a Social Media Automation System with Make