How to Automate Facebook Posts with Make
Have you ever felt stressed managing your Facebook posting schedule? You’re not alone! In today’s world, manual social media posting can be a real-time drain. That’s where Make (formerly Integromat) comes in as a game-changer! According to recent statistics, businesses that automate their social media posts see a 40% increase in engagement and save an average of 6 hours per week.
In this comprehensive guide, we’ll walk you through everything you need to know about automating your Facebook posts using Make’s powerful automation platform. You will need only two modules, Canva and Facebook, and this step-by-step will show you how to post videos and photos and how to automate them if you want.

Let’s dive right in!
What You’ll Learn
This step-by-step guide will show you how to:
- Set up Facebook automation workflow
- Connect Canva for automated design publishing
- Post automatically to Facebook
- Schedule Facebook posts
Prerequisites
Before we begin, you’ll need:- A Make account
- A Facebook Page
- Canva accounts for design creation
Creating Your First Facebook Post Automation
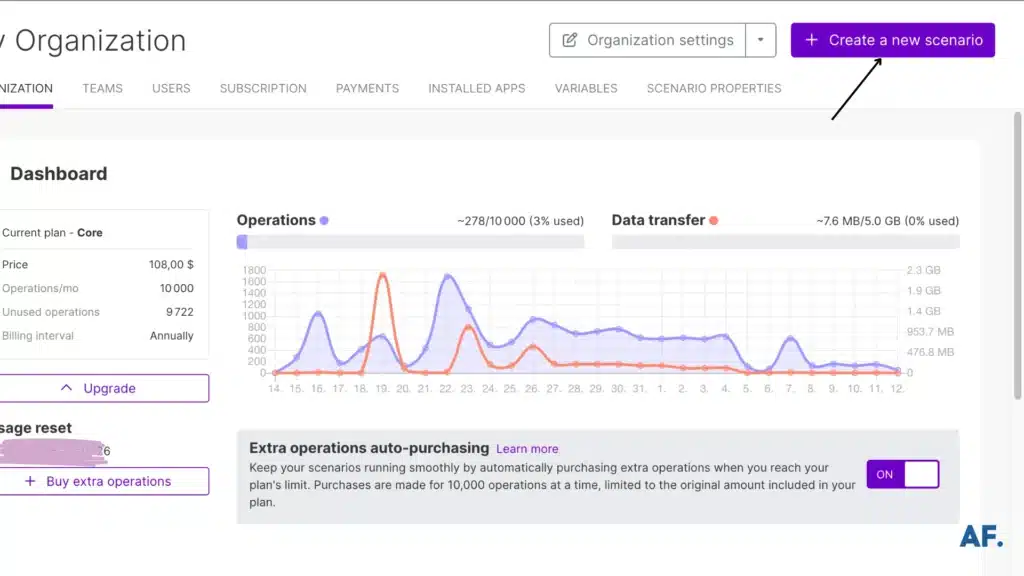
Step 1: Create your scenario
To begin, navigate to your dashboard and click the “Create a new scenario” button:
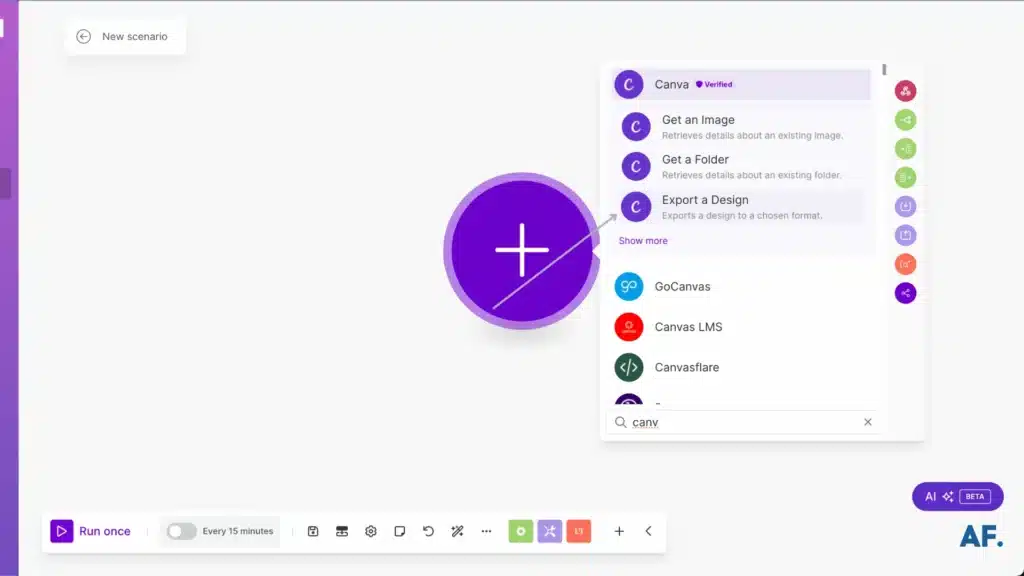
Step 2: Add Your First Module
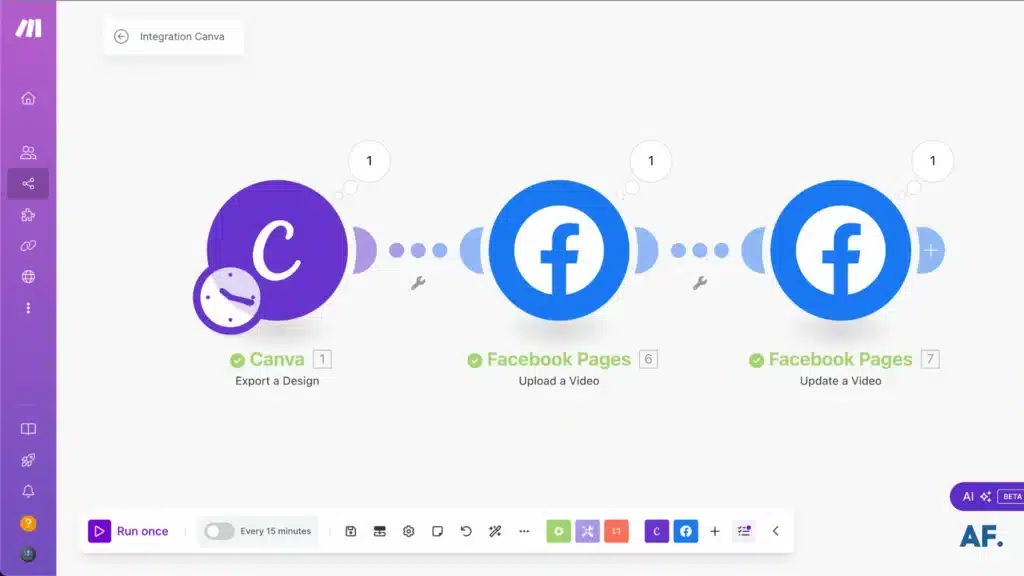
Let me show you how to seamlessly export your designs from Canva, whether it’s a video or an image. Begin by typing “Canva” and selecting “Export a Design“:
Export Image from Canva :
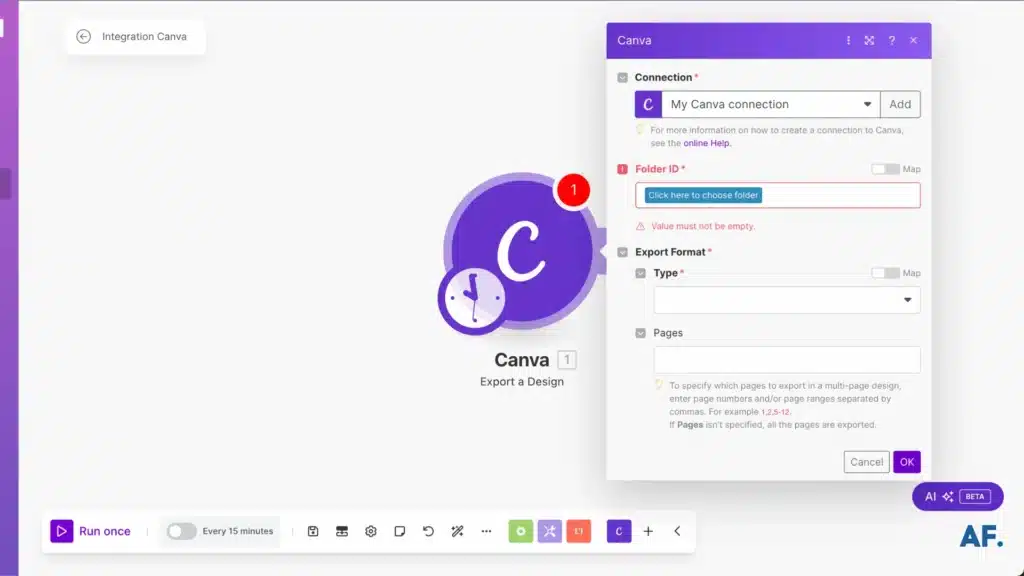
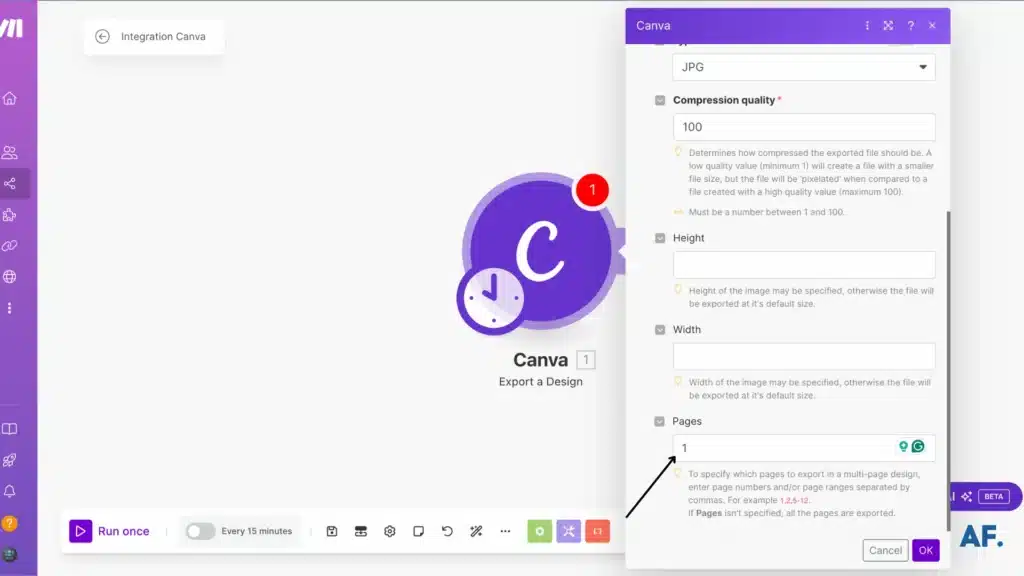
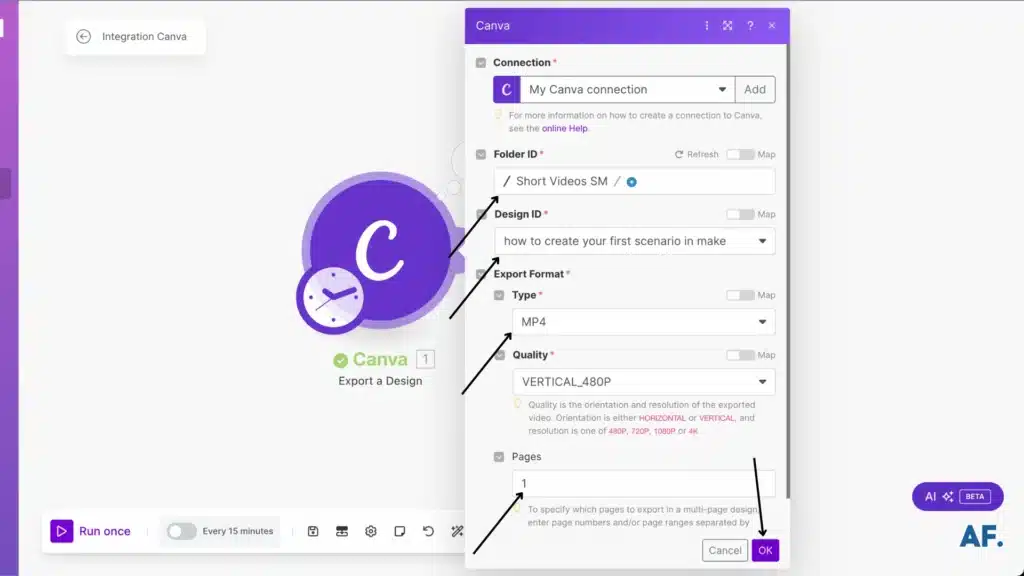
In the folder ID section, enter the folder where your Canva designs are stored. Next, select the specific design you want to export from that folder. Choose the image format you wish to export, and I recommend selecting JPG for optimal quality:
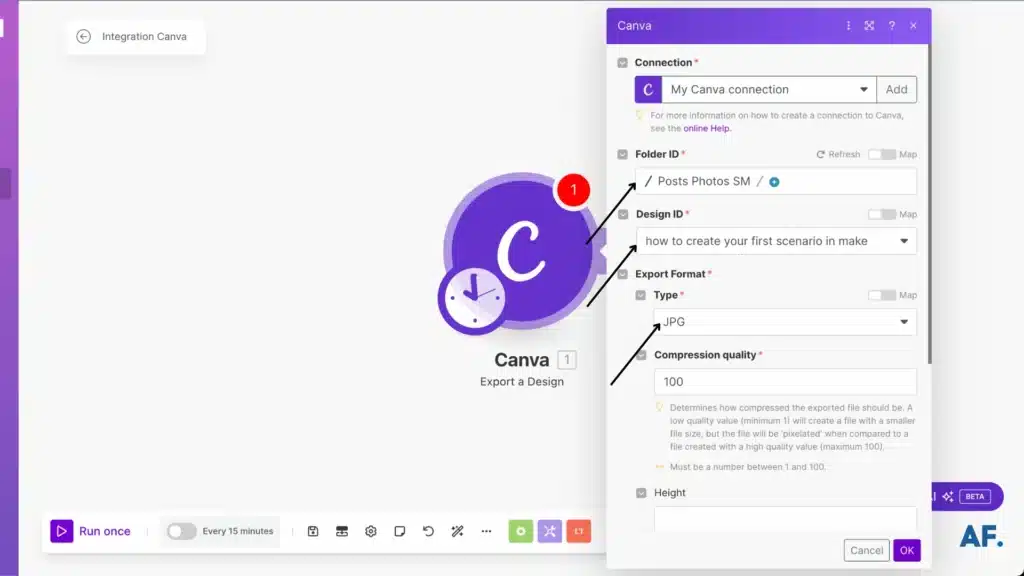
Then select the page number from the design you want to export:
Export video from Canva :
If you want to export a video, start by selecting the folder, then choose your design, and finally select MP4 as the format type:
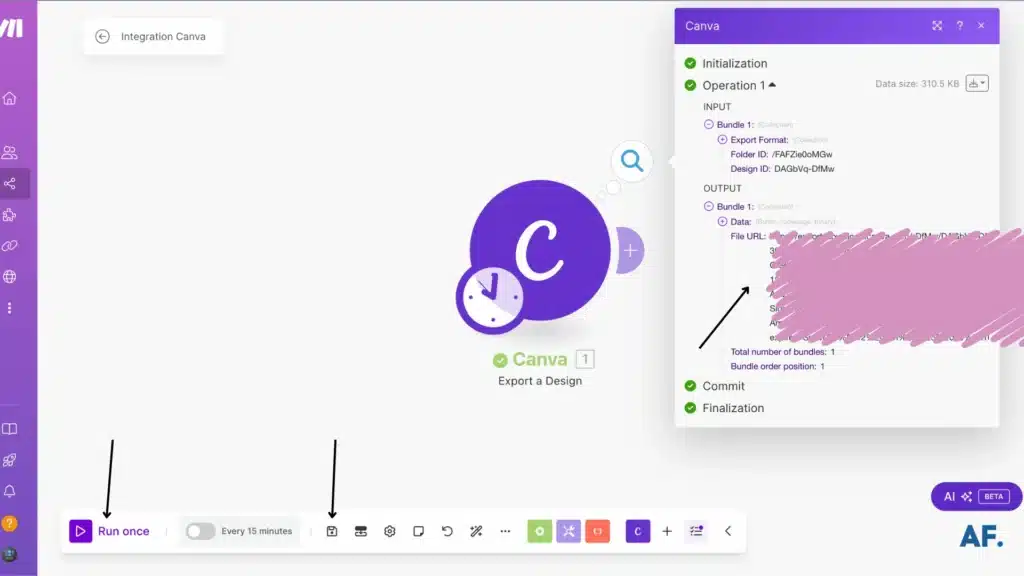
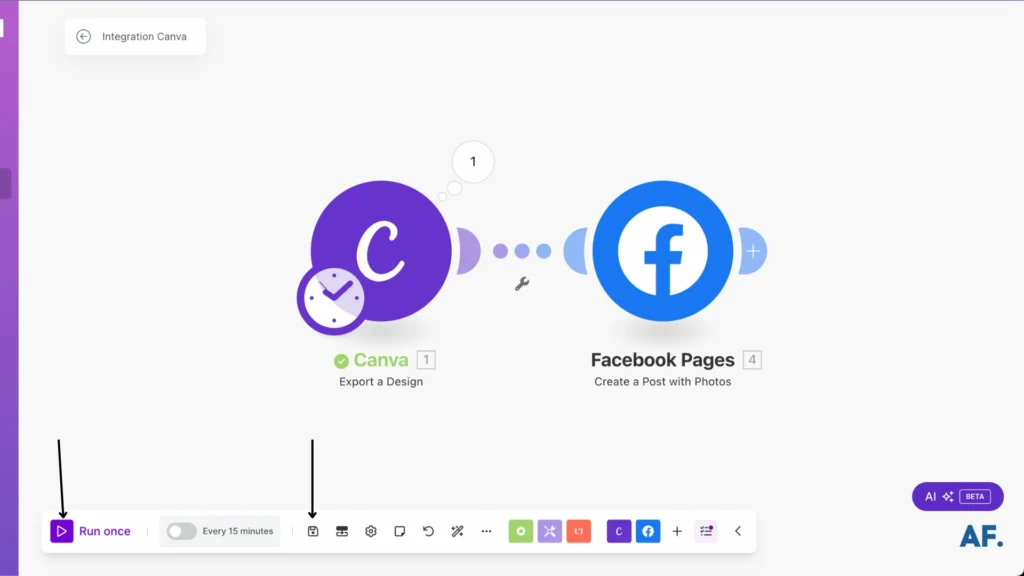
Step 3: Save and Run Scenario
Once you’ve saved and run your scenario, you should be able to see the output File URL:
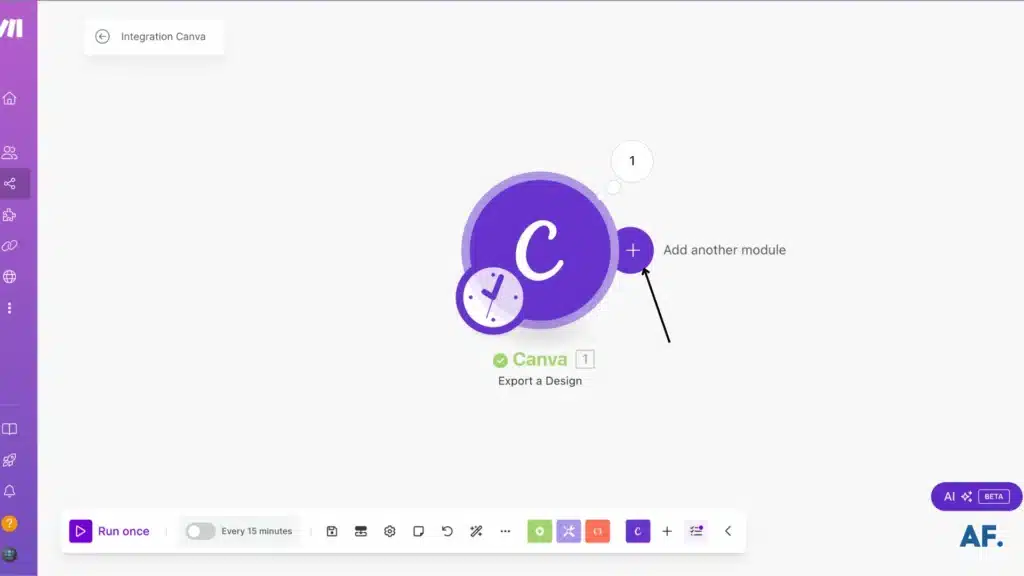
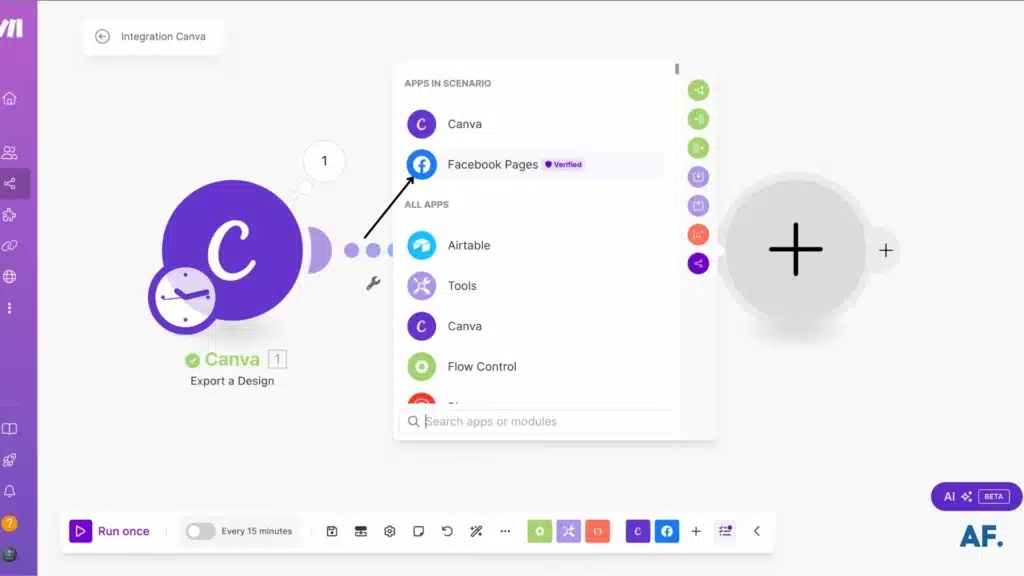
Step 4: Add Facebook Module
Now that your Canva module is functioning correctly, let’s move on to adding the first Facebook module:
Type “Facebook” in the search bar. Once “Facebook Pages” appears, click on “Show more”:
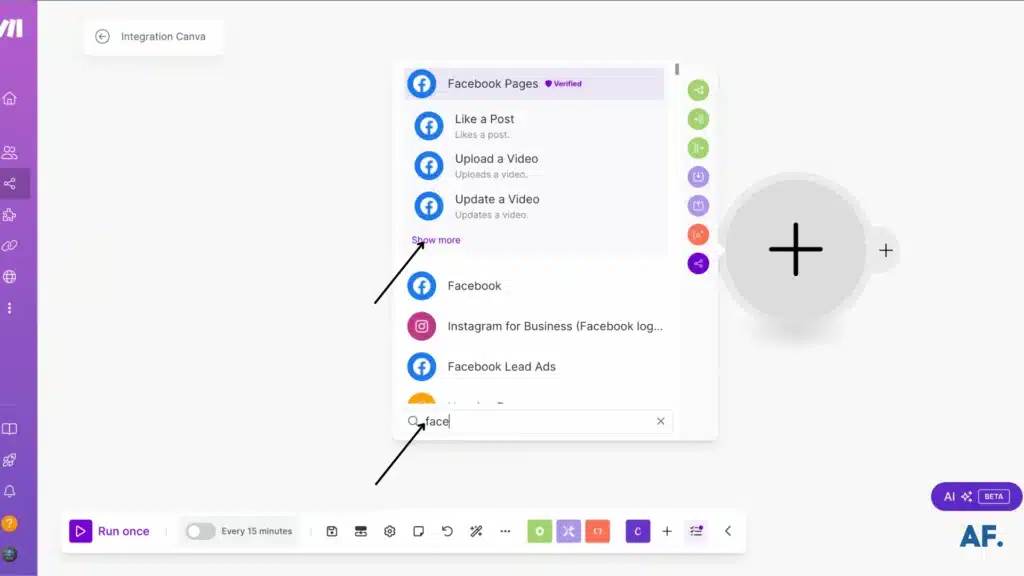
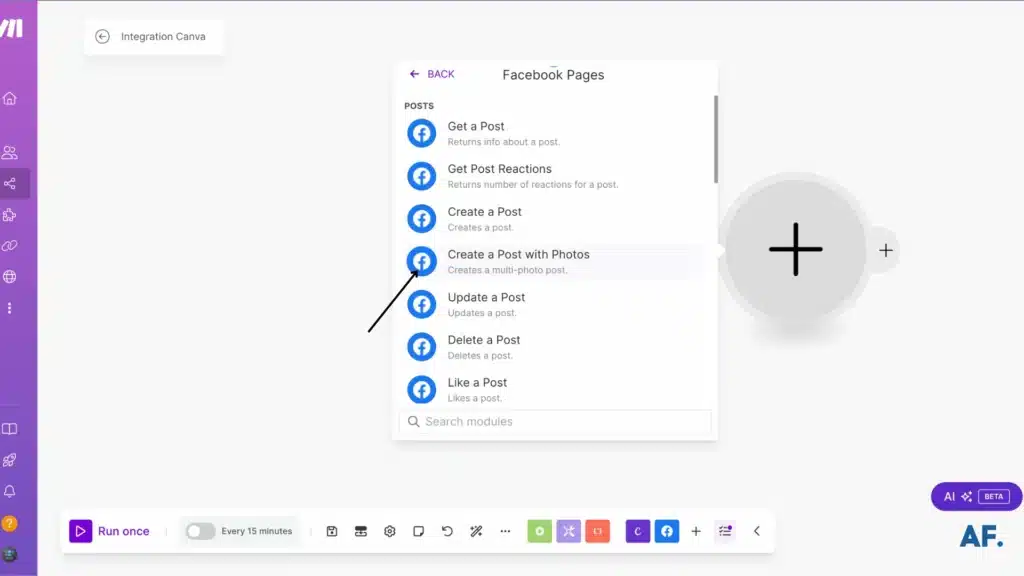
Image post :
If you’re looking to post a photo, select “Create a Post with Photos”:
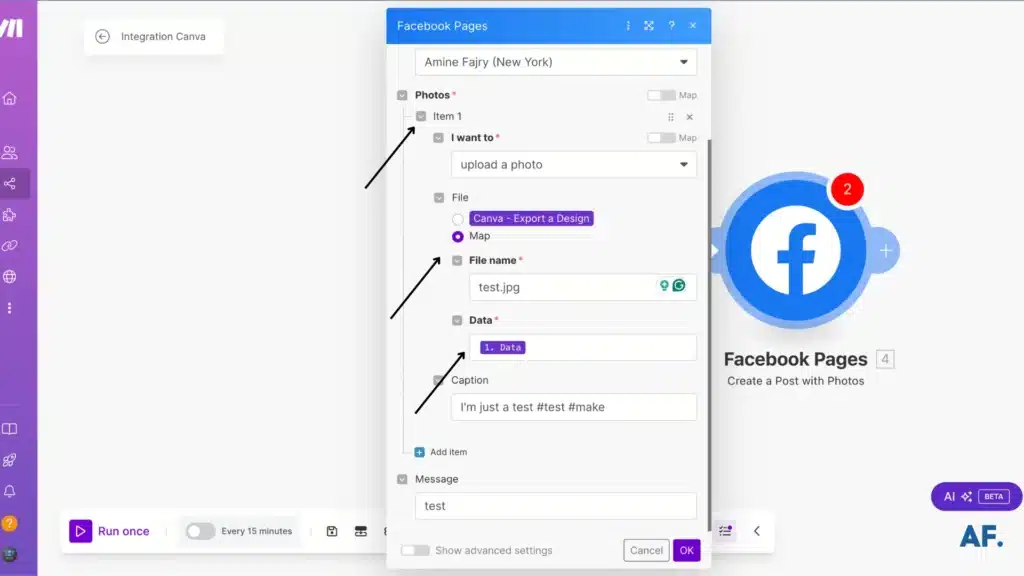
Ensure you choose Your Page:

Here’s how I filled in this section: select “Map” and add a filename. Don’t forget that once you add a filename, you must include the image extension. For example, I used test.jpg
Once you save and run your scenario, test it to ensure everything is functioning correctly:
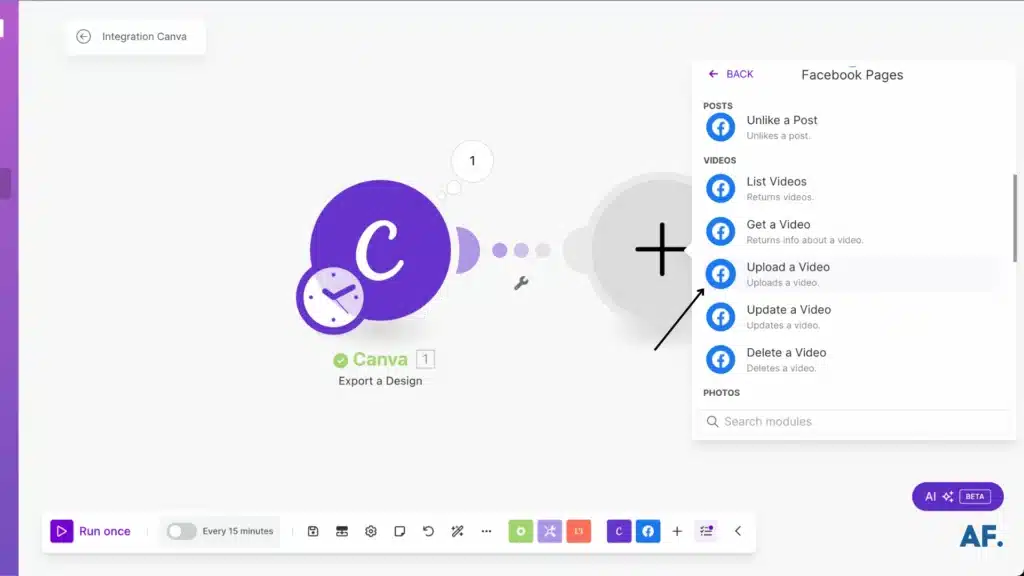
Video post:
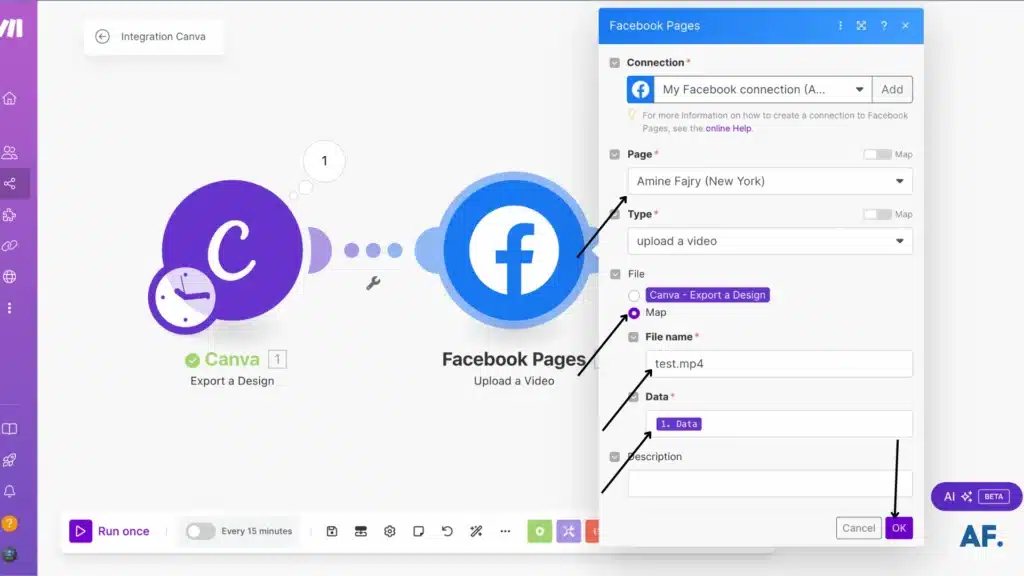
If you want to upload a video to your Facebook page, select “Upload a Video” from the options.
Fill in the necessary details, ensuring your filename includes “.mp4“, and leave the description blank:
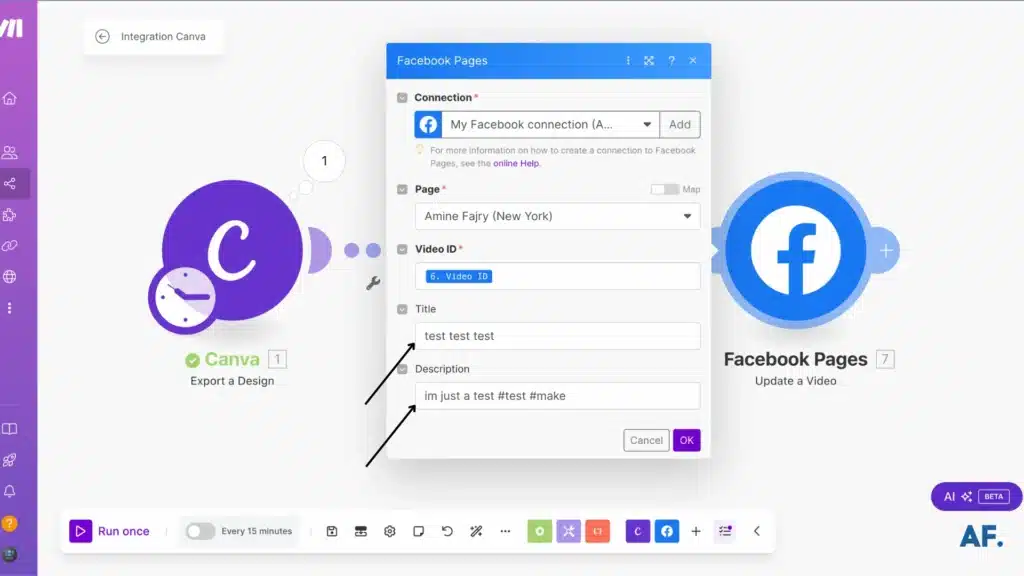
Introduce another module if you want to add a caption to your video. Once again, select “Facebook Pages“:
Next, select “Update a Video” from the options:
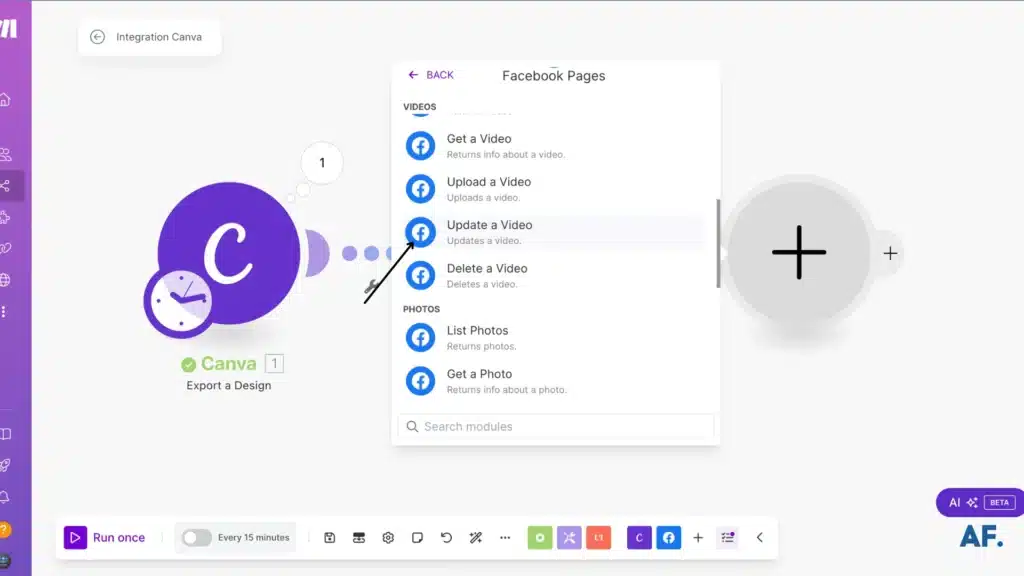
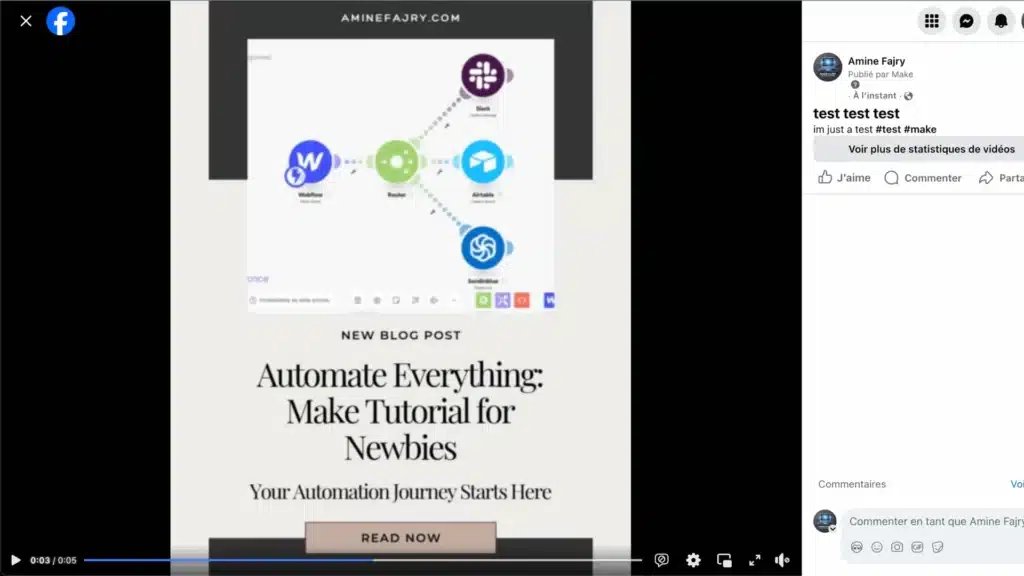
Here, you can add a title and description:
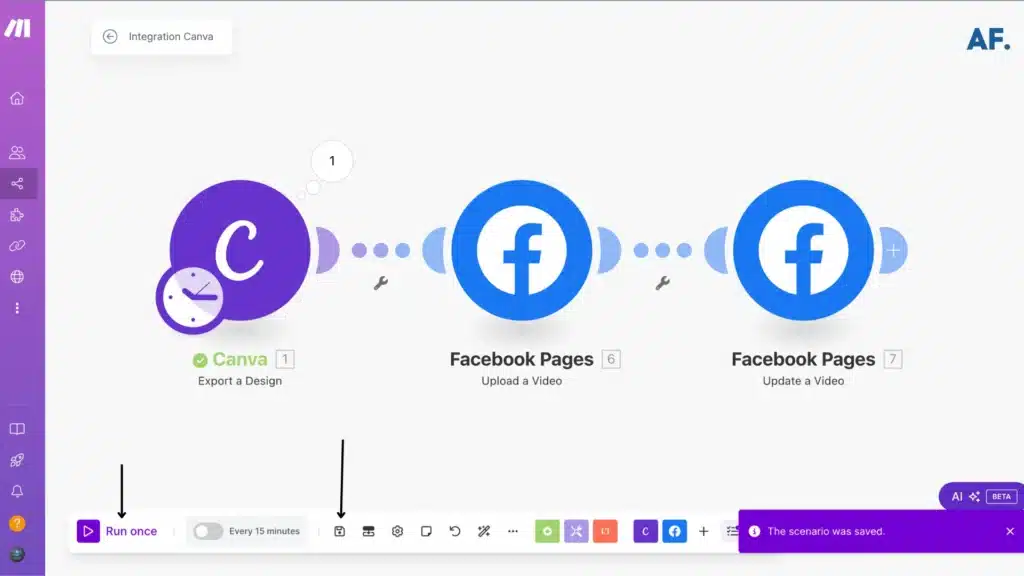
Once you’re done, make sure to save and execute your scenario
Step 5: Results
As you can see, the scenarios have been successfully executed as planned:
Image post:
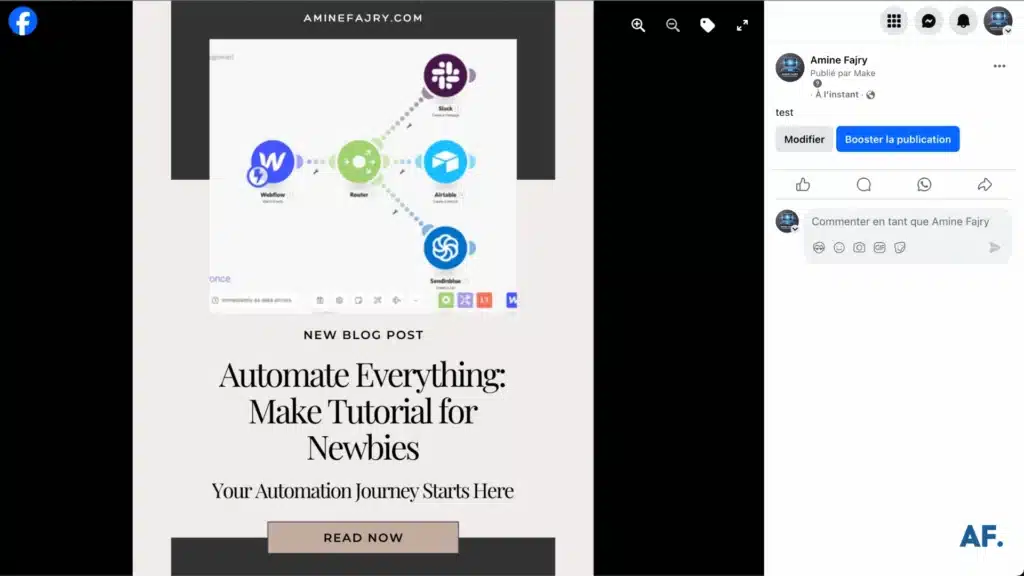
Video post:
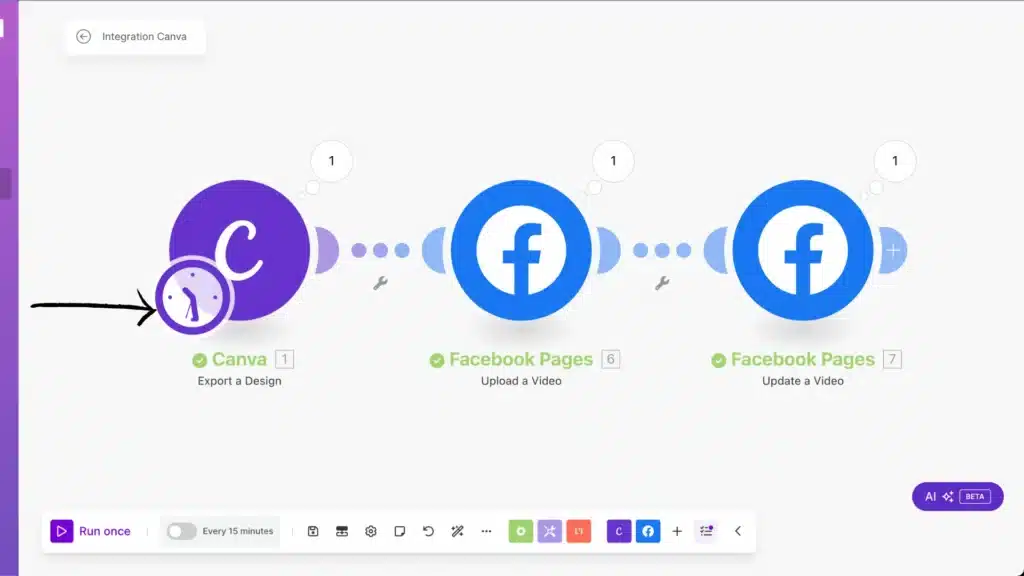
Step 6: Schedule your automation
If you’re looking to automate your Facebook posts, here’s how to do it:
Begin by clicking on the clock icon:
You’ll see a screen like this. If you want to set it up for daily automation, click on “At regular intervals“:
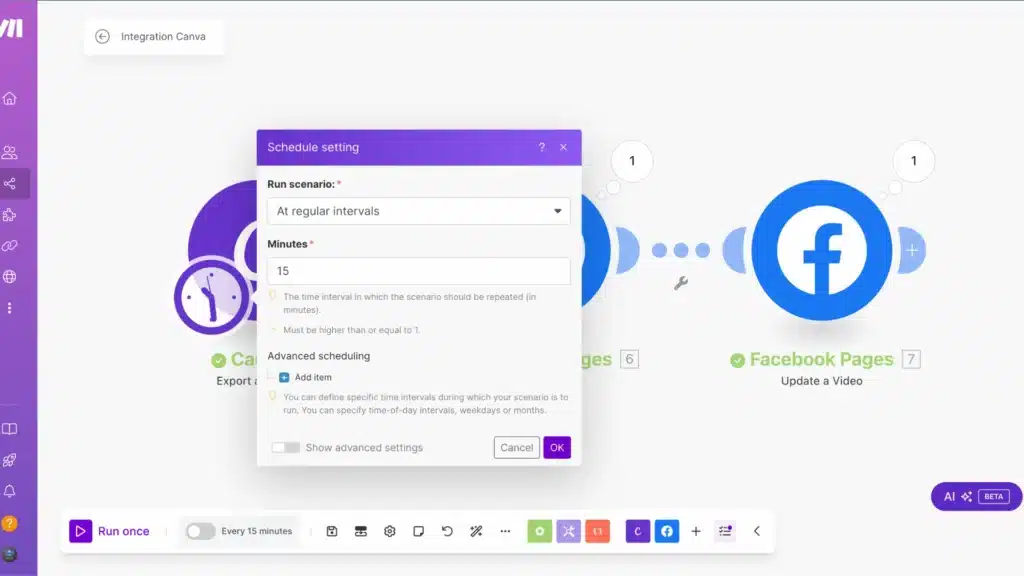
Personally, I decided to schedule posts to go live every day at 10:00 am:

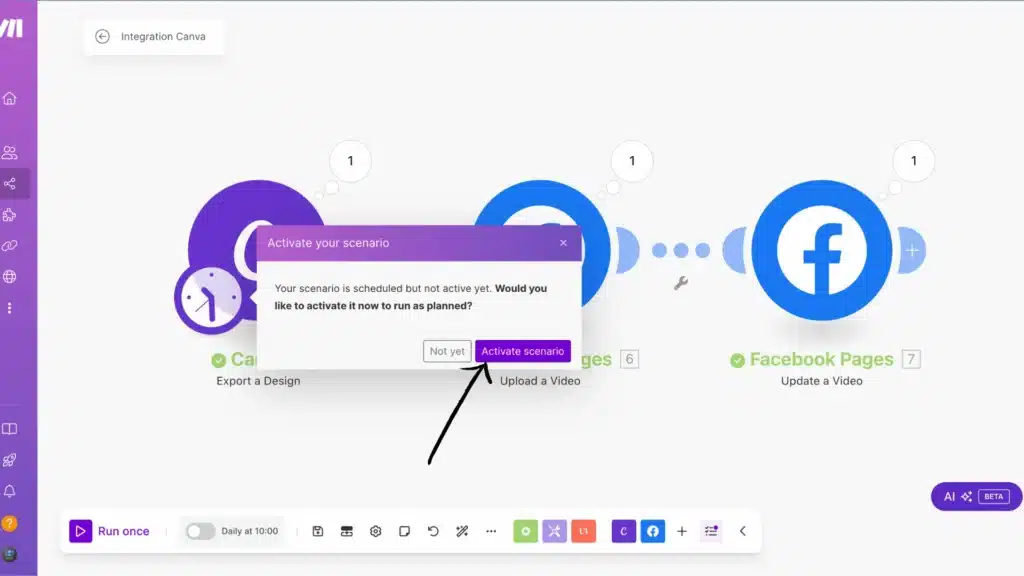
Next, click on “Activate scenario” and you’ll see this:
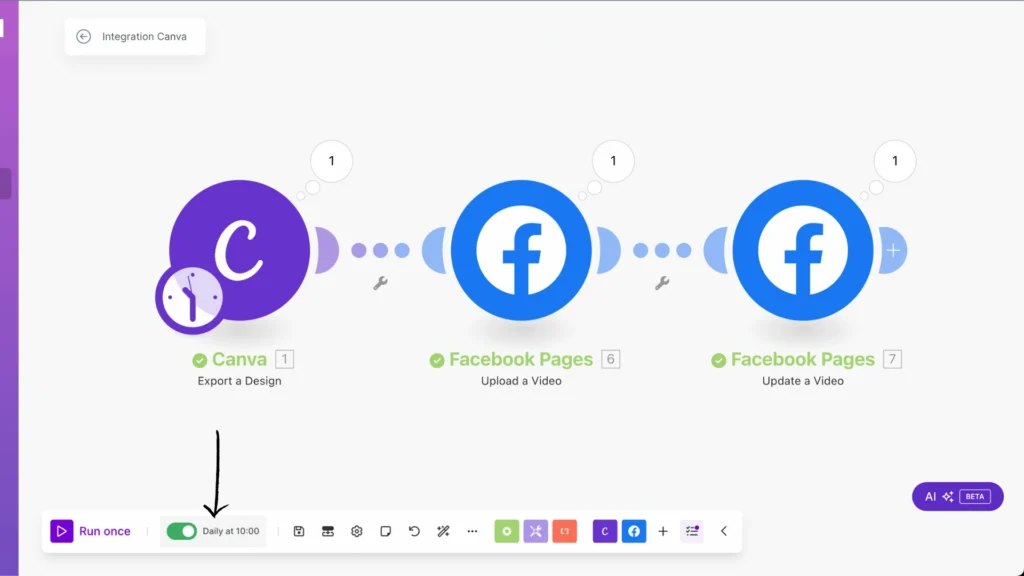
Once clicked, you’ll notice that the daily switch at 10:00 AM is activated:
After finishing your scenario, you can easily scale it up using Airtable or AI tools like ChatGPT or Claude AI. There are plenty of AI options available to generate captions and hashtags. You can also add notifications with Discord or Slack. Best of luck, and have fun experimenting with these tools!
Get this scenarioUnderstanding Make’s Interface and Setup Process
Let me share my experience with Make and connect it with Facebook. I remember feeling slightly overwhelmed initially, but I promise it’s not as complicated as it looks.
You’ll want to head straight to the Facebook connection when creating your Make account. Here’s a pro tip I learned the hard way: ensure you’re logged into your Facebook account with admin access to your business pages before starting the connection process. I spent 30 frustrated minutes wondering why I couldn’t see my client’s page until I realized I was logged into my account!
The Make dashboard might look a bit intimidating with all its options, but focus on these key areas first:- Scenarios (this is where your automation magic happens)
- Connections (your integrated apps live here)
- Data stores (useful for storing information between runs)
Setting up your first scenario is pretty straightforward. Click the “Create a new scenario” button to see the visual canvas where everything comes together.
Speaking of modules, these are your building blocks. Think of them as Lego pieces that snap together to create your automation. Each module performs a specific action, like “Watch Facebook Page” or “Create Facebook Post.” The connections between modules determine how data flows from one step to the next.
One mistake I made early on was trying to build complex scenarios immediately. Start simple—maybe set up a module to monitor your Facebook page for new posts. Once you get comfortable with that, you can start adding more sophisticated functions.
Remember to test each module individually before connecting them. There’s nothing worse than building an entire scenario only to find out the first module isn’t working correctly. Trust me, I’ve been there, and it’s not fun debugging a complex scenario!
Best Practices for Automated Facebook Posting
Getting the timing right has been a game-changer for my clients’ engagement rates. When I started, I scheduled everything for 9 AM because that seemed logical; was I wrong? Through careful testing, I’ve found that different audiences have wildly different peak times. For B2B content, Tuesday through Thursday between 10 AM and 1 PM typically sees the highest engagement. For consumer brands, evenings between 7 PM and 9 PM often work better.
Here’s something crucial about the content variety that took me ages to understand: you need a healthy mix of 70% valuable content, 20% shared content, and 10% promotional material. I made the rookie mistake of automation-dumping purely promotional content and watched my engagement tank faster than a lead balloon.
When monitoring metrics, don’t just look at likes and shares. I’ve learned to pay close attention to these specific indicators:- Reach-to-engagement ratio
- Time of day performance patterns
- Comment sentiment (not just quantity)
- Click-through rates on different content types
One of the biggest pitfalls I see people fall into is over-automation. Look, I get it—we’re all busy. But you can’t just set up a month’s worth of posts and disappear. Facebook’s algorithm detects this behavior, which can hurt your reach. I now recommend checking in at least every 48 hours to respond to comments and adjust scheduling if needed.
A quick tip that’s saved me countless headaches is always to preview your automated posts on mobile devices. About 98,5% of Facebook users access the platform via mobile, and I’ve had perfectly formatted desktop posts look terrible on phones.
Remember to audit your automated posting schedule regularly. What worked last quarter might not work now. Social media is constantly evolving, and so should your strategy.
Conclusion
Ready to transform your Facebook posting strategy? With Make’s powerful automation capabilities, you can streamline your social media workflow effectively. Successful automation isn’t about set-and-forget – it’s about creating innovative, dynamic systems that adapt to your needs. Start small, experiment with different approaches, and gradually build more complex scenarios as you become comfortable with the platform.
FAQs
Is there a way to automate Facebook posts?
Yes! You can use Make (formerly Integromat) to automate your Facebook posts, saving time and keeping your page consistently active. It’s especially useful for scheduling content from Canva.
Is there a way to schedule personal Facebook posts?
You can schedule personal Facebook posts directly through Facebook’s built-in Creator Studio or use third-party tools like Make to set up regular posting schedules at your preferred times.

Further Resources
- How to Create Your First Scenario in Make
- How to Build a Social Media Automation System with Make
- How to Set Up Webhooks in Make: Complete Guide
- How to Automate Photo Posts on Reddit with Make
- How to Easily Use the Router Module in Make
- How to Automate Instagram Posts with Make
- How to Automate Twitter with Make
- How to Automate Photo Pins on Pinterest with Make