How to Automate Document Approvals with Make
Did you know that 55% of managers spend 8 or more hours weekly on administrative tasks? That’s over 400 hours per year that could be better spent on strategic initiatives! Automating these processes could significantly boost productivity and allow teams to focus on high-value activities. I’m excited to show you how automating document approvals with Make can transform your workflow. Whether dealing with contracts, invoices, or internal documents, automation is the key to eliminating bottlenecks and accelerating your approval processes.
We will build two automated scenarios that will revolutionize your approval workflow. The best part? It’s completely free and straightforward!
Here’s what you’ll need to follow along:- A Google Drive account
- An Airtable account
- A Gmail account
- Make.com account
That’s it! No paid subscriptions or complex setups are required. I’ll guide you through this step by step, showing you how to copy and configure everything precisely as I have it. Together, we’ll create an approval system that’ll save you hours of manual work!

Let’s dive in!
What You’ll Learn

- Set up automation document approvals workflow.
- Send automatic emails.
- Update automatically data on Airtable.
Setting Up Your Automation Document Approvals
Step 1: Create Folders on Google Drive
Let’s start by setting up your folder structure in Google Drive! First, create a main folder called ‘Approval System’, our home base. Inside this folder, we’ll need three essential subfolders:- ‘Approved‘
- ‘Rejected‘
- ‘Wait for Approval‘
I’ve included a helpful image below to show you exactly how this should look:

Step 2: Create Your Table on Airtable
Now that we have our folders set up let’s head over to Airtable to create our tracking system. Open up Airtable and create a fresh table; we’ll customize it with specific columns to manage our approval workflow effectively. Here’s precisely how I’ve structured the columns:

- ‘Pending‘
- ‘Approved‘
- ‘Rejected‘
These status labels will help us track each item’s progress through the approval workflow!
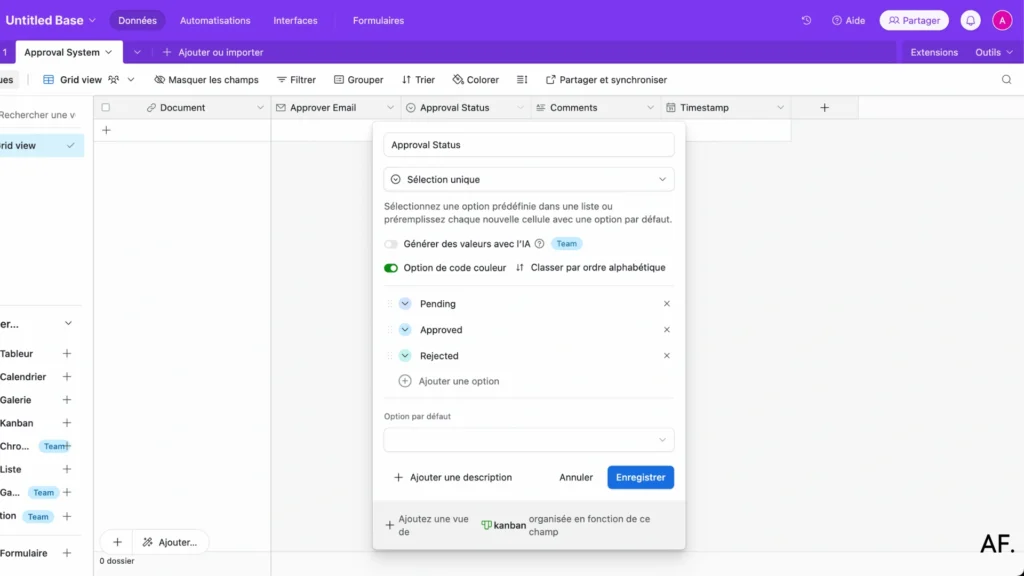
Next, let’s configure the Timestamp column to track our dates properly. This is a quick but essential step:
- Find the Type dropdown in your Timestamp column
- Select ‘Date’ as your data type
- Toggle on both the hour and ‘now’ options
This setup will help us automatically track when each item moves through our approval system!

Step 3: Create Your Document
Great! Now that our Airtable is all set up, let’s create a test file to ensure everything works smoothly. This will help us see the approval system in action!

For this test, we’ll keep things super simple. Just create any basic file. It could be a quick text document, a simple spreadsheet, or even a blank PDF. The content doesn’t matter since we’re just testing our workflow!

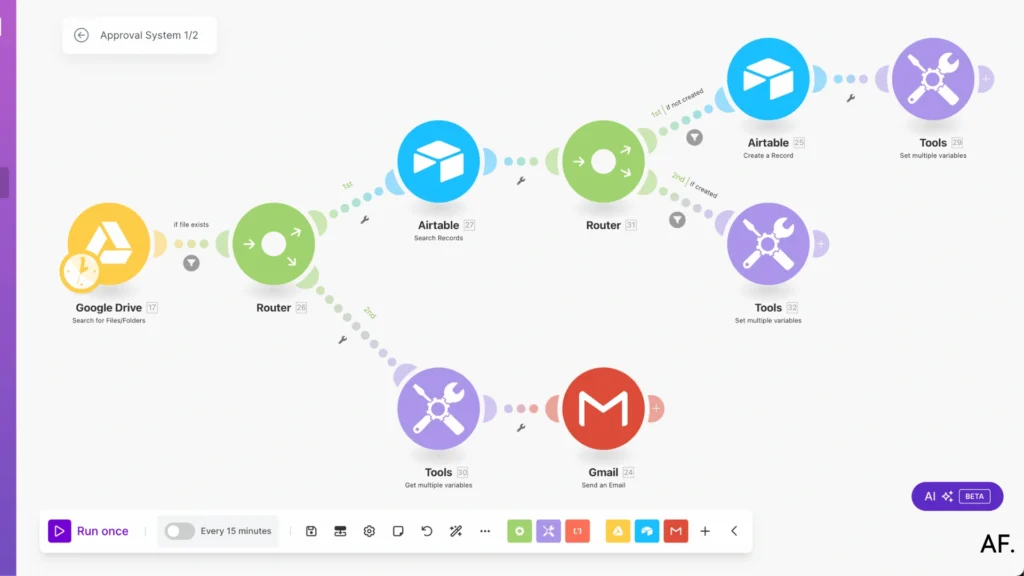
Step 4: Create Your Scenario Approval System 1/2
Now comes the fun part: let’s head over to Make (formerly Integromat) and create a new scenario! This is where we’ll build the automation magic that powers our approval system.

Step 5: Build Your Scenario
We’ll use ‘Search For Files/Folders‘ in Make for our first module. Here’s a pro tip from my testing experience: While you might be tempted to use the ‘Watch Files in a Folder‘ module, I’ve found it unreliable. The ‘Search For Files/Folders‘ module is much more consistent and works great for everyone; trust me!

Now, let’s configure the essential settings for our module. I’ll show you which values to fill in to make everything work perfectly. Here’s what you need to enter:

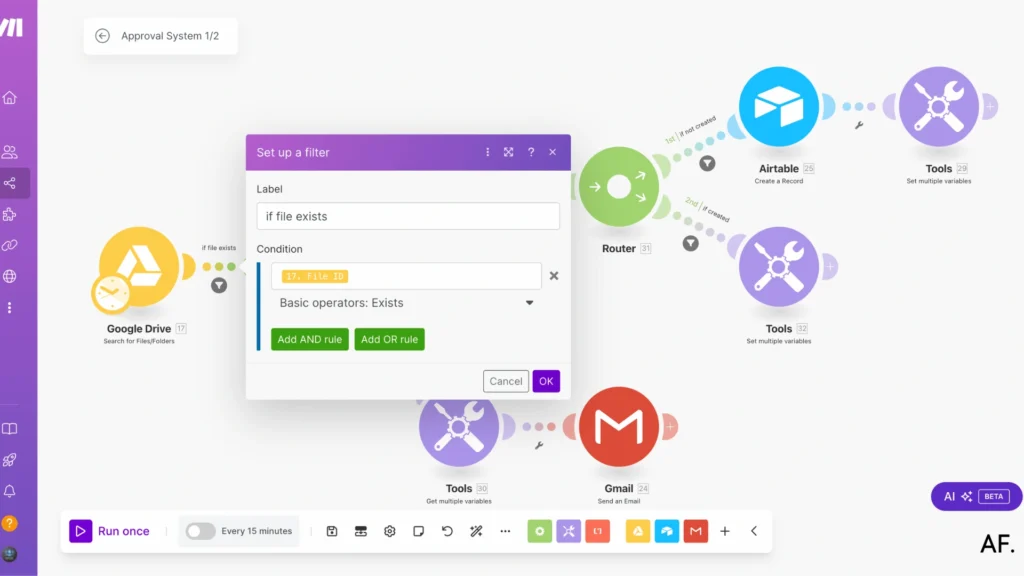
Next up, we need to add a filter, a crucial step that helps us be specific about which files we want to process. Let me show you how to set up this filter to make our automation smarter!

Let’s set up our filter about this! We’ll tell it to check if the file is in our ‘Wait for Approval‘ folder. It’s pretty straightforward; our scenario will continue running if it finds a file there. If not, it’ll skip and wait for the following file.
Think of it as having a helpful assistant who checks your ‘Wait for Approval‘ folder and only moves forward with files that need our attention!
Now, let’s add a Router module; this is where our automation gets interesting! The Router will act like a traffic controller, helping us direct files down different paths based on the approval decisions.
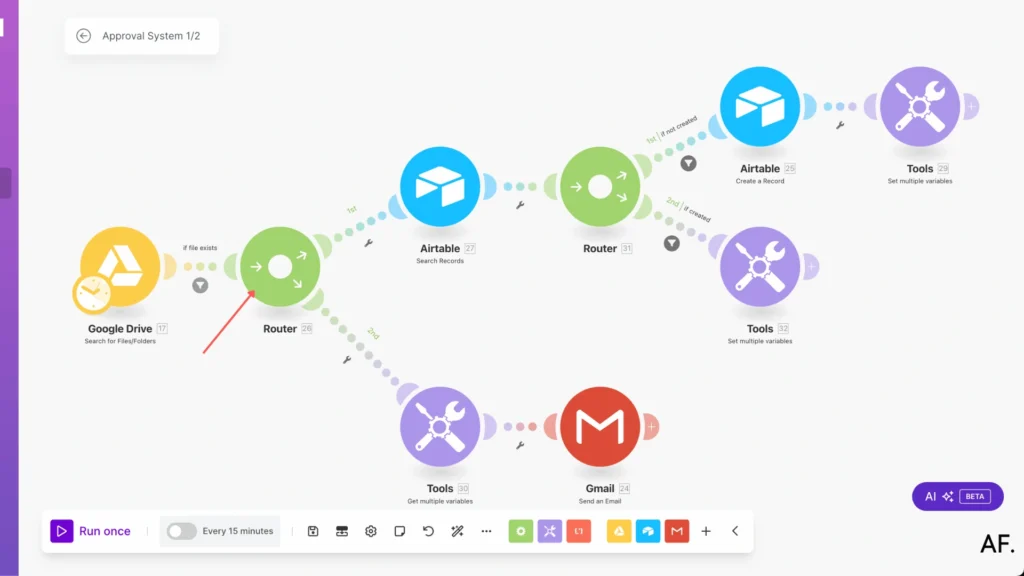
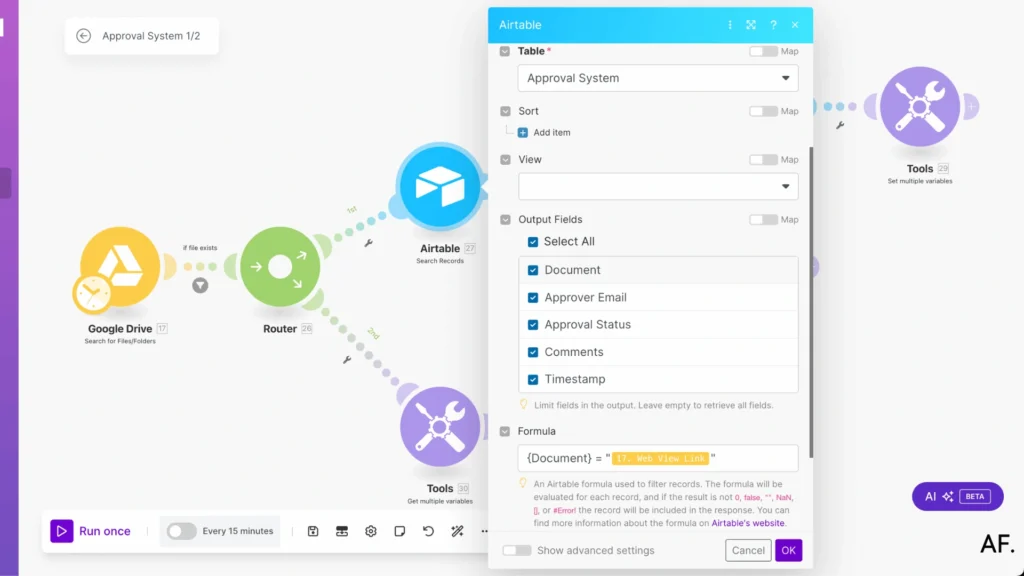
Our next step is to add the ‘Search Records‘ module from Airtable. This module acts like a double-checker—it will look through our Airtable to see if we’ve already processed this file.
It’s time for another Router module – this one will be useful! We’ll use this second Router as a decision-maker, helping us determine what to do based on whether we found any existing records in our previous step.
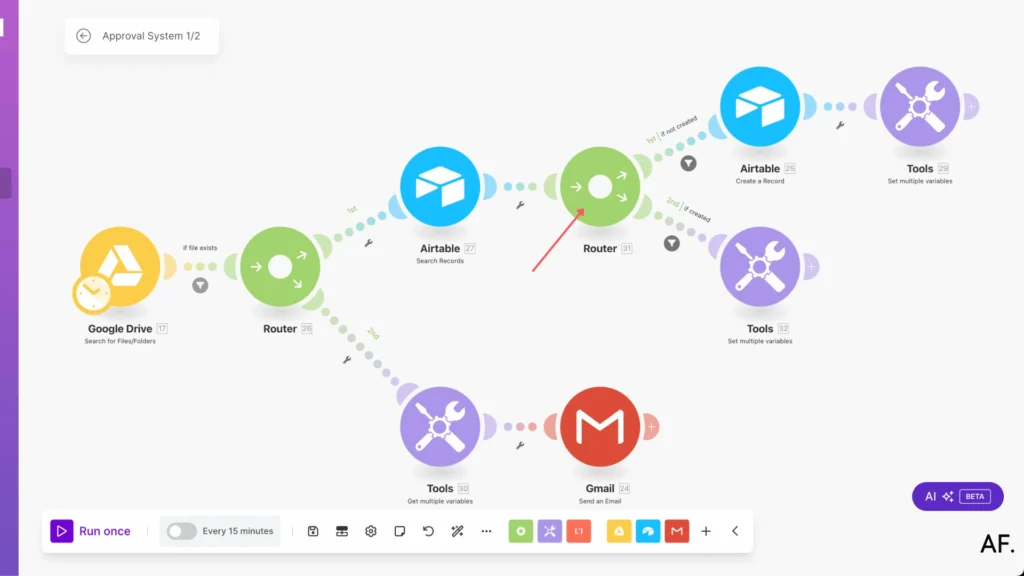
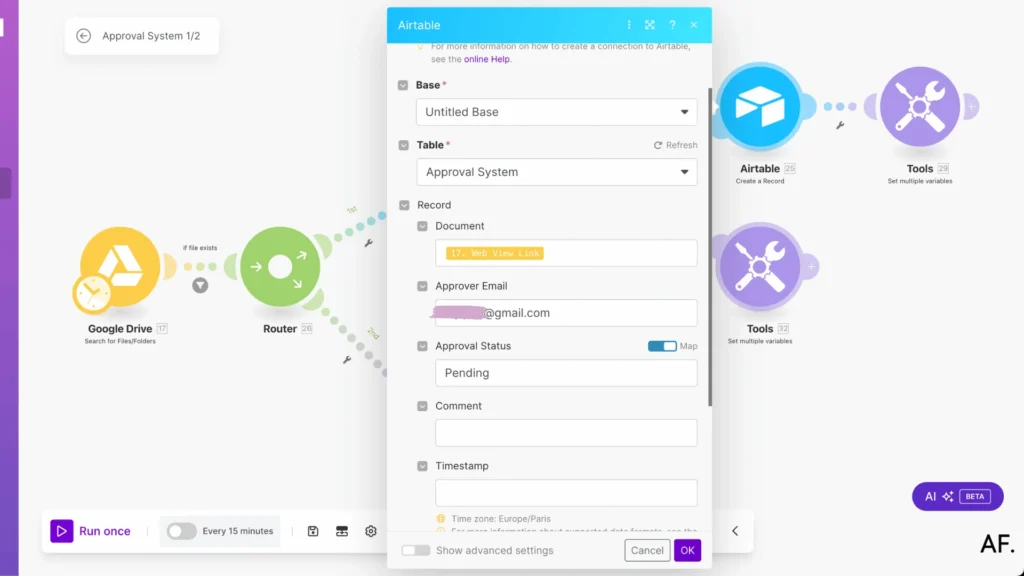
Next, add the ‘Create a Record‘ module from Airtable. This module has an important job: when we find a file that’s not yet in our database, it automatically creates a new record for it.
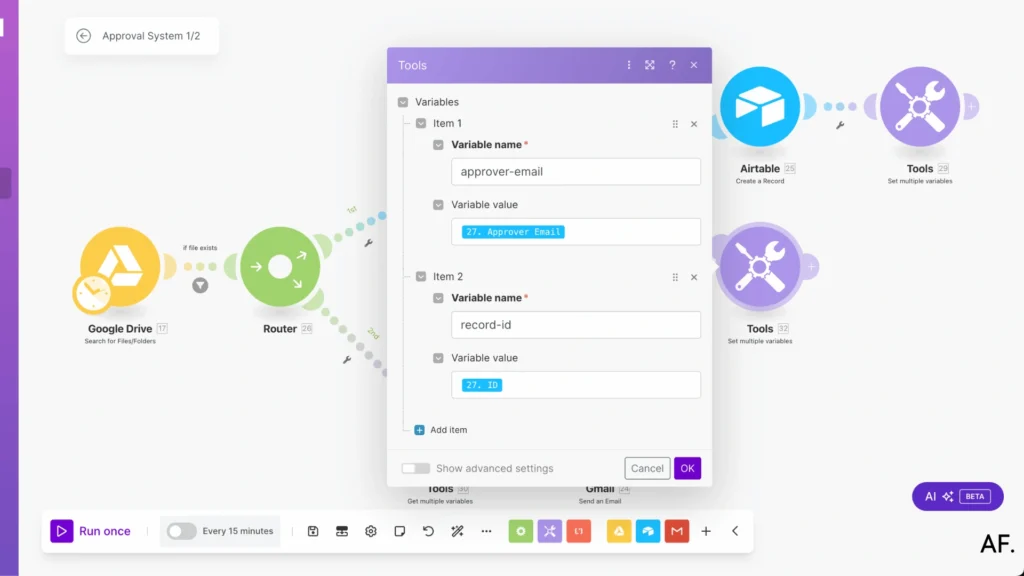
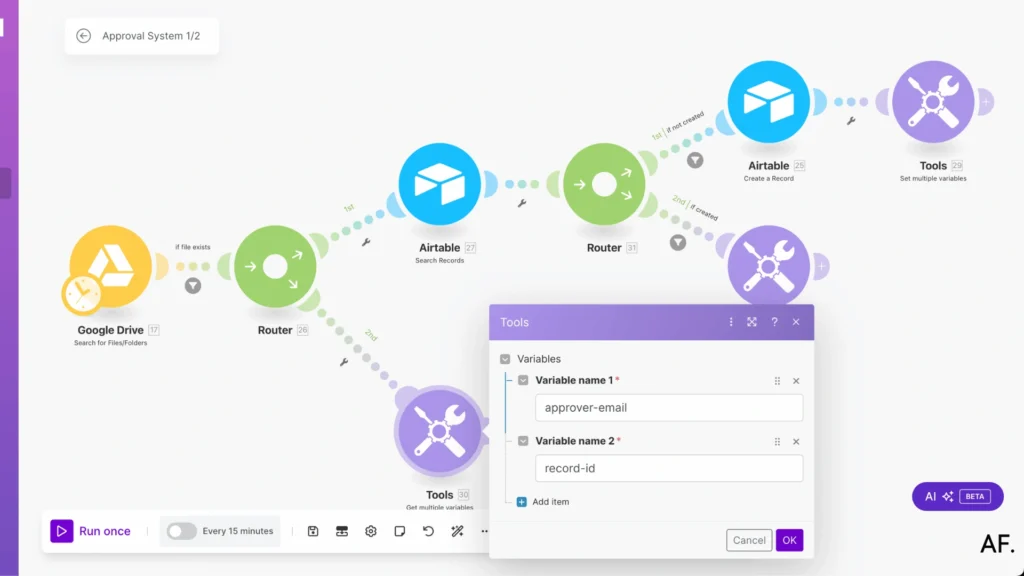
We’ll use the ‘Set Multiple Variables‘ tool to capture and store the results from our previous module. This will help us keep track of all the important information we’ll need later in our automation. Think of it like creating helpful bookmarks for our data!
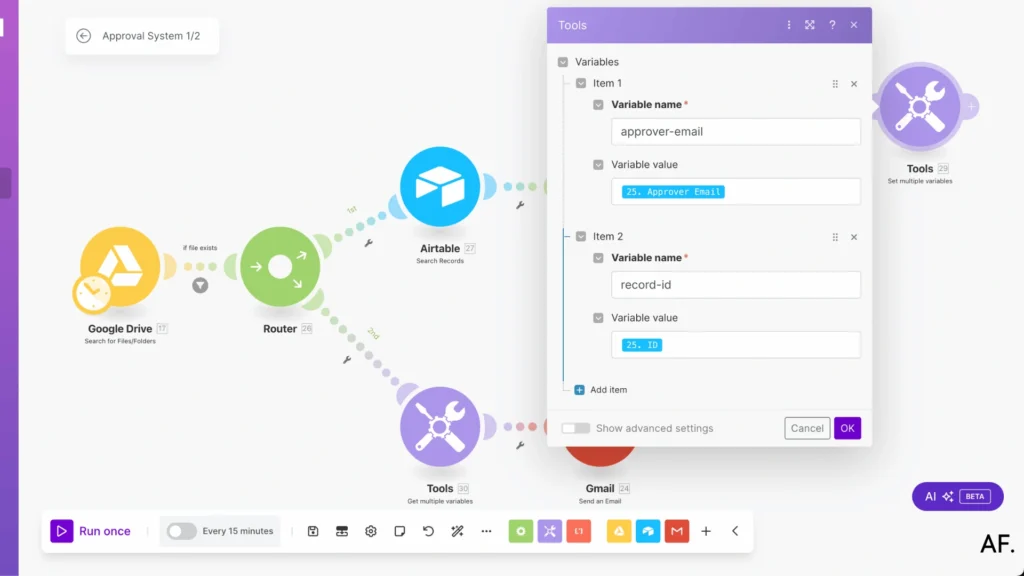
we’ll duplicate the ‘Set Multiple Variables‘ module we just created. It’ll have the same setup as the previous one, so we don’t have to configure everything from scratch. Please copy and paste the module; we’re ready for the next step!
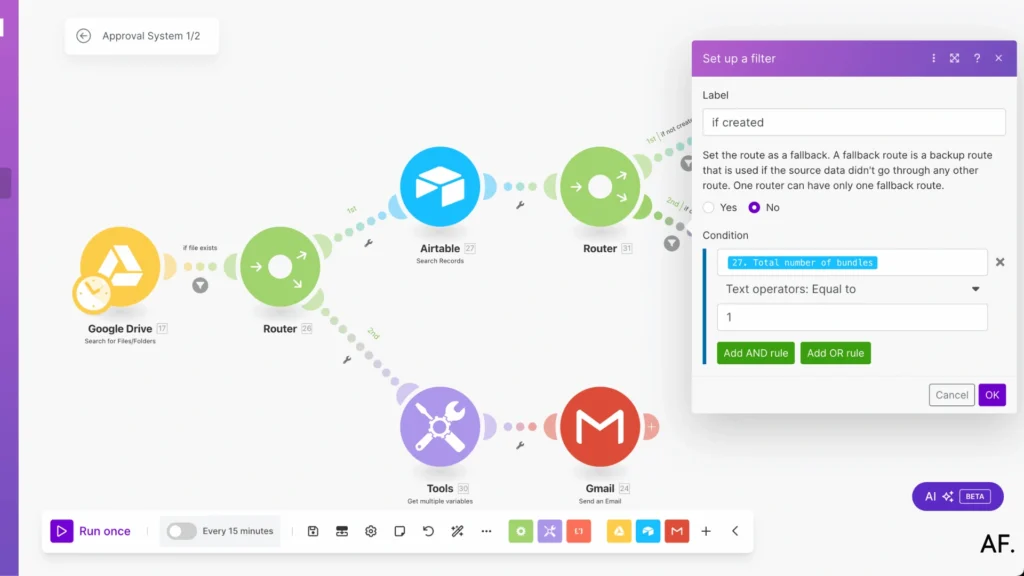
- If no record exists (meaning it’s a new file), we’ll process it one way
- If a record already exists, we’ll handle it differently
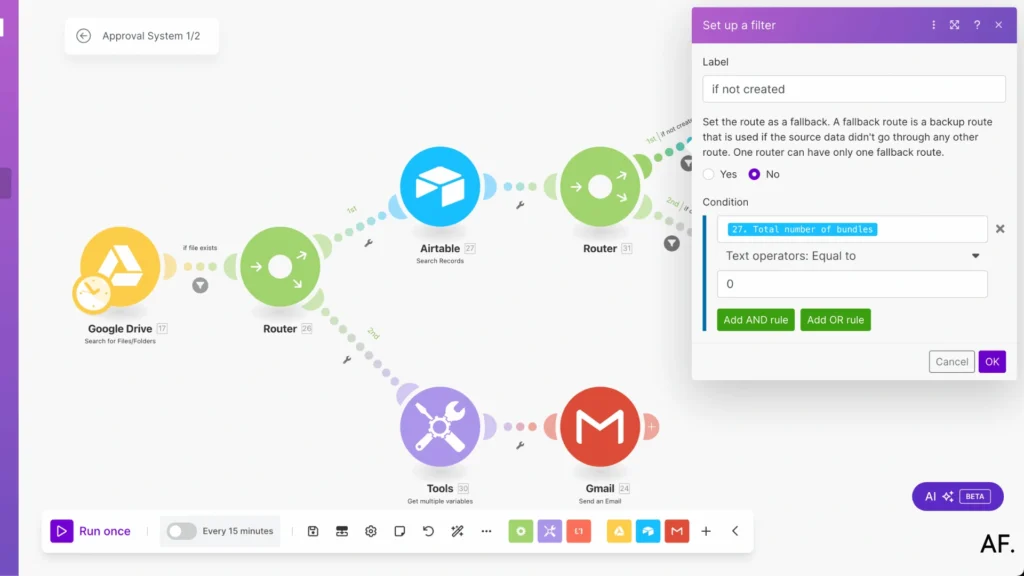
- When it detects an existing record, it will trigger this path
- This ensures we handle updates properly instead of creating duplicates
Now we’ll add a ‘Get Variables‘ module – this is where things get interesting! This module will help us retrieve all those important details we stored earlier. It’s like opening up our data ‘bookmarks’ to use the information in our next steps!
Now for the exciting part – setting up email notifications! Let’s configure the email module to keep everyone informed. I’ll show you precisely what to include:
First, grab those details we stored in our ‘Get Multiple Variables‘ tool and use them to personalize your email. Here’s where you’ll need to:- Add your custom subject line
- Enter the recipient email address(es)
- Insert the email content template
I’ll share the email template that you can easily customize for your needs
<!DOCTYPE html>
<html lang="en">
<head>
    <meta charset="UTF-8">
    <meta name="viewport" content="width=device-width, initial-scale=1.0">
    <title>Document Review</title>
    <style>
        body {
            font-family: Roboto, system-ui, -apple-system, sans-serif;
            margin: 20px;
            padding: 0;
        }
        .container {
            max-width: 800px;
            margin: 0 auto;
            padding: 40px;
            border: 1px solid #e5e5e5;
            border-radius: 16px;
            background-color: white;
            text-align: center;
        }
        h1 {
            color: #202124;
            font-size: 24px;
            margin-bottom: 24px;
            font-weight: 500;
        }
        .document-link {
            margin-bottom: 32px;
        }
        .document-link a {
            color: #1a73e8;
            text-decoration: none;
            font-size: 16px;
        }
        .document-link a:hover {
            text-decoration: underline;
        }
        .comment-section {
            margin-bottom: 24px;
            text-align: left;
        }
        .comment-label {
            display: block;
            margin-bottom: 8px;
            color: #202124;
            font-size: 14px;
        }
        .comment-textarea {
            width: 100%;
            min-height: 100px;
            padding: 12px;
            border: 1px solid #dadce0;
            border-radius: 4px;
            font-family: inherit;
            font-size: 14px;
            resize: vertical;
            box-sizing: border-box;
        }
        .comment-textarea:focus {
            outline: none;
            border-color: #1a73e8;
        }
        .buttons {
            display: inline-flex;
            justify-content: center;
            gap: 8px;
        }
        .submit-button {
            border: none;
            background: none;
            padding: 0;
            cursor: pointer;
            margin: 0 4px;
        }
        .button-link {
            display: inline-block;
            padding: 8px 24px;
            font-size: 15px;
            border-radius: 4px;
            color: white;
            font-weight: 500;
            letter-spacing: 0.25px;
            min-width: 100px;
            text-decoration: none;
        }
        .approve {
            background-color: #66bb6a;
            margin-right: 8px;
        }
        .reject {
            background-color: #e75d4f;
            margin-left: 8px;
        }
        .reject:hover {
            background-color: #d93025;
        }
    </style>
</head>
<body>
    <div class="container">
        <h1>Document Review</h1>
        <div class="document-link">
            <a href="{{17.webViewLink}}" target="_blank">View Document</a>
        </div>
        <form action="Past Your Webhook Link here" method="GET" target="_blank">
            <div class="comment-section">
                <label for="comment" class="comment-label">Add your review comments:</label>
                <textarea
                    id="comment"
                    name="comment"
                    class="comment-textarea"
                    placeholder="Enter your comments here..."
                ></textarea>
                <input type="hidden" name="recordId" value="{{30.`record-id`}}">
                <input type="hidden" name="fileId" value="{{17.id}}">
            </div>
            <div class="buttons" style="margin: 0 -4px;">
                <button type="submit" name="status" value="approve" class="submit-button" style="margin: 0 4px;">
                    <span class="button-link approve">Approve</span>
                </button>
                <button type="submit" name="status" value="reject" class="submit-button" style="margin: 0 4px;">
                    <span class="button-link reject">Reject</span>
                </button>
            </div>
        </form>
    </div>
</body>
</html>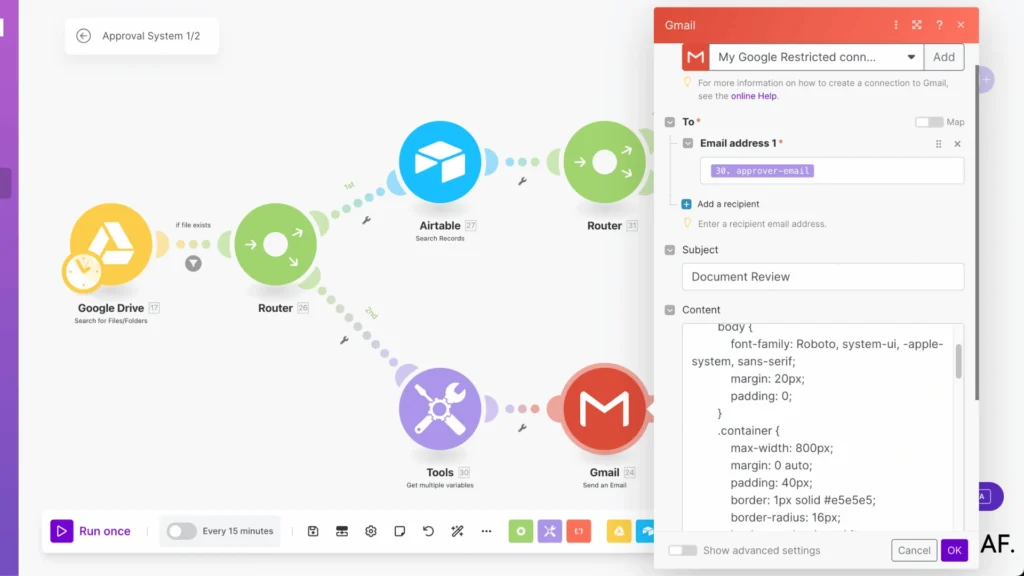
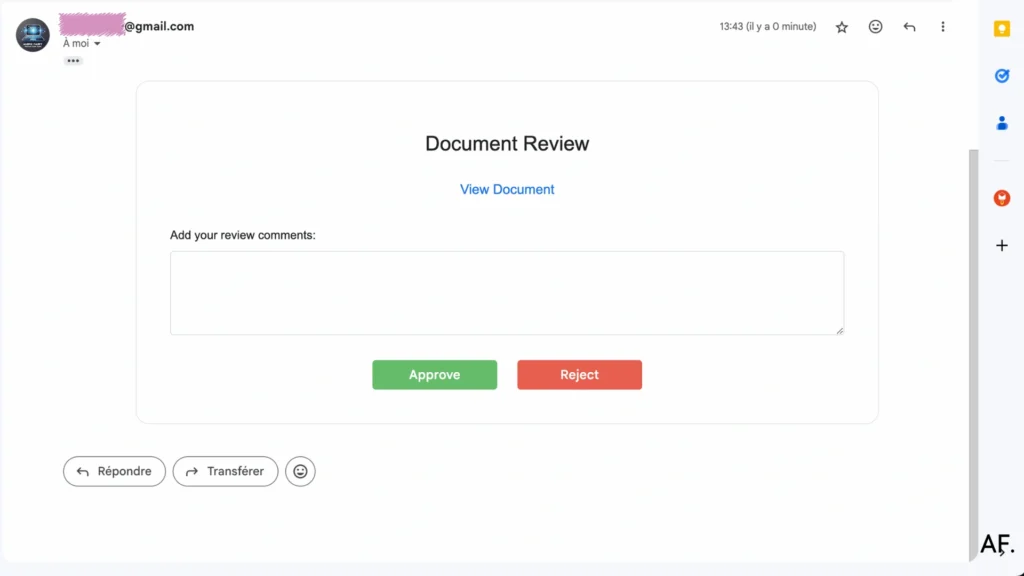
Step 6: Result First Scenario
Time to see the fruits of our labor! Check your Gmail inbox; you should see a freshly delivered email notification about your approval request. Here’s what you’ll find when you open it:

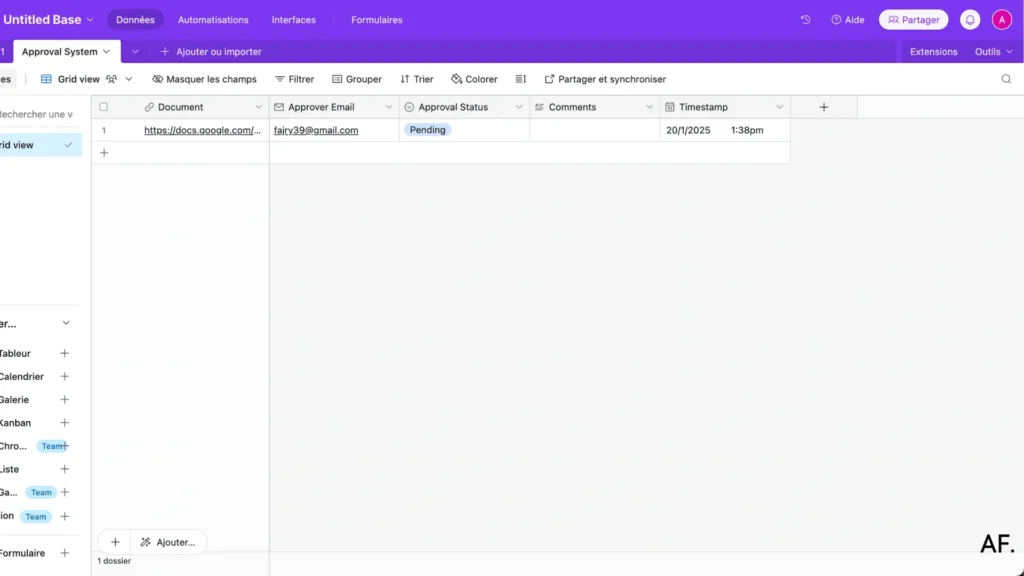
And there we have it – success! Look at our Airtable base, where the data has been automatically populated. This shows our automation is working perfectly, capturing all the details in real-time!
Let’s check out the record that was just created:
Step 7: Move Your File
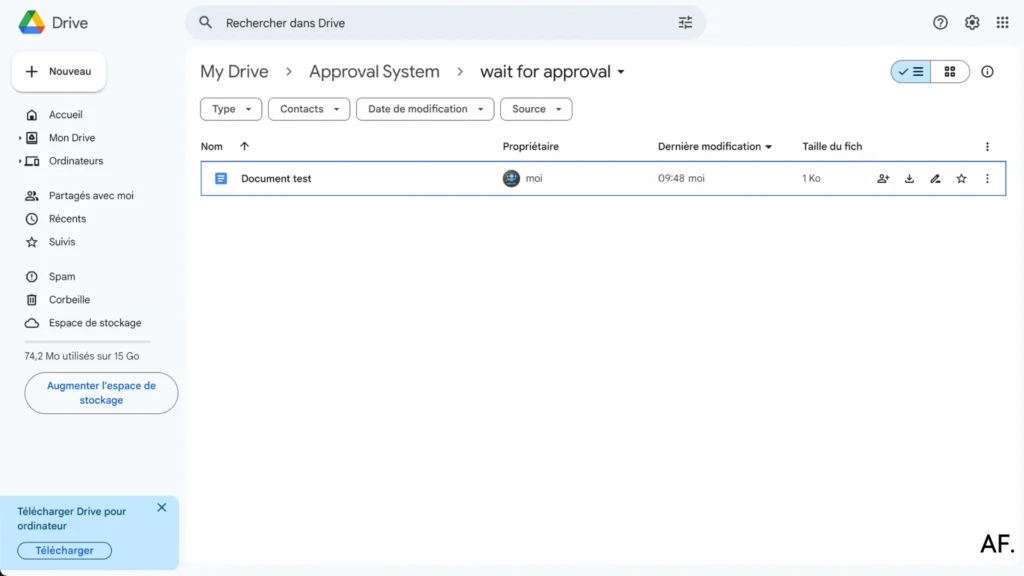
Time to put our system to the test! Head to Google Drive and move your ‘Document test‘ file into the ‘Wait for Approval‘ folder. This will trigger our automation workflow, and we’ll see all our hard work in action!

Here’s a visual showing exactly how I placed the test document in the ‘Wait for Approval‘ folder. The image below demonstrates the correct location, ensuring our automation picks it up and processes it properly!
Step 8: Create a Second Scenario Approval System 2/2
We will create a second scenario; this one’s super important! It will handle what happens after an approver clicks the button in their email and submits their review. Let’s set it up:
First, we’ll add a trigger module using the ‘Custom Webhook‘ from the Webhooks app. This webhook will act like a digital doorbell, alerting our system when an approver makes their decision!
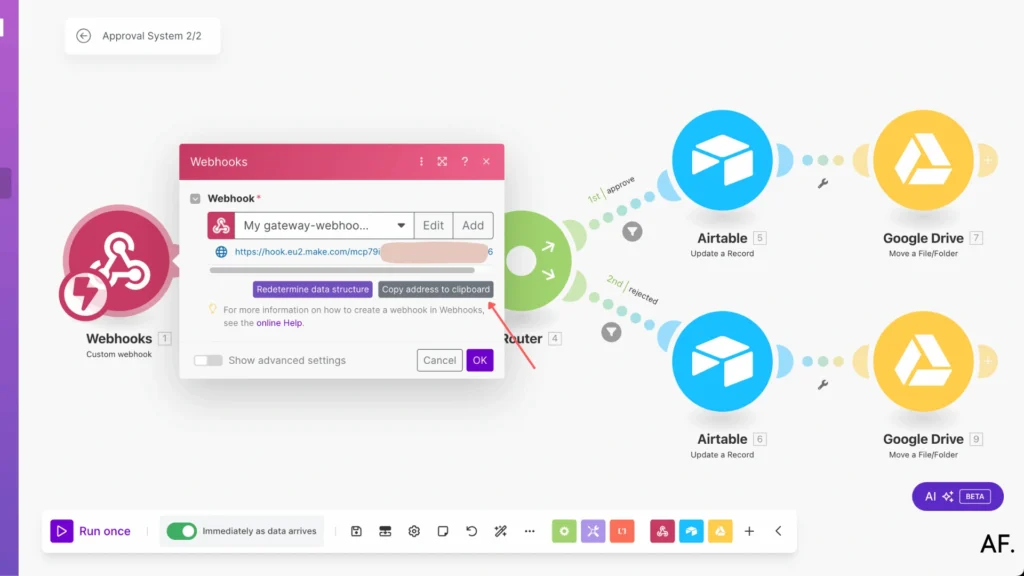
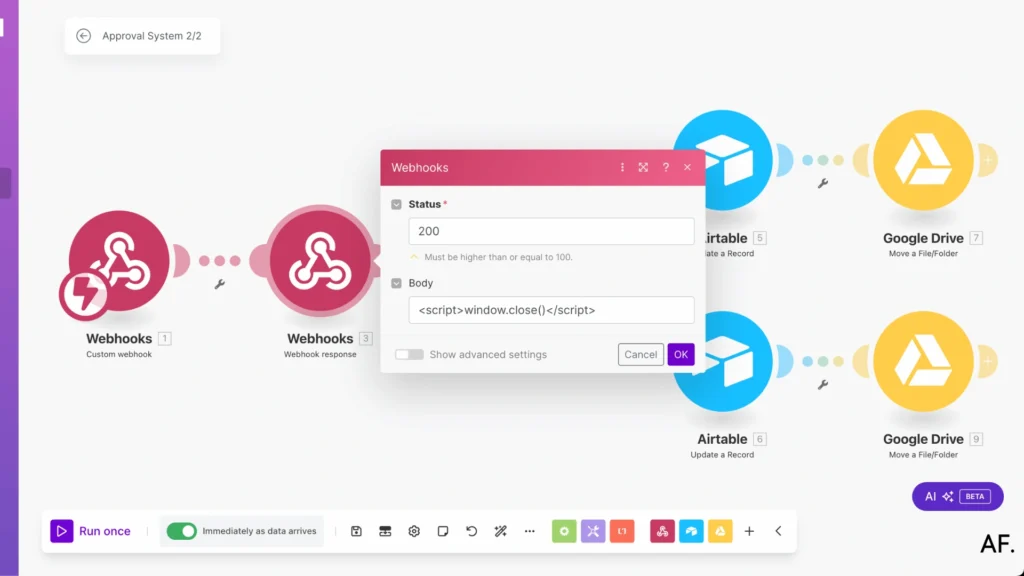
Next, we’ll add a ‘Webhook Response‘ module after our trigger. This module is essential; it sends a confirmation back to the approver that their response was received. Let me show you exactly how to configure it:
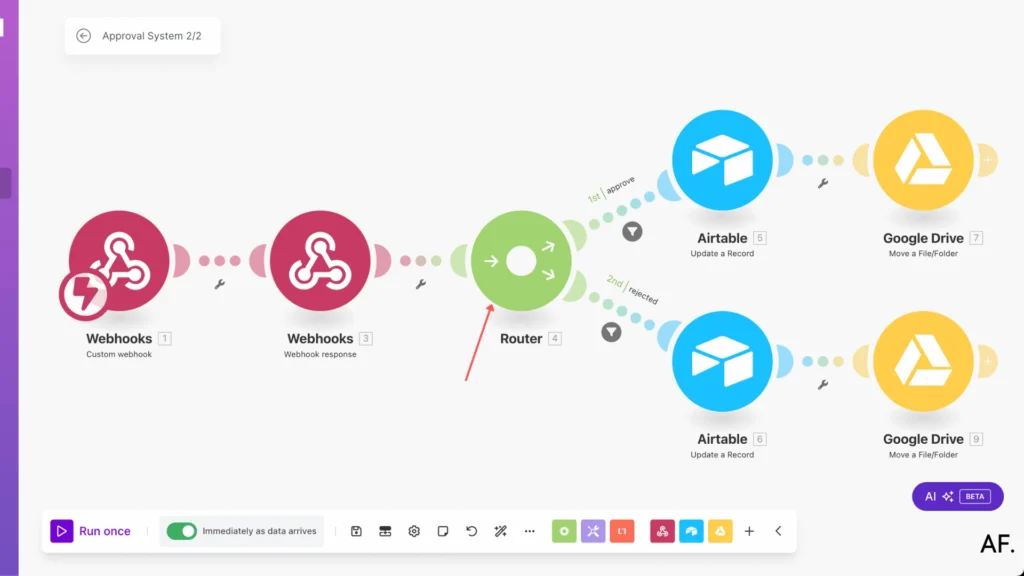
Now, let’s add a Router module – this is a crucial decision point in our workflow! The Router will help us determine what happens next based on the approver’s decision. It’ll direct the file down different paths depending on whether they approve or reject it.
Next, we’ll add our first filter-branch for approved items. This filter will catch all the ‘approve‘ responses from approvers. Let me show you exactly how I’ve set it up in the image below – this ensures we properly handle all approved documents!
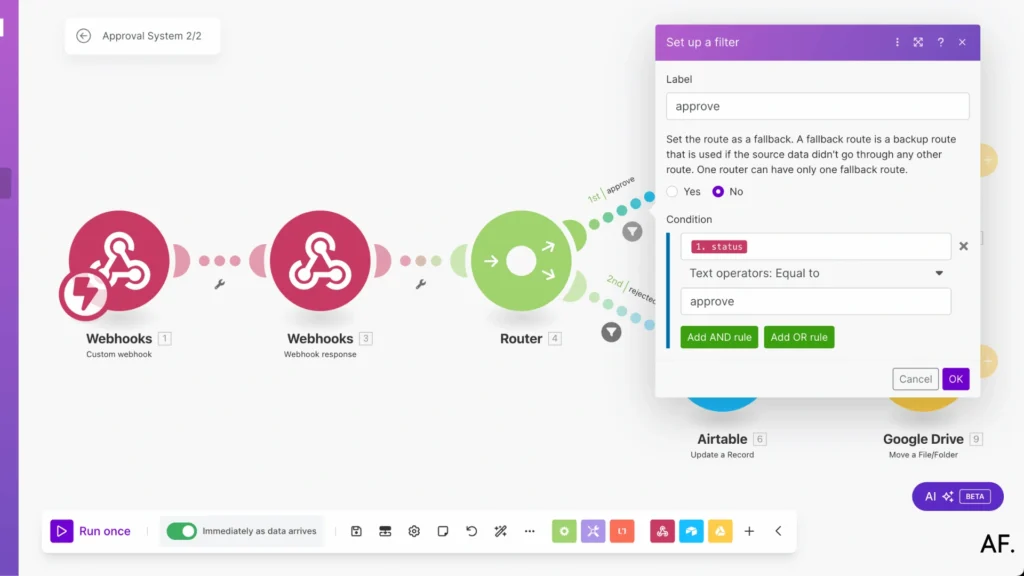
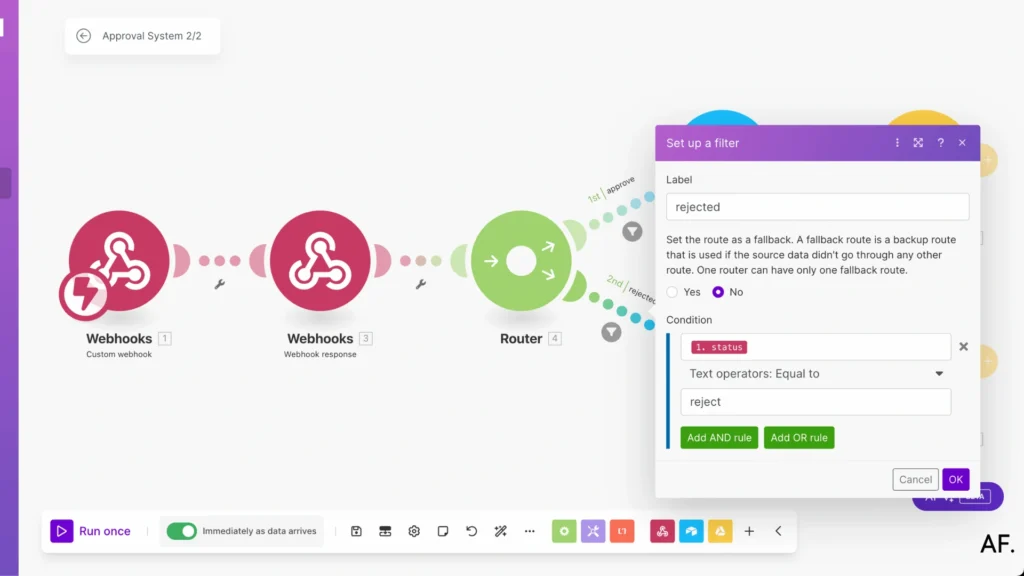
We’ll set up our second filter-branch to handle rejected items. This filter will process all the ‘reject‘ responses from approvers. I’ll show you in the image below exactly how to configure it, making sure rejected documents are appropriately handled!
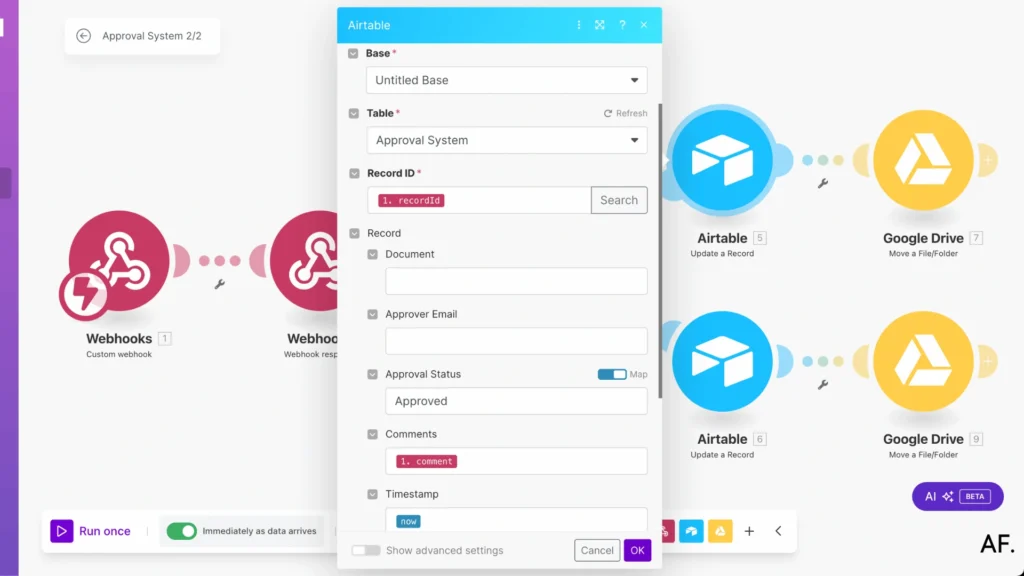
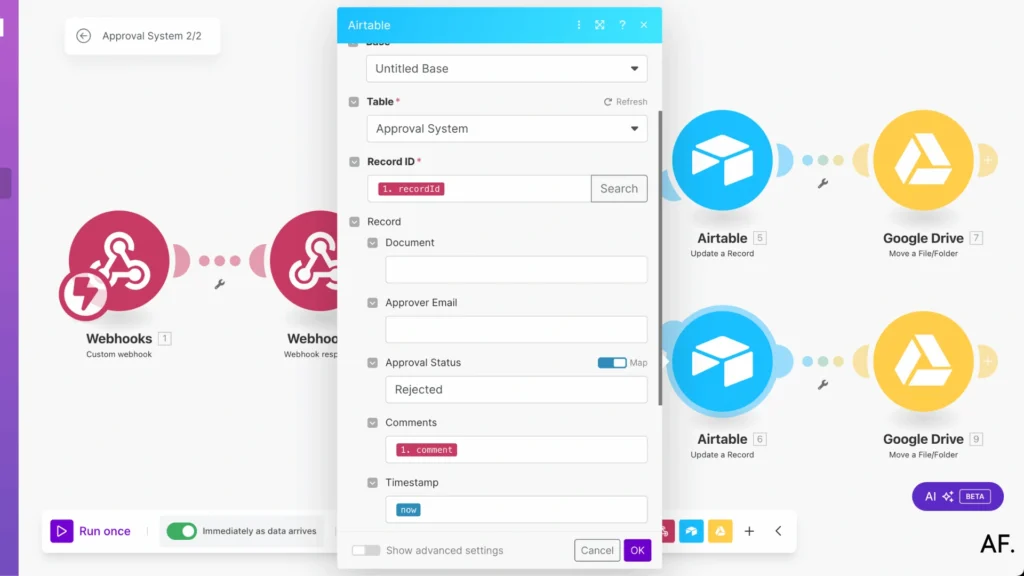
Next, we’ll add the ‘Update a Record‘ module from Airtable. This is where we’ll record the approver’s decision in our system. Let me show you exactly which values we must fill in to keep our records current!
- For approved files, they’ll go to the ‘Approved’ folder
- For rejected files, they’ll move to the ‘Rejected’ folder
This keeps our Google Drive organized and reflects the approval status perfectly!
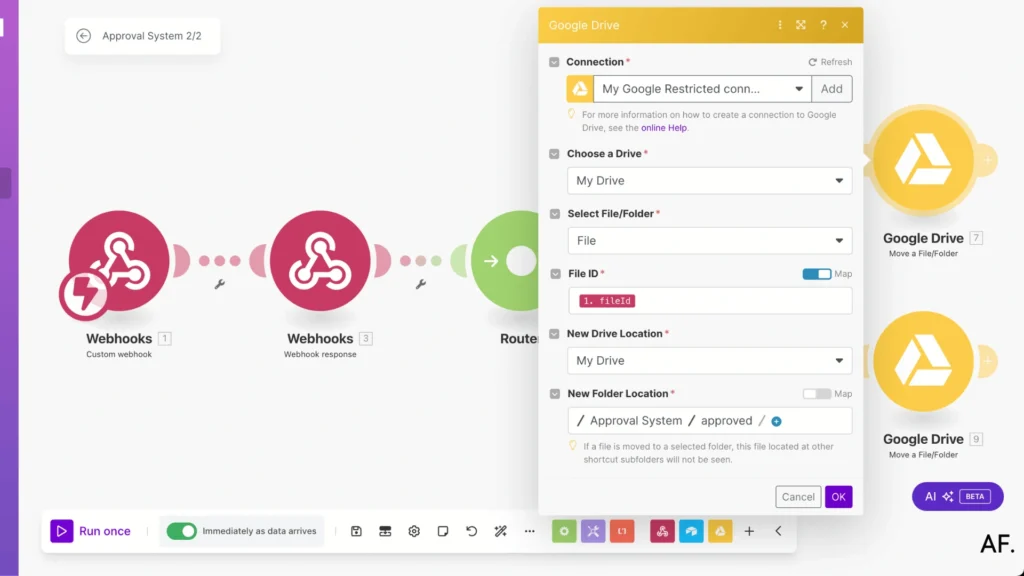
We’ll repeat the same process but set up the other path—choose the correct destination folder this time! If we set up the ‘Approved‘ path earlier, we’ll now configure it for the ‘Rejected‘ folder (or vice versa). This ensures our files end up exactly where they should be based on the approval decision!
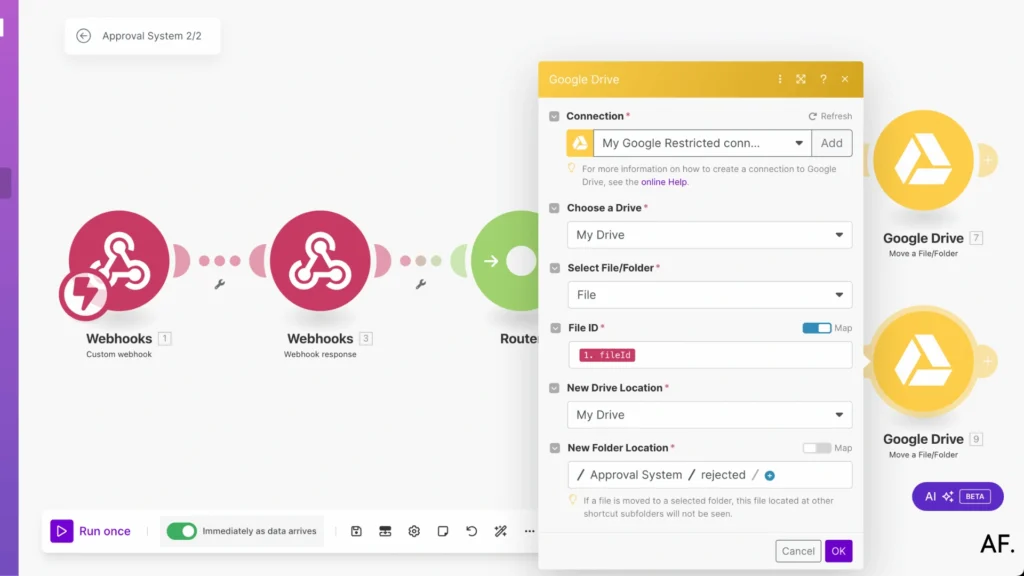
For this final setup, we’ll mirror what we did in the first path, but with one key difference – we’ll change the approval status to match this path. Like before, we’ll use the ‘Update a Record‘ module, but this time, set the status field to reflect whether it was rejected or approved (depending on which path you’re configuring)!
Step 9: Schedule Your Automation
Finally! Schedule Your First Scenario, “Approval System 1/2” to be fully automated; I wrote this article to help you through this :
Congratulations! You’ve successfully built your approval system! Here are some pro tips to make the most of it:
Remember to take it step by step:- Save your progress frequently
- Test each part as you build
- Make sure everything works before moving forward
- Add Slack notifications to keep your team in the loop
- Set up Discord alerts for instant updates
- Send thank-you emails to approvers
- Create custom notifications for different teams
The possibilities are endless; customize and build upon this foundation to match your team’s needs. You’ve got this! 🚀
Get this scenarioConclusion
Automating document approvals with Make isn’t just about saving time; it’s transforming how your organization handles essential documents. Implementing these automation strategies will reduce errors, increase efficiency, and save valuable time for more strategic work. Ready to revolutionize your document approval process? Start building your first automated workflow today!
Join the Newsletter
Subscribe to get our latest content by email.
We won’t send you spam. Unsubscribe at any time.
✅ You’re subscribed!
FAQs
Q: Do I need to pay for any tools to set up this automation?
A: No, you can set up the system using free accounts on Make, Google Drive, Airtable, and Gmail.
Q: How long does it take to set up this automation?
A: The complete setup takes about 30-45 minutes if you follow the step-by-step guide.
Q: Can I customize the email notifications?
A: Yes, you can easily customize the email templates, recipients, and subject lines to match your needs.