How to Build an Automated Time Tracking System on Make
Have you ever felt overwhelmed by manual time tracking? You’re not alone! Now, automating time tracking isn’t just a luxury – it’s a necessity. According to time-tracking statistics from Accelo, inefficient tracking methods contribute to significant productivity losses, with many businesses failing to capture billable hours accurately. Studies show that untracked or misreported time leads to revenue leakage, affecting profitability and efficiency. Automated solutions can help recover lost time and improve workflow management. Read more here: Accelo Time-Tracking Statistics. That’s why building an automated time-tracking system on Make can be a game-changer for productivity! In this comprehensive guide, we’ll walk you through creating a robust, automated time tracking system that works while you focus on what matters most.

Setting Up Your Time Tracking Foundation
Step 1: Create Your Table
Let’s start organizing your projects in Airtable! First, create a new table with these essential columns:- Project name
- Client/Company name
- Status
- Start date
- End date (we’ll leave this empty for now)
- Total hours
- A calculate button to track your time
The empty end date will help you track your ongoing projects, and the calculate button will automatically track your hours.
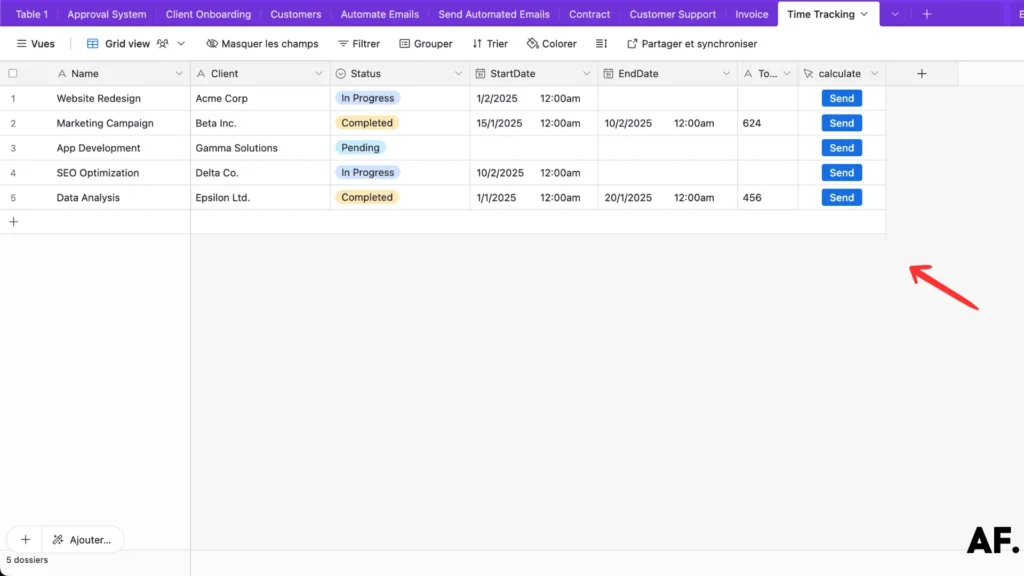
- Active: For projects currently in full swing
- In Progress: When you’ve started working but aren’t at full speed yet
- On Hold: For temporarily paused projects
- Pending: When you’re waiting for something before you can move forward
- Completed: For those satisfying moments when you’ve wrapped everything up!
This clear set of status options makes it super easy to track where you stand with each project.

Step 2: Create Your Scenario
Ready to automate your workflow? Let’s get you set up with Make! Here’s what to do:
If you’re new to Make, don’t worry – you can start with their free plan, perfect for getting your feet wet. Head over to Make’s website and sign up for your free account.
Once you’re in, you’ll see your organization dashboard. Click on ‘Create a New Scenario‘ – this will be your automation playground.
Step 3: Add A webhook
Now for the fun part – let’s set up your first automation module!
Start by adding a ‘Custom Webhook‘ module – this will be the trigger that kicks off your automation. Once you’ve added it, Make will generate a unique webhook address. Click the ‘Copy Address to Clipboard‘ button (you’ll see it in the module), and keep this address handy – we’ll need it in just a moment!

Step 4: Put Your Webhook on Table
Next up, let’s connect everything! We’ll need to create a formula that includes your webhook and a unique identifier for each record. Here’s what you’ll do:
Take that webhook address we just copied and add it to your formula. But wait—there’s one crucial piece we can’t forget! Make sure to include the RECORD_ID() function as well. This helps us track which specific project we’re working on.
Note: The image below this instruction shows precisely how the formula should look with both pieces in place.

Step 5: Start Building Your Scenario
It’s time to add our second module – this is where the magic happens!
Let’s set up a ‘Webhook Response‘ module after your first one. This module will handle all the data coming back from Airtable. Copy the script shown in the image into your module’s configuration (though I notice you haven’t shared the image yet – feel free to share it so I can give you more specific guidance about the script!).
Think of this module as your data translator. It takes all that information from Airtable and ensures everything is processed correctly.
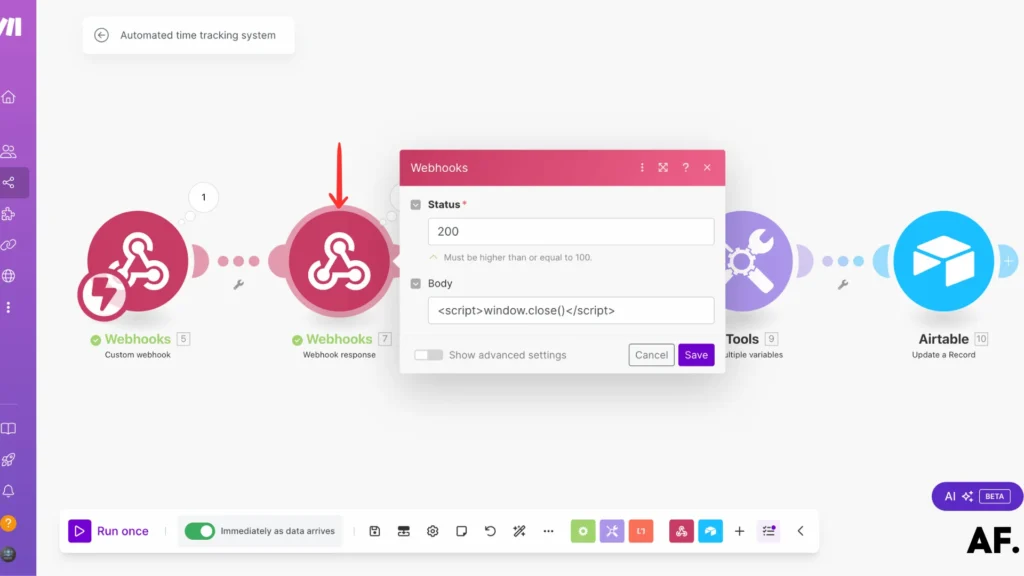
Now it’s time to grab our project’s details! Let’s add the ‘Get a Record‘ module to your scenario.
Here’s the cool part: Remember that Custom Webhook we set up earlier? We’ll edit it to fetch the correct record. Just pop the ID from your Custom Webhook module into the Record ID field of your new Get a Record module. It’s like giving your automation a treasure map to find the right project!
Pro tip: Make sure the connection between these modules is solid. This ID helps your automation know exactly which record to update.

Let’s add another piece to our automation puzzle – the Tools module! This is where we’ll process our data to calculate those hours.
We’ll need to set up some variable values in this module, as in the image below, we need to create a variable named hours and should add this variable value to convert into hour:
{{round((formatDate(parseDate(now); "X") - formatDate(parseDate(6.StartDate); "X")) / 3600)}}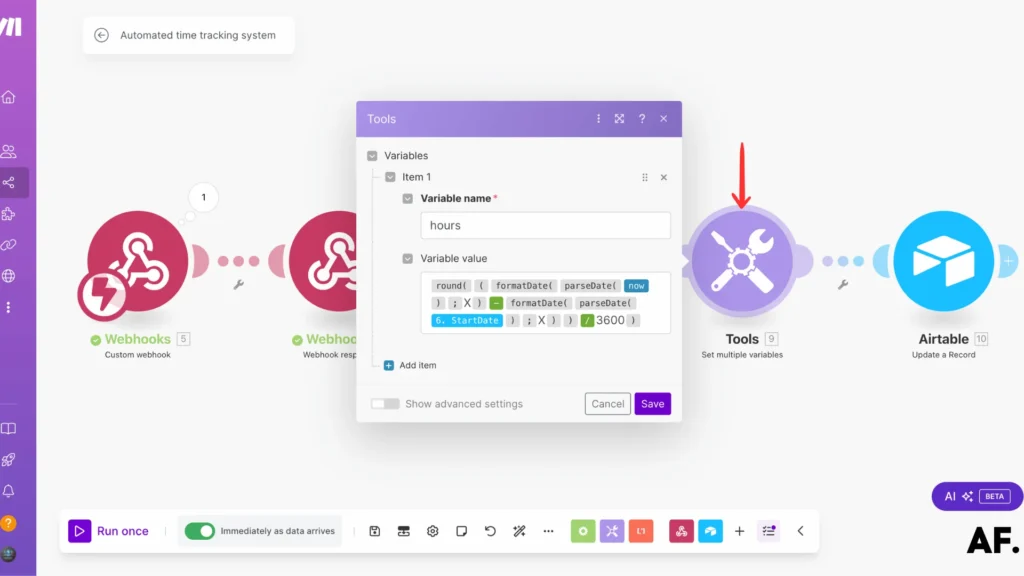
We’re at the final stretch – let’s wrap everything up with an Airtable Update Record module!
This is where all our calculations come back home to Airtable:- Add the ‘Update a Record‘ module for Airtable
- Just like before, we’ll use that same ID from our webhook as the reference
- This tells Airtable exactly which project needs updating with the new calculations
Think of this as closing the loop. Your automation now knows how to receive data, calculate hours, and send everything back to the right spot in your Airtable.

- For the ‘End Date‘ field, set it to ‘now‘ – this automatically stamps the current time when your calculation runs
- You can drop in the ‘hours‘ variable we created in the Tools module. This will put your freshly calculated hours right where they belong.
Pro tip: Double-check that you’ve mapped both these fields correctly. The ‘now‘ timestamp and hours variable make your time-tracking magic happen!

Step 6: Add Filter
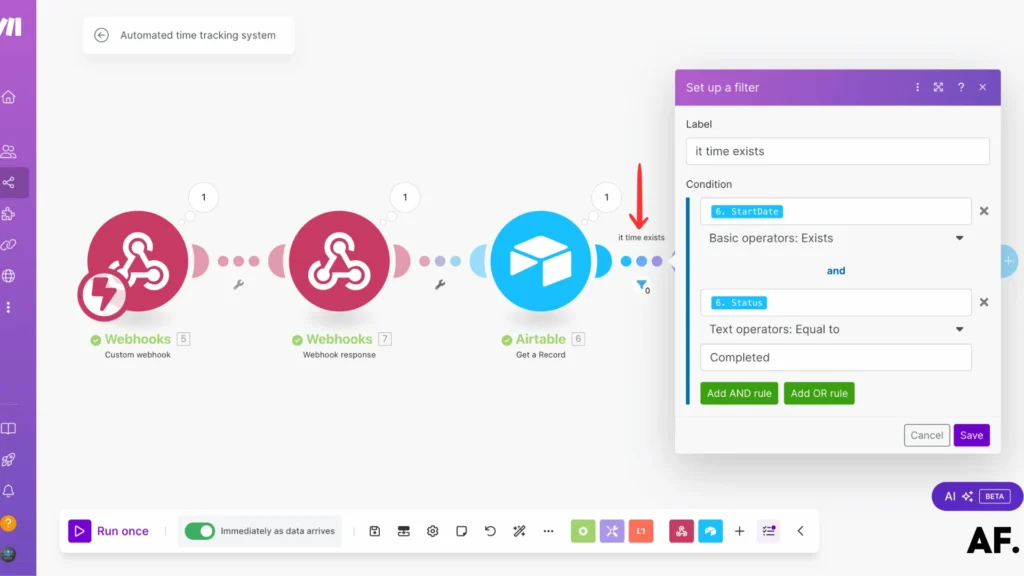
Let’s make your automation even more brilliant by adding a filter! This filter will help your scenario know precisely when to run.
Set up your filter in the ‘Get a Record‘ module with these two key conditions:- First condition: The Start Date must exist (this ensures you’re only calculating time for projects that have started)
- Second condition: The Status must equal ‘Completed‘ (this way, calculations only run when projects are finished)
Think of this filter as your automation’s traffic controller. It only lets projects through when they meet two conditions: they have a start date and are marked as completed. This keeps your calculations clean and accurate!
Step 7: Save and Run
Great job setting everything up! Now it’s time for the exciting part – let’s bring your automation to life:- Click that ‘Save‘ button to store all your hard work
- Hit ‘Run Once‘ to take your automation for a test drive
A quick tip: Watch your scenario run. When everything works perfectly, seeing all those modules light green is always satisfying! If you spot any orange or red signals, don’t worry—your automation is telling you where it might need some fine-tuning.
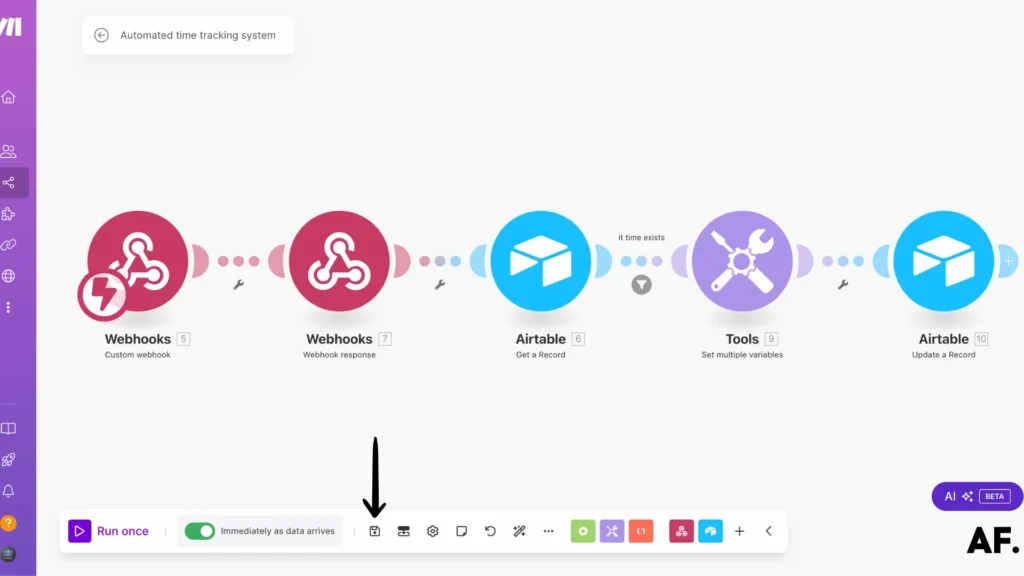
Step 8: Results
And there you have it – your automation works like a charm! Let’s look at what we’ve accomplished:- Your end date gets stamped automatically when a project is completed
- The total hours are calculated instantly and accurately
- Everything updates seamlessly in your Airtable
No more manual calculations or timestamp entries – your project tracking is now running on autopilot. It’s incredible how a few connected modules save you so much time.
With this automation in place, you can focus on what matters – your actual projects – while letting Make and Airtable handle all the time-tracking details behind the scenes.
Step 9: Automate Your Scenario
Ready to take your automation to the next level? Let’s make it run instantly whenever you click that ‘Send‘ button in Airtable!
Look for the scheduling section in Make (you mentioned an image, though it hasn’t been shared yet). Find the switch that turns on ‘Real-time’ execution. When you flip this switch, your scenario becomes lightning-quick. Your automation springs into action when you click ‘Send‘ in Airtable!
Pro tip: This instant automation is perfect when you need those hour calculations immediately. There’s no waiting around—click ‘Send‘ and watch what’s happening in real time!

Conclusion
Building an automated time tracking system on Make is a powerful way to streamline your workflow and boost productivity. This guide taught you how to create a robust solution that saves time and reduces human error. Regularly testing and optimizing your automation scenarios is the key to success. Ready to transform your time-tracking process? Start implementing these steps today and watch your efficiency grow!
FAQs
How to build a time tracker?
Create a project tracking system using Airtable for data storage and Make (formerly Integromat) to automate time calculations with webhooks and custom modules.
How do I track time automatically?
Set up an Airtable base with a calculate button that triggers Make automation to instantly compute and record project durations whenever you mark tasks as complete.

Further Ressources
- How to Automate Contract Management with Make
- How to Send Automated Emails with Make
- The Ultimate Guide to Data Mapping in Make
- How to Automate Employee Onboarding in Make
- How to Send Automated Emails from Google Forms Using Make
- How to Use Canva to Automate Social Media Posts with Make
- How to Automate Invoice Processing with Make
- How to Build a Customer Support System Automation in Make


